 |
Volume I, No. 3, Spring 1974 |
TACKING FOR COMFORT
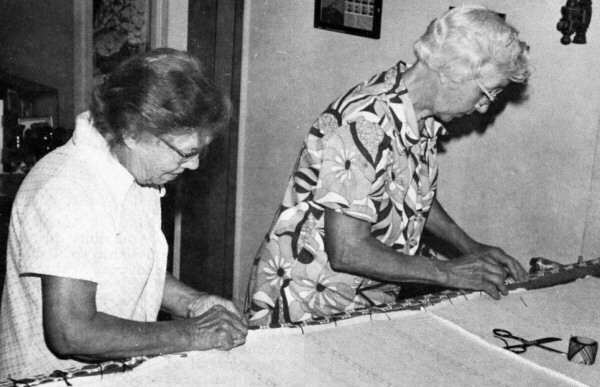
One morning an enthusiastic crew from BITTERSWEET set out for the Hough's and a lesson in comfort tacking--another of Myrtle Hough's many hobbies. She was assisted that morning by a good friend and neighbor, Essie Hamilton. Both Myrtle and Essie have been tacking comforters and quilting for many years, and it was they who set me straight on the difference between tacking and quilting. Both are methods of keeping the top, filling and lining in place. You tack a comforter and, of course, quilt a quilt. Tacking is tying the layers together and is always done by hand. Quilting on the other hand is sewing together material with very fine stitches, but in a definite pattern, usually a very artistic pattern. It has traditionally been done by hand, but can also be done with a sewing machine. Quilting takes more skill, is more time consuming and tedious than tacking. The result is also much more artistic and valuable. Myrtle has been offered as much as $100 for some of her quilts, though she wouldn't sell any of them. Quilting involves careful planning and making an overall pattern, whereas tacking is more spontaneous, the pattern simple and usually geometric. It is tacked enough to secure the layers of material. Whether you finish with tacking or quilting, the steps of putting it in the frames are the same.

Essie Hamilton begins to unlace the tacked comfort from the frame.
[43]
THE FRAME
Essie and Myrtle both have their own frames that they use to tack and quilt. Essie's frame is hung from the ceiling. For our endeavor we used frames that were made 57 years ago for Myrtle by Mr. Hough's father. "There was just one set of frames in the family,'' Myrtle explained, "and there were four girls. Somebody always had Ma's frames. So he [Elvie's father] made me these frames and I'm so proud of them." The frames are made of walnut and are typical in every respect to the frames used long ago.
Diagram 91 is a representation of a frame hung from the ceiling. The frames can be propped on chairs as Myrtle did. The frame is made of four 1 x 2's or 1 x 4's, the two ends about 8 feet long, and the two side pieces about 9 feet. The diagram illustrates the location of the holes in the frame. The holes are used to stretch the quilt and to make rolling easier. In earlier days, Myrtle laced the lining through the holes on the frame, or around the frame. Since then, she has tacked flannel material to the inner side of the frame, thus enabling her to sew or pin the lining to this material, rather than lacing through the holes.
Some frames have more holes at the ends of the long frame pieces for rolling, while others have holes drilled the entire length of all pieces about 3 inches apart. Nails are put through the holes on each corner of the frame to hold together the two overlapping ends. However, we used clamps instead of nails to secure the frame. The frames are easily adjusted to any size comforter.

Showing comforter in frames suspended from the ceiling
SEWING THE LINING
With the frame pieces in their proper position (end piece opposite end piece, side piece opposite side piece) and clamped together in a square fashion, it may be propped up on the tops of chair backs or suspended from the ceiling. You are now ready to begin lacing or sewing to secure the bottom lining to the frame. We used a flannel lining, although almost anything can be used for the lining, including feed sacks sewn together, muslin and other similar materials. The size of the lining should be the size of the comforter you want. We made our comforter to fit a standard double bed.
[44]
Begin sewing one corner of the lining to the flannel material on the inner side of the frame, or lacing the lining to the frame through the holes. Continue working down one side of the frame keeping the material stretched as tight as you can. Be generous in the spacing of your stitches. When you have completed sewing one side of the lining to the frame, begin sewing the opposite side, making sure to stretch the lining very tight. By the time you are ready to begin sewing on the third side of the lining, you may need to remove the clamps on the end or reposition a nail one or two holes away from its original position to stretch the lining to a point where it will be very tight. Refasten clamps. Continue sewing down the third side. When you're ready to fasten the final side, stretch the lining as much as you can as you sew it to the frame. You are now ready for the filler.
"This is lacing them in," Myrtle Hough explains.

"You fasten yours and then I'll stretch it."
THE FILLING
On top of the lining is placed the filling or padding. During World War II, Myrtle used cotton. This cotton came in 500 pound bales and Myrtle remembers taking hunks out of a large bale and pulling the cotton apart. She never uses cotton, now, however. For our comforter we used 100% polyester fiber.
[45]
As Myrtle says, "It's that new-fan-gled stuff. It won't ever mat up or anything. It even cuts easier than cotton. It's more like wool."
Essie cards her own wool and frequently uses that wool as the lining in her quilts and comforters. She uses raw wool which she cards, then spreads out thinly over the lining, making a soft, lightweight warm cover.
The filling is spread all across the bottom lining, and the excess padding is trimmed off at all sides. You only need the padding to go to the edges of the lining. Myrtle uses the excess padding to fill pillows.

"Get it good and smooth even if it does have to be trimmed off."
PINNING THE LAYERS TOGETHER
Myrtle used scrap material sewed together in squares for the top. Some of the material was formerly baseball uniforms belonging to her sons. Almost any kind of material can be used, and in any pattern. Comforters are usually made for practical use and are made quickly. Often the pattern is simple; however, some comforter tops are .quite intricate. Myrtle's top had alternately dark blue and light gray striped squares joined together with briar embroidery.
The finished top is stretched out on top of the filling and lining. Our top happened to be smaller than the lining so we just stretched it as much as we could so it would not be bunchy, and then pinned it to the padding and bottom lining. The three layers can be pinned together with large safety pins, although Essie prefers to use straight pins because they are easier to get out.
Having these three layers stretched and securely fastened together, you are now ready to begin the actual tacking.
TACKING
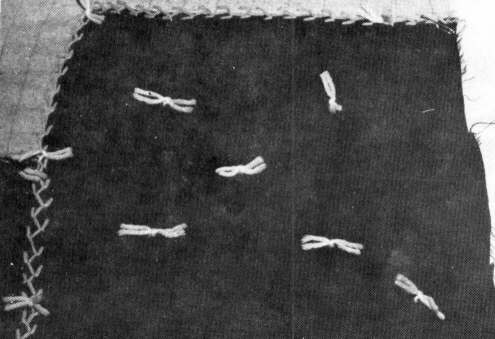
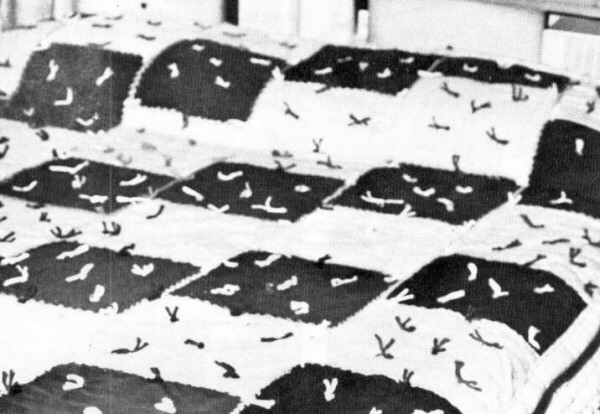
Large needles and yarn are generally used to tack. The thread can be doubled to make it stronger. To begin tacking, you must figure out the pattern you want to follow. Leaning over the comforter with your sewing hand on top and other hand under to guide the needle, take a stitch through all three layers in the place you want it tied. Leave about one-inch of thread and cut. The length of thread you leave is your own preference. Now tie the strands of yarn together with a hard knot. Thus lining, padding, and top lining are "tied" together. Repeat this process throughout, following the pattern of your choice. A completed square looks like the photo on page 47.
It is important to note, however, that even though you are following a pattern when tying, the mislocation of a tie is never important enough to take out. As Myrtle says, "You can't make it wrong. You can't hurt it when you're tacking it. Now if you were quilting I wouldn't tell you that. With a comforter it doesn't make much difference, cause you'll never notice it after it's all tacked."
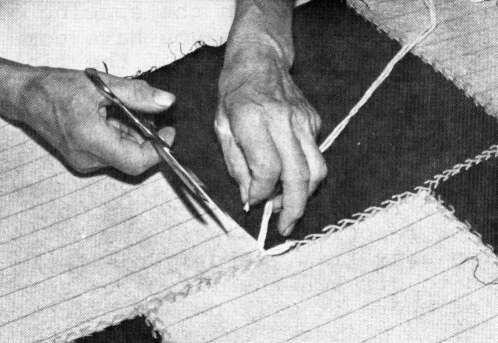
"We can cut a little off. We'll cut it about like that."
[46]
A completely tacked square.

Even Robert McKenzie, our photographer, got into the act.
ROLLING
When you have tacked all around the comforter as far as it is comfortable to reach, roll the frames to make the comforter shorter. You roll under the finished or tacked area to be able to reach farther into the comforter's center. To do this, remove the clamps or nails at the corners. Now remove the pins or bastings on the sides of the frame as far as you need to roll. As you roll the sides under, the tacked portion will be wrapped around them. Reposition clamps or nails. Continue tacking and rolling until completed. When finished tacking, remove comforter from the frame.
BINDING
The outer edges of the comforter need to be trimmed and finished in some manner. They can be bound with a matching or contrasting bias binding of your choice. If the lining is larger than the top, the extra lining edges can be turned over the top and hemmed in place, mitering the corners.
[47]
Copyright © 1981 BITTERSWEET, INC.
Next Article | Table of Contents | Other Issues
