 |
Volume VII, No. 3, Spring 1980 |
Copper Kettle Magic
THE ART OF MAKING APPLE BUTTER
Written by Kathy Long and Tracy Waterman, Photographed by Mary Schmalstig
"Smoke follow beauty," teased John Playter when we tried to avoid the smothering gray smoke while helping stir the big copper kettle full of bubbling apple butter. His adding more wood to the fire only increased the smoke so that no matter where we stood, it found its way from under the kettle into our eyes and lungs.
We had been cooking and stirring for eight straight hours that chilly October day when Charlene asked her husband for the second time, John, don't you think it's done now?"
Rising from beside the kettle after carefully distributing the wood to keep the fire burning evenly, he peered over the edge and for a minute or two watched the bubbles breaking into soft craters on the surface of the apple butter. Everone gathered around eager for a confirmation. "No, it's not quite firm enough," he said. "We'll let it cook just a little longer."
But from his expression the entire Playter family, along with a few friends and us, knew it would not be long. We had all worked together since the evening before, visiting, eating and anticipating this moment. The daughters and their husbands carried out the cans and jars getting everthing ready for the final canning. With clean cloths, protective gloves and sauce pans for dipping, they stood assembly-line fashion ready to finish the job.
[17]
This gathering of people to help one another used to be a common occurrence. On many farms during apple harvest, neighbors gathered to make the work go faster while enjoying one another's company. The Playters are still carrying on this tradition.
John and Charlene began making apple butter on their own after helping a friend for several years. They've made it every year since 1956 and have encouraged many other people to start making it, too. Even while they were cooking apple butter, across the hedge the next-door neighbors were also busily stirring their apple butter in their thirty gallon copper kettle.
For one batch of apple butter the Playters use five bushels of the best quality jonathan apples available. They prefer Jonathans because of their tart flavor, firmness and red color.
From experience the Playters have decided that in Order to make apple butter of optimum quality, they must allow an entire day for the cooking and canning processes alone. Therefore, they completed all other preparations the previous evening. The following directions explain how the Playters make apple butter in an outside kettle.
Washing the apples is the first step in making apple butter. Then cut out any bad places, quarter and core the apples. Remove only the seeds when coring because the natural sweetness of the apple lies next to the core. Some people also peel their apples, but the Playters believe that the peeling adds flavor, color and pectin to the apple butter.
Slice the apples as thin as possible to reduce cooking time. Use a very sharp knife and frequently alternate slicing methods to relax your fingers. Use a wooden cutting board when slicing by hand becomes uncomfortable.
Store the sliced apples in clean, air-tight, plastic trash bags. Tie the top of each bag securely to prevent discoloration and preserve freshness. Place the bags outdoors in the cool night air or in a cool place until morning, or when ready to cook.
Early the next day the Playters begin preparing the kettle and equipment to be used throughout the day's events.
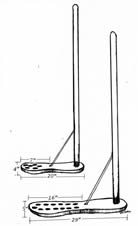
Even though some people use only one paddle throughout the process, the Playters have found that another smaller paddle is very useful in stirring the bulky apples as they cook down. The paddles have somewhat proportional dimensions, and their handles are the same size. Both paddles are made from one inch birch
Equipment needed:
kettle
stand
two apple butter paddles
jars, lids, rings
several colanders
two saucepans
several rectangular flat pans
several stone crocks
protective gloves
long-handled spatula
The kettle is the most important piece of equipment needed for making apple butter. It is advisable to cook apples and other fruits in a brass or copper kettle. Apples cooked in iron will have a poor flavor and will be discolored because of the acid reacting with the metal. Copper's ability to heat its contents evenly is also advantageous in making apple butter.
[18]
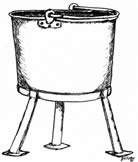
Charlene uses the beautiful copper kettle to store and display her colorful handiwork during the months when it is not being used outdoors. The kettle measures twenty-eight inches in diameter, eighteen inches deep and has a forty gallon capacity which provides plenty of storage space. The base of the kettle sits fifteen inches above the ground in an iron stand. Each leg is two and one-half inches wide and is angled slightly outward from the rim of the stand. The legs are also made of iron to withstand the kettle's weight.
The Playters used a friend's copper kettle until 1976 when they purchased their own. Some friends told them of the handmade kettles they had seen hanging in the window of a furniture story in New Harmony, Indiana. Upon inspecting them, the Playters chose a forty gallon kettle. One thing that makes this kettle so unique is the way the seams are joined. The bottom and side joints are formed by interlocked fingers soldered into place creating a perfectly smooth seam. The kettle has a rounded bottom with no corners for sauce to accumulate and burn.
Gently clean the kettle with vinegar, salt and water solution to remove the tarnish. Then rinse thoroughly with water.
Someone should start the fire while the kettle is being cleaned. Though many old-timers preferred Osage orange hedge wood which produced a more intense heat, the Playters prefer oak because it kindles much more quickly and they do not care for such a hot fire. John seems to get best results from a moderately hot fire. A very hot fire may heat the kettle unevenly and cause the apples to scorch in some places. "We're not in any hurry," John said. "We've got all day." Use two inflammable, perhaps metal wind shields to retain the flames and to prevent embers and ashes from being blown over the yard.
Pour one gallon of water per bushel of apples into the kettle and place it over the fire. Some people use apple cider instead of water for a stronger flavor even though it is more expensive. Add approximately one half of the sliced apples and allow them to cook down. As they begin to lose their chunky appearance, the apples will take up less room in the kettle and will make stirring much easier. Then gradually add the remaining apples.
Stir the apples with the small homemade apple butter paddle. Paddles are often made of birch wood, for oak and pine do not withstand heat as well and may add an undesirable flavor to the apple butter. Never use a metal paddle for metal will scratch the soft copper surface. Its smaller size makes the paddle easier to pull through the bulk of the quartered apples during the first cooking. Because of the right angled design of the paddle, it needs a brace between the handle and the paddle itself.
Cook the apples two or three hours, or until they become very soft and mushy, and then remove the kettle from the fire. The apples are now ready to be strained through the colanders. Put a strong board or pole through the bail of the kettle with one person supporting each end and carry the kettle from the fire to a work table. Meanwhile, equip the table with two saucepans to dip out the apples, several colanders sitting in flat pans to catch the applesauce, stone crocks to hold all the resulting sauce and a long-handled spatula to scrape out every particle from the pans and utensils.
[19]
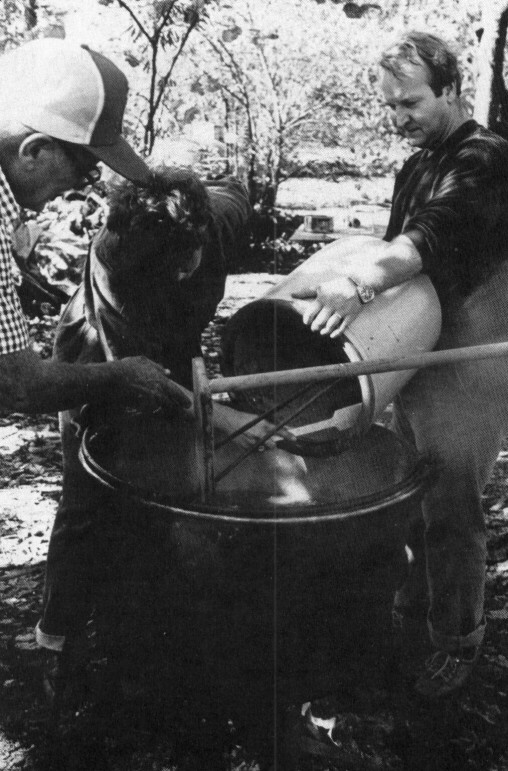
The Playters set up an assembly line using two people to dip the apples out of the kettle with saucepans into five or six colanders. Perhaps the hardest work of all is forcing the apple pulp through the tiny holes in the metal colanders with the wooden pestle. Those working the colanders rotate the pestle around the sides of the colander until most of the pulp is pressed through the holes and only the dry peeling remains. They empty the peelings into a cardboard box or other garbage container. In past years, farmers fed this roughage to their hogs. As the pans fill with applesauce, other people empty them into the large stone crocks. When the kettle is empty, they rinse it thoroughly with water.
The apples are now ready for their second and final cooking. Put the kettle back onto the fire, empty the applesauce from. the stone crocks back into it and resume stirring.
This time the Playters use a larger, heavier wooden paddle with bigger holes and a longer handle. The larger paddle keeps the sauce in a constant swirling motion preventing the ingredients from settling. The larger holes help to mix the ingredients thoroughly, especially as the sugar and spices are added. The holes act much the same way as the slots in a slotted mixing spoon do to distribute the ingredients evenly throughout a mixture, creating a smooth blend of their flavors. The longer handle provides the increased leverage needed during the vigorous stirring.
Stirring is extremely important during this stage. John showed a good pattern of stirring to keep the sauce constantly moving. "We go down the middle, around the side, back down the middle and around the other side. The bottom is smaller than the top, so if you do that, you pretty well cover the whole bottom. If you keep stirring in the middle, pretty soon you've let the sides stick. You constantly move everything on the bottom."
As the sauce thickens, especially after the sugar is added, it can easily scorch. "If you ever burn it and stick it," John warned, "you've had it. You've ruined the whole batch and the kettle, too. You've got to be careful."

Everyone began to realize some progress when we gathered around the table to strain the apples through the colander, preparing them for their second cooking. (by Kathy Long)
[20]
Charlene gave two major precautions to take to prevent such a disaster. "Never stop stirring, and never let the firewood touch the bottom of the kettle, for that would make one little spot where it's too hot, and it would make it stick." Therefore, take care to keep the fire evenly spread beneath the kettle.
The curved edges of the paddle also help prevent sticking because they somewhat fit the round shape of the kettle and are capable of scraping more surface area. As the applesauce begins to boil, the bubbles break against the sides of the kettle, forming a thin film around the rim. A long-handled spatula is more convenient than the paddle for scraping it back into the mixture. The spatula is also helpful in removing leaves or other impurities that may blow into the kettle.
When the sauce is hot and boiling well, it is time to add the remaining ingredients to the five bushels of cooked apples.
1 box whole cloves
2 ounces stick cinnamon
4 pounds of red hots
75 pounds of sugar (or less depending on taste)
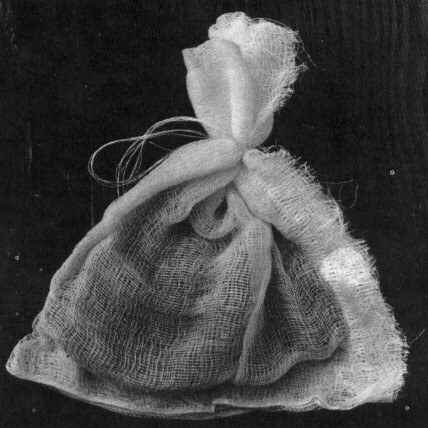
First enclose the clove's in a small bag made of cheesecloth. Then simply toss the loose pouch into the kettle. The porous cheesecloth serves as a strain for the cloves, preventing the tiny, inedible nuggets from spreading throughout the sauce, while allowing the sauce to absorb the flavor.
Break the stick cinnamon into small pieces about one inch long, and add them to the bubbling contents of the kettle. Be careful not to crumble the sticks. They need to be visible so they can be removed when the apple butter is eaten.
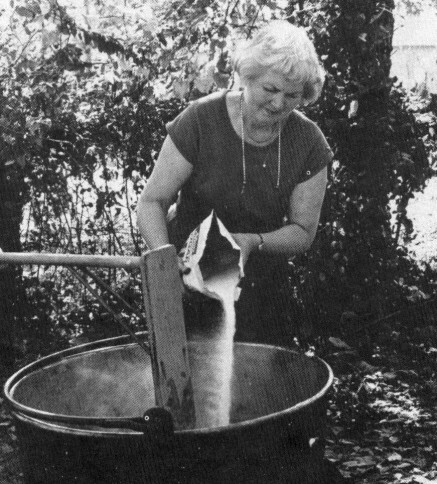
Add the sugar slowly enough that the sauce never stops boiling. How well the sugar dissolves depends on the temperature of the applesauce. If the sauce is boiling, it will be hot enough to dissolve the sugar as it is added. Otherwise, the sugar crystals will quickly settle to the bottom of the kettle and may stick and burn. Therefore, vigorous stirring, especially on the bottom, is important during this stage. It is also advisable to wear long gloves to protect the hands and arms while adding the sugar because the applesauce is very hot and may easily burn the skin. Gloves protect also as the apple butter thickens, for sometimes as the bubbles burst, they send splatters of hot apple butter in all directions.
[21]
Finally, add the bags of red hots all at once. The Playters use this cinnamon-flavored candy to add a rich, dark red color, as well as the spicy flavor. Long ago before red hots were sold commercially, people usually used oil of cinnamon to obtain a similar flavor. They probably added a little less than a teaspoon of oil per gallon of apple butter. Some people continue to flavor their apple butter with the oil, but the finished product may not be as flavorful as apple butter flavored with red hots, and the rich red color is forfeited.
At this point the applesauce still has a thin consistency. Allow the sauce to thicken by maintaining a steady boil, still stirring constantly. This cooking time varies depending on the fire and the weather, but usually takes another three or four hours. The sauce must be carefully watched as it begins to thicken so that it will be of the right consistency for apple butter.
The Playters perform thickness tests repeatedly until everyone agrees that the apple butter has just the right texture. "John and I always have to argue about that quite a little while," Charlene said. "Everyone's ready to eat it before John's ready to start canning. But he's always been the final judge, and he hasn't failed us yet."
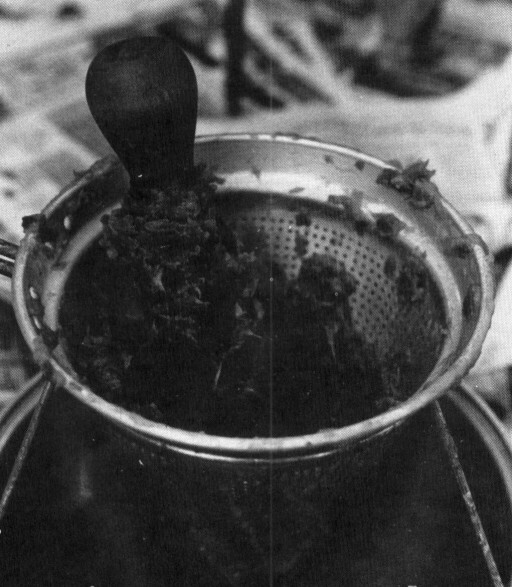
The first test consists of simply observing the formation of the bubbles. When enough water has evaporated from the sauce, the bubbles become large and airy, taking a couple of seconds to reach their peak in height. As they burst, they make deep craters in the surface of the apple butter. After the apple butter has reached this stage, make a second test. Place a spoonful of the apple butter on a small saucer, and tilt one side of the saucer to see whether the sample holds its shape. If a watery liquid separates from the sample, it needs to cook longer.
Charlene adds the sugar to the apple butter after it has begun to boil during its second cooking stage. When large, airy bubbles (below) form, it is time to take out a sample to test for doneness. (by Tracy Waterman)

The finished product should be firm enough to hold its shape, yet moist enough that it can be spread. Of course, the degree of thickness depends on personal preference.
Since only John and Charlene are involved in the actual testing of the apple butter, there are plenty of others to prepare for the next process. Those in the kitchen sterlize the jars and boil the lids for proper seal and bring them out to the table ready for canning.
[22]
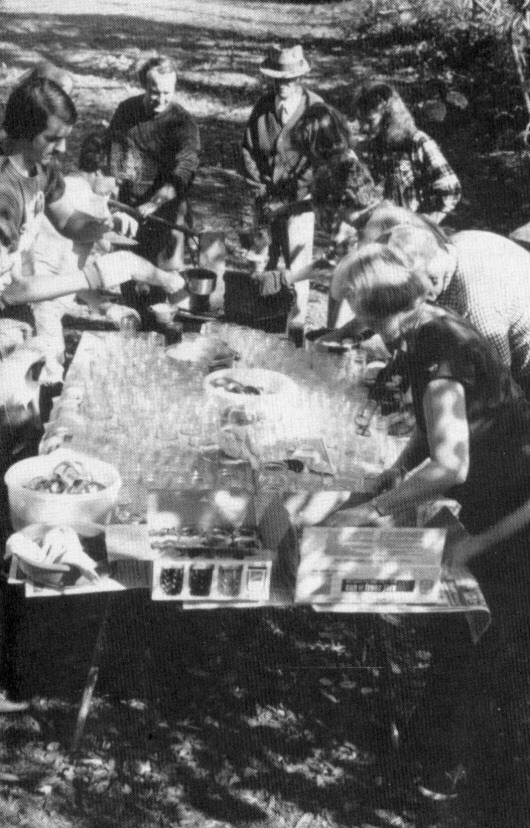
Finally in late afternoon, everyone gathers around the work table to participate in the canning of the warm, spicy apple butter. With assembly-line precision, they fill the jars, wipe the rims, seal and store them for future use.
"Now it is ready!" John and Charlene both agree. This pronouncement activates another assembly-line formation down both sides and ends of the work table. John and his son-in-law once again remove the charred copper kettle from the fire and place it at the end of the table. As before, two people, equipped with gloves or hot pads to protect their hands, dip the apple butter from the kettle into a funnel in the top of the first jar. The next two people carefully wipe the top rim of the jar with soft white cloths to remove any spilled apple butter, assuring a good seal. The next down the line place the cap on the rim of the jar and secure it with a metal ring. The next wipe the jar clean and put it in a box. One by one the jars are filled until the kettle is empty, and about 172 pints of rich, red apple butter is canned.
Though the apple butter is finished, the work is not, for there still remains the cleanup. The copper kettle needs immediate attention. Clean the inside of the kettle soon after the canning is finished before the residue starts to dry. Use water to rinse the sticky inside and wipe it dry with a clean soft cloth. Cleaning the outside is a much harder job, usually not undertaken the same day. Apply a copper cleanser to the outside of the blackened kettle with a soft cloth and rub it clean. Copper is very easily dented and scratched, so take care in using the cooking utensils, and never use steel wool to clean the kettle. With diligent scrubbing the copper's warm shiny glow will begin to appear from beneath the charred black coating of smoke and ashes.
After spending a long evening and the following day making homemade apple butter, its advantages may become camouflaged by the convenience of commercial brands. Does the taste of the homemade applebutter really compensate for the time and effort devoted? Some people who make it regularly believe that the taste is worth every bit of the effort. Others take a personal pride in making their own food products and in knowing exactly what they are eating. And still others simply enjoy making apple butter as a social event, uniting friends and family members in a worthwhile project.
Whatever the reason, the tradition of making apple butter each fall is not just a thing of the past. It is becoming a new tradition for a number of families with others learning to make it each year. Perhaps you would like to start a tradition of making apple butter. If so, invitee your neighbors in, polish up a copper kettle, fill it with tart, red apples, kindle a good smoky fire and enjoy a taste of the past.
[23]
Copyright © 1981 BITTERSWEET, INC.
Next Article | Table of Contents | Other Issues
