 |
Volume X, No. 3, Spring 1983 |
CREPE PAPER FLOWER
HOMEMADE FLOWERS FOR DECORATION DAY
by Lisa Mestan
Photos by Allen Gage
The art of making crepe paper flowers was a delicate talent that was used as a substitute for real flowers back in the early 1900s. The women and older girls of a family would busily start constructing crepe paper roses, irises, sweet peas and morning glories several months before Memorial Day or Decoration Day, as it was called then, for the decoration of the family graves. They made crepe paper flowers as a substitute for real flowers which were not always available around Memorial Day. Some families lived quite some distance from the cemetery where their relatives were buried, so real flowers usually did not survive the long trip. Since plastic flowers were not even heard of yet, many women resorted to making crepe paper flowers in bouquets and wreaths as grave decoration. Not only did the flowers look real, they lasted longer than real flowers. Waxing them made them last even longer.
One of the girls who used to help her mother prepare for Decoration Day from the time she was old enough to help, was Irene Smittle. She said, "Early in the spring, we would start working on the crepe paper flowers when it was rainy and we couldn't go outside, up until we went to the cemetery. We would work on them as we could. There would be times that the mothers and the neighbors would get together and make flowers. We would make enough flowers to cover our relatives' graves.
[58]
"Everybody took care of their own graves and we always wanted them clean for Memorial Day. We'd go about a week earlier, as close to Memorial Day as we could, so that we could clean the grass off the graves. We'd usually take our flowers with us, because we couldn't always go back on Memorial Day.
"We'd put sweet peas on the babies' graves and the bigger flowers on the grandparents' graves. Roses, sweet peas and morning glories were made the most. Some people made their flowers in bouquet types and other would just stick individual flowers in the ground. They'd have a stiff enough stem that it would just stick down in the ground.
"Everyone made wreaths. We'd have more than one wreath. On one grave we'd have maybe two wreaths of roses and two wreaths of morning glories. Sometimes, we'd have two wreaths that were different colors, but we liked to have both the graves to look alike."
MATERIALS
Ail the materials used in making the crepe paper flowers are important, but the basic material of all is crepe paper. Be sure to get a good brand of crepe paper, or you will have a hard time working with the flowers.
"You might say that our paper was the only thing we bought," Irene said. "We used Denison crepe paper. That was the best that you could get then, because it stretched. In the stores where we bought our paper, they would cut a package like this for a dime."
Getting together the wire, glue and all the other necessary materials you will need in making the crepe paper flowers will be rather simple compared to what it used to be like. Then people that made them had to rely on what they had around the house.
"We didn't buy wires," Irene continued. "On a farm, we always had some fine wire. Usually, my dad and brothers would have copper wire that they'd gotten out of some machine. When we made sweet peas, we would ravel out screen wire. When we got ready to put the flowers together, we'd get a heavier wire, like bailing wire or just any kind of wire we had laying around the farm."
"We didn't have Elmer's glue, either. We made a paste out of flour and water. In tying them, we used strong thread. We'd just use whatever we had at home."
The materials you will use to make all the flowers in this article are: scissors, string or thread, glue, floral wire, coat hanger wire, paraffin and crepe paper--green, yellow, red, pink, lavender and any other colors you desire. Even today, you can probably find many of these materials around your home.
Following are the instructions for making several flowers--rose and rose bud, sweet pea and morning glory and bud.
ROSE
The crepe paper rose was the most popular flower in the grave decorations of long ago. Not only was it very pretty and looked intricate, it was also easy to make. Many made no other flower but roses, using different colors and sizes for variety.
. 1.STEM--To begin cut a piece of floral wire approximately seven inches for the stem. You do not necessarily have to use floral wire--any thin, but sturdy, bendable wire will work. Bend one of the ends into a small hook
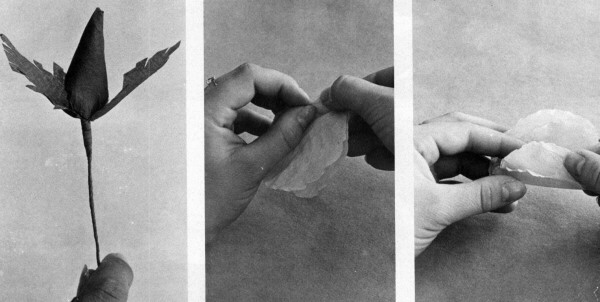
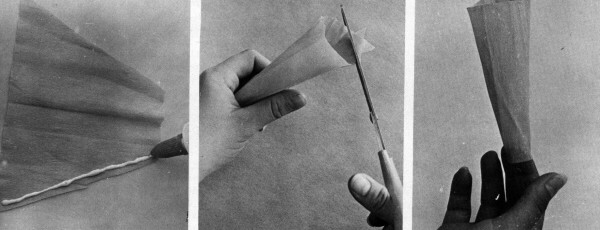
2.STAMEN--Begin in the center of the rose with the stamen. Cut out a two by two inch square of yellow crepe paper. With scissors, snip approximately ten cuts with the grain on one side of the square, cutting them evenly just a little past the middle point of the paper. With your thumb and index finger, twist each one of these cuts separately. (Photo 1) Slip the hook of the stem down in the middle of the twists and mash the hook down against the paper to hold it in place. Wrap the uncut portion of the stamen section around the stem and hook, but if you can not get the paper to stay secured around the stem, use some glue, string, or tape to keep it in place. (Photo 2) The completed stem and stamen are shown in Photo 3. Set this aside.
[59]
3.PETALS--Cut out, or trace onto another sheet of paper, the rose petal pattern. Unroll a large sheet of crepe paper--the color of this will determine the color of the rose. Fold up the straight edge (with the grain of the paper) and make it just a little bigger than the width of the pattern. Fold up the paper six times. This, of course, will make six petals.
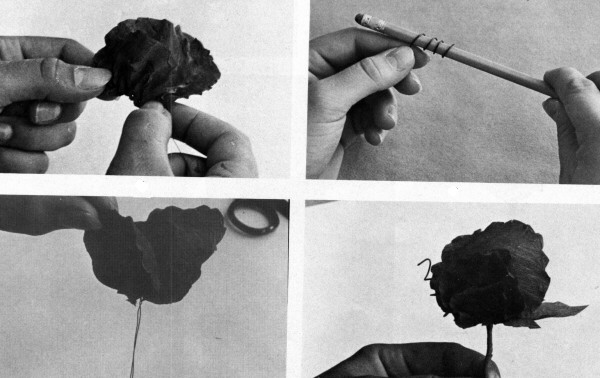
Put the pattern down on the paper and cut around it. (Photo 4) To make this easier, you may want to pin the pattern to the crepe paper with a straight pin. When this is done, move the pattern down to the next place on the paper and cut six more petals. You will need about twelve petals in all to get a desired rose shape. Next, use one of the blades of a pair of scissors to flute the round edge of a single petal to get it to curl under. (Photo 5) You can also get the same effect using a butter knife. Be sure, though, that you do not scrape too hard or you will tear the petal. Flicking the blade of the scissors very slightly will make it curl more quickly. Using both of your thumbs, gently push in the center of each petal. Do this to each, individually to give it a cupped center. If the paper you use is very stretchy, this should be no problem. (Photo 6)
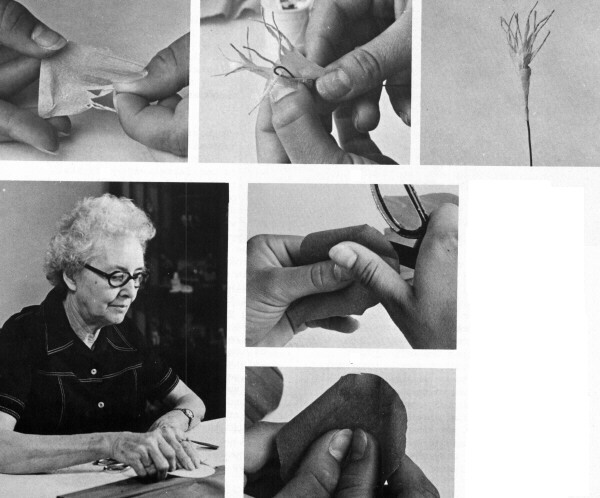
Photos 1, 2, 3, 4, 5, and 6 all show the steps in making the crepe paper rose. Photo 4 shows Lucille Simpson laying the rose petal pattern down on folded layers of crepe paper. She will then cut around the pattern to get several petals. Mrs. Simpson remembers helping her mother make crepe paper flowers for the graves. She had many interesting stories to tell.
[60]
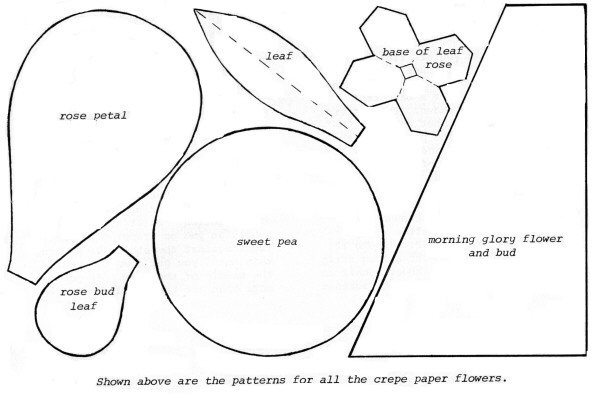
Shown above are the patterns for all the crepe paper flowers.
4.BUILDING THE ROSE--You are now ready to build your rose. Put the straight or base end of the first petal a little below the stamen and twist it. You will need to cup the first petal around the stamen a little more than the others, but do not hide the stamen completely. Also, be sure that the center petals do not stick up higher than the rest or you will have a result that looks more like a tree, rather than a rose. Arrange the rest of the petals around the stamen, overlapping each petal somewhat as you progress around the stem. (Photo 7) This is one of the more difficult but most important steps in making the crepe paper rose. It may be helpful to use thread to help hold the petals in place as you build the rose. Holding all the petals in place at one time can be rather difficult and prove to be frustrating, so to remedy this problem, tie a piece of thread around the base of the rose about every third petal. (Photo 8)

Lucille Simpson puts on the rose petals.
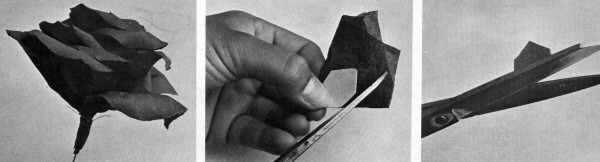

The finishing steps in making the crepe paper rose are shown in the above photos.
[61]
5.BASE LEAF--When you are finished arranging the petals and the rose looks the way you want it to, cut out of green crepe paper a base leaf with the pattern shown. The pattern is shown unfolded, but to speed the process up, fold the pattern on the dotted lines and place it on a double-folded piece of crepe paper. (Photo 9) Simply cut out the shape of the leaf and snip out the center. (Photos 3.0 and 11) Then, slip the stem of your rose in through the hole in the leaf and slide it up to the base of the rose. (Photo 12)
6.WRAPPING AND LEAVES--Cut a long strip of green crepe paper, about a half an inch wide and 18 inches long, against the grain. This will be the wrapping for the stem. Set this aside.
Using the rose leaf pattern provided, cut out a leaf from green crepe paper. Simply fold the pattern as shown with the dotted lines, place on a small piece of crepe paper that has been folded in half and cut out. If you think that you might want more than one leaf on your rose, cut out another one.
[62]
Set the leaf aside and using the wrapping strip, put one end directly underneath the base leaf and
start twisting the paper around the stem in one direction. Stretch the paper gently as you go
wrapping it pretty tight against the stem. Keep doing this until you get down to about the middle
of the stem. If you want more than one leaf, you'll need to stop a little below the base of the rose
for the first leaf. Put the leaves where they look natural, stop wrapping and put the stem of the
leaf just below the area where you stopped wrapping. Twist the leaf stem around the wire. (Photo
13) Then, just continue wrapping the stem, entwining the stem of the leaf in with it. Keep
wrapping all the way to the bottom of the wire. When you reach the bottom and are completely
finished, tear or cut the excess wrapping off at the end. Twist into place any added paper that
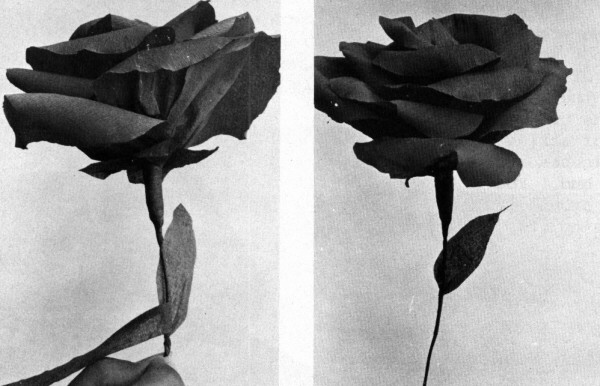
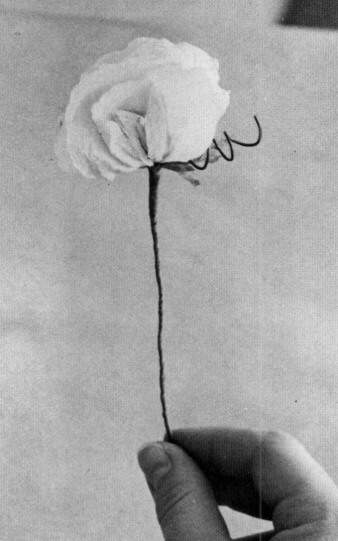
might be hanging out. There you have it, your finished rose! (Photo 14)
 |
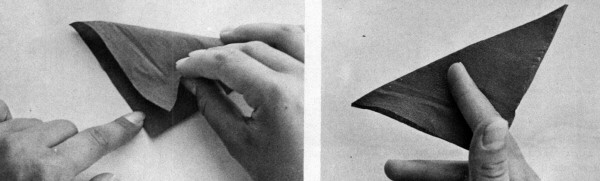 |
Photo 13 shows the last step, wrapping the stem. Photo 14 is the finished product. Photos 15 and 16 are the first steps in making the rose bud. The procedure used to make the rose bud is much easier and less time consuming than that of the rose. The rose bud adds a nice touch to any crepe paper bouquet or grave decoration. You can make the bud any color you like--even if it is to add a splash of color.
ROSE BUDThe rose bud will add a nice touch to whatever you make--a grave decoration or a simple bouquet for home. Not only will there be open flowers, but flowers that are ready to be opened, making any flower design more realistic.
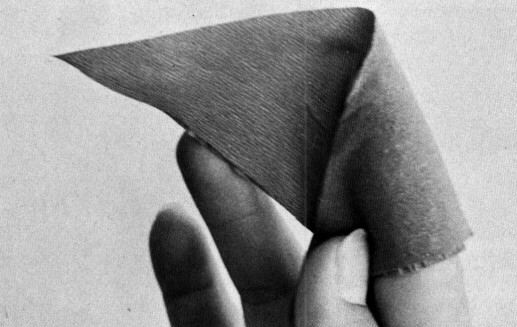
1.MAKING THE BUD--Cut out a four inch square of crepe paper the color you want the rose
bud. Fold the square into a triangle shape. (Photo 15) Now, comes the difficult part. The
wrapping of the bud can be frustrating if not done correctly. With these next few steps, you will
be trying to construct a cone shape. Grasp the bud, center-point first, between your index and
second fingers. (Photo 16) The point of the triangle should be toward the inner branch of the two
fingers and tip of the fingers only reaching the middle
point of the pattern. Take one of the points on the side and wrap it across your index finger,
bringing it to rest on the other side of your finger. (Photo 17) Do the same to the other point. In
this manner, the two ends will be overlapped, forming a cone. (Photo 18) When you have finished
this process, the bottom should be rounded and loosely wrapped around your finger with a point
at the top. Remove the bud gently from your finger without destroying its shape. (Photo 19)
Gather the paper at the bottom of the bud together. Twist it lightly, but not too tight, for you will
need to open the bottom later. (Photo 20) Now that you have completed this step, you should
have a rose bud--it should be twisted at the bottom with a pillowed rose bud on top.
[63]
STEM--Hook one end of a piece of floral wire that measures seven inches. Open up the bottom of the rose bud and gently stick the stem up in it, not up too high, but keep the stem hook near the base of the bud. Retwist the bottom of the bud around the stem. To hold the bud onto the stem, tie a piece of string approximately six or seven inches long around the base of the bud. You may want to wrap the string around the base several times before tying it. (Photo 21)
 |
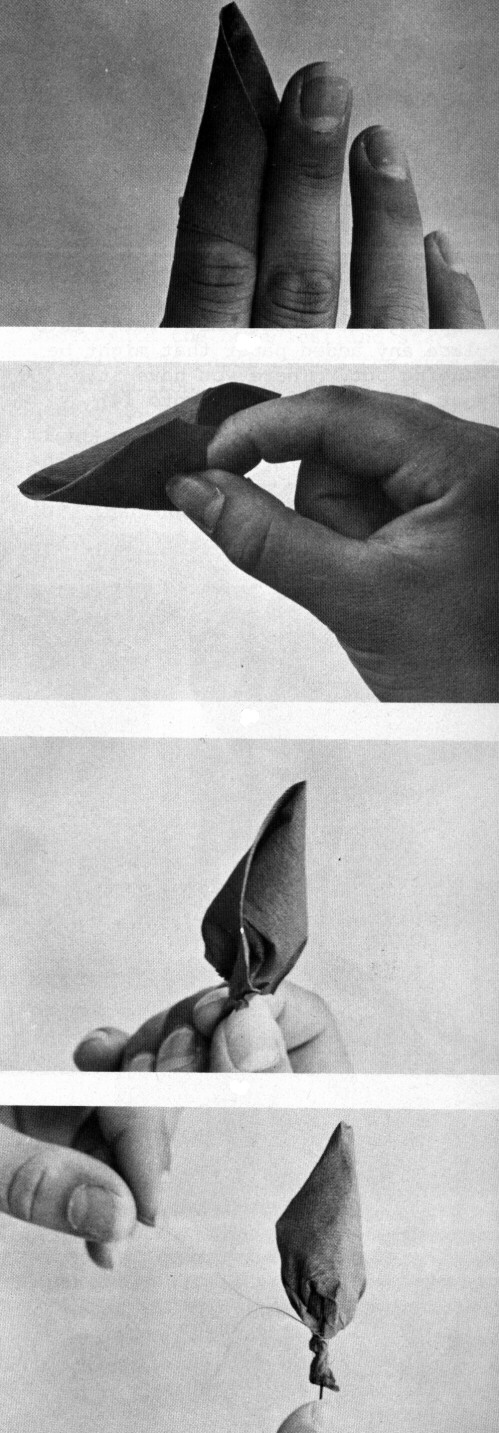 |
These photos are the steps in making the rose bud. Folding the bud to get the "pillow" may be difficult at first.
[64]
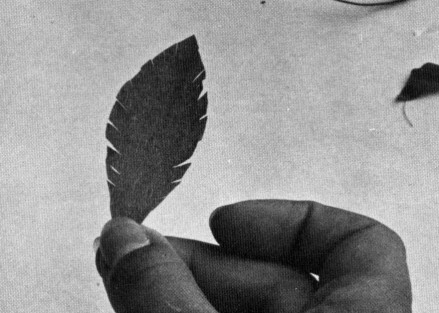
3.LEAVES--The rose bud requires two leaves. Using the same leaf pattern as used on the rose, cut out two leaves on folded green crepe paper. Without unfolding them, snip the edges of the leaves, one at a time, producing a fringe-like effect. (Photo 22) Place a leaf on each side of the rose bud and twist the stems around the stem of the flower. You may want to use some glue to make this task easier. Then, wrap the stem as before.(Photo 23)
SWEET PEA
The sweet pea petal pattern shown may look relatively simple, but you would be surprised at what can be done with just a circle.
1.PETALS--Cut the pattern out or trace it onto another sheet of paper. Double a piece of crepe paper by folding it up once, with the grain. Lay the petal pattern down on top of the paper and cut as you did the rose petal. You will have two, separate circular patterns which will become the sweet pea petals.
2.FLUTING--Without pulling the crepe paper circles apart, flute the edge all the way around. Do this by gently grasping the edge of the circles together with your thumbs and index fingers on both hands and pulling them gently in opposite directions. It will appear that you are going to tear them, but this motion will crinkle them all the way around. (Photo 24)
3.BUILDING THE SWEET PEA--Still keeping the two circles together, fold them almost in half. Layer the petal edges so that they can each be seen. (Photo 25) When completed, you should have four, visible petals.
 |
 |
Photos 22 and 23 finish up the rose bud while photos 24 and 25 introduce the sweet pea.
[65]
4.STEM--Cut a small piece of thin wire for the stem approximately eight or nine inches long. Place the center of the wire in the fold so that there are two petals in front and two behind the wire. Bend the wire until the two ends meet and mash the bottoms of the petals all together on the wire. (Photo 26) Twist the wire together as close to the base of the flower as you can and continue twisting all the way down, to secure it and keep the two stem pieces together. Crush the two center petals together gently and pull them forward. Pull the very back petal backwards and cup it. (Photo 27) Curl the very front petal over and leave it where it is.
5.LEAF--Cut out the base leaf pattern on the fold of green crepe paper. Cut it with the grain. Snip little fringes all along the edge of the leaf, excluding the stem of the leaf. Set this aside for awhile.
6.LEAF--In like manner cut out the leaf. Flute the end of the leaf with the blade of a pair of scissors, just as you did the rose petals. This will give the leaf some curl. Set this aside.
7.QUIRL--Practically everyone has seen the little, curly stem that protrudes from the sweet pea flower. Irene called it a quirl. Your sweet pea flower will have one, too, only it will be homemade. You need some thin wire to make it. Any thin wire will do. You can even use Christmas tree light wire for the quirls. It is already green colored and curls very nicely. All you need to do is cut a piece approximately five inches long and then wrap it around a match-stick or a pencil to give it curl. (Photo 28) Be careful not to overlap each turn. Leave about an inch and a half cf straight wire on one end to wrap around the sweet pea stem. When it is completed, it should look like a corkscrew. Place the untwisted end of the quirl near %he base of the flower and as near underneath it as you can. (Photo 29) Twist the quirl stem around the stem of the flower to hold it in place.
Photos 26-29 demonstrate the techniques used in completing the crepe paper sweet pea.
[66]
When Irene Smittle was a young girl making crepe paper flowers, floral wire or Christmas lights were not available, so she used a piece of thin, bendable wire and wrapped it with a strip of green crepe paper, just as is done to the stem of the rose. She then twisted it and had her own homemade quirl. However you make your quirl does not matter. Perhaps you have another way.
8.WRAPPING--Twist the base leaf stem right under the petals in back of the rose stem, adding the leaf.
You now have a completed sweet pea. (Photo 30)
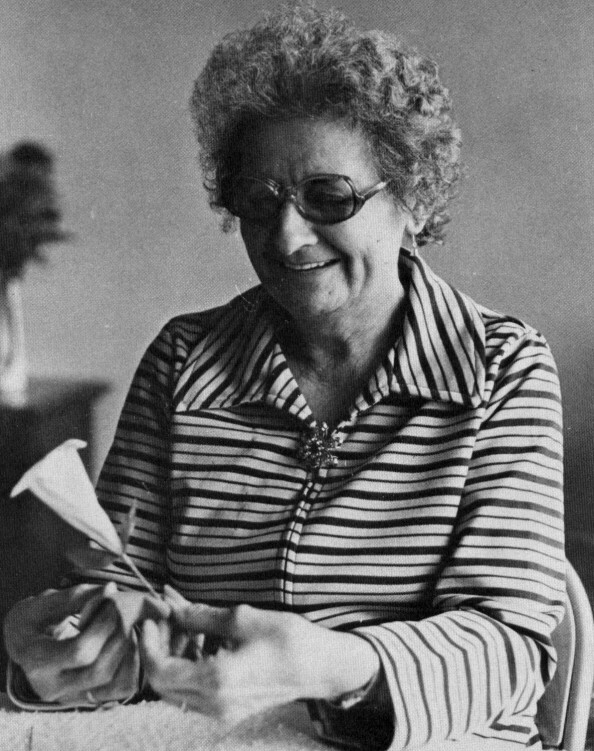
In the photo above, Irene Smittle gently handles a morning glory that she has just finished. She learned how to make these flowers from her mother.
MORNING GLORY
The morning glory flower was not as popular as the rose, but yet it had a charm of its own. The leaf on the flower is one of its more interesting features.
1.STEM / STAMEN--To start the morning glory, make the stem and stamen for the center of the flower. These directions are found under the rose instructions.
2.FLOWER--The construction of this petal is pretty simple. Cut out a pattern and place the edge of the fold against the edge of a double folded piece of crepe paper on the grain. It is very important that you fold the paper with the grain for this will determine the appearance of the flower later on. Cut out the petal. Open the petal and lay it on a sturdy surface and apply a thin line of glue along one of the long, slanted sides.
[67]
(Photo 31) Roll the opposite side over until its edge meets the glued side. When you finish this process, you should have a sort of cone shape with a small hole at the bottom and a large opening at the top. (Photo 32)
Cut off the point of paper protruding from the wide end of the flower so that the top is now even,
but if you happen to cut a little crooked, do not worry. It will not be noticeable when the flower is
completed. (Photo 33) Gently grasp the top edge of the flower with both your thumbs and index
fingers. Stretch, very lightly, the edge of the flower all the way around to produce a trumpet
effect. The flower should stretch without any problems if the paper is very flexible and is folded
correctly on the grain during the cutting of the flower. (Photo 34) When the edge of the flower
has been stretched all the way around, slightly curl back the edge with your fingers, giving the
flower a funnel shape. You can also place the flower, wide end down on a table or other sturdy
surface and press out a funnel shape by flattening the edge outward. (Photo 35) Next, place the
stem and stamen inside the petal. It is easiest if you slip the stem in first at the top of the petal,
then pull it downward until the base of the stamen meets the base of the flower.
(Photo 36)
Twist the bottom of the flower around the stem to secure it.
3.BASE LEAVES--Cut out two base leaves. Place them on opposite side beneath the base of the flower and twist them onto the stem. (Photo 37)
4.LEAF--Using a piece of green crepe paper, cut out a wide heart shape and lay it down on a sturdy surface. Snip out a small strip of green crepe paper and a piece of thin wire about five inches long. Place the heart so that the rounded edge is toward you. Put the wire down on top of the heart a little more than halfway. Dab a small amount of glue onto the strip of paper and place the paper smoothly on top of the wire. (Photo 38) Be sure that there isn't any paper protruding from the edges of the leaf for this paper is only to hold the wire secure and shouldn't be seen. Let the leaf dry for a few minutes. Next, arch the leaf back slightly with the wire underneath, giving the leaf some shape. Twist the stem of the leaf onto the stem of the flower and to complete the morning glory, wrap the stem as usual. Be sure to include in the wrapping, the stems of the base leaves and the stem of the leaf.

These photos show the making of the morning glory flower while photo 39 is the bud.
[68]
MORNING GLORY BUD
NOW that you have learned how to make the morning glory flower, you may want to try the
smaller version, the morning glory bud. It is very easy to make because it is made just like the
flower, only the stamen and the heart-shaped leaf are left off.
1.STEM--Simply cut a seven inch piece of floral wire and hook it over at one end. This way of
making the stem is used in almost all the flowers.
2.PETAL--Make the cone, as shown in the morning glory flower. Twist the base of the bud onto
the stem to secure it and then, instead of stretching the edge of the wide end of the cone, mash it
togehter. You will need to use some glue to make it stay in place. (Photo 39) The bud should be
pinched at the top and twisted onto the stem, leaving a pillow-like or hollow area in the middle.
3.BASE LEAVES--Cut out two leaves from the patterns provided and attach them each onto opposite sides at the base of the bud. Wrap the stem and add to the bouquet or grave decoration, giving it a realistic look.
[69]
WAXING
After doing all the work to make the flowers, the women wanted them to last as long as possible. There was the problem of keeping the flowers nice on the grave without them being ruined from dew, dust, wind or the first rainfall. This was remedied by coating them with paraffin. Dipping the finished flowers in some melted wax furnished them with a temporary, protective coating.
"When we were done making the flowers, we would wax them," said Irene. "We used the regular paraffin like you put on jelly. They'd be better when they were waxed because the wax would shed the water."
The procedure of waxing the flowers can be messy if you are not careful. All that is needed is some paraffin and a pan or can. Place two chunks of wax into a pan and melt them over a warm heat until they become liquid. There are at least two methods of applying the wax to the flowers. One is to pour the wax into a deep can or pan and literally dip the whole flower into the wax. The pan must be deeper and wider than the flowers to be dipped. If the flowers are wrinkled they will remain in that shape after being removed from the paraffin. It is best if the paraffin is deep enough in the pan to cover the flower.
You can also spoon-dip the wax over the flower and keep doing so until the flower, leaves and stem are coated. Hang the flowers by the stems, upside down so that any excess wax will drip off. When dry, the flower will be stiff and hold its shape nicely.
Most women waxed their flowers specifically for grave decoration, but you can choose whether or not to do it for flowers in bouquets. Waxing gives the flowers a different appearance, a smoother texture and glossy surface.
WREATHS
While passing by or through the cemetery on Decoration Day in the early 1900s, you would have seen what seemed like hundreds of bright, multi-colored crepe paper flowers decorating many graves. You might have seen some flowers arranged in a bouquet, others just singly stuck by their stems into the earth, but the most popular arrangement would have been the wreath.
Many people made wreaths in all shapes and sizes and of different kinds of flowers. You can make a wreath out of every flower that you have learned how to make. You can construct a rose wreath and to be creative, maybe even put in a few rose buds. In addition to the flowers, all you need is a piece of fairly heavy wire such as a straightened out coat hanger for the base. The length of this wire base will determine how many flowers you will be using, so use your own judgment. Wrap the base with green crepe paper just as you would the stem of the flower. Make a hook on one end of the wire until there is a loop at the top. You may need to use a pair of pliers to make this easier.
In making the wreath, you'll need about ten or twelve completed flowers. If you would like to have waxed flowers on your wreath, wax them before you assemble it together. Wrap the stems of the flowers around the wire base and arrange them on each side and on the loop. Be sure you leave enough stem at the bottom for tying on a bow for the finishing touch.
[70]
Copyright © 1981 BITTERSWEET, INC.
Next Article | Table of Contents | Other Issues
