 |
Vol. V, No. 2, Fall 1991 |
How I Carve Wooden Dough Bowls
By Bob Elgin
Self-taught woodworker Bob Elgin has been County Surveyor of Phelps County, Missouri for 26 years. He lives at St. James.
About ten or twelve years ago I became interested in traditional woodworking techniques of making such things as treenware, chairs, stools and other wooden items once popular in the early days of our Country. Of particular interest to me were the large, hand carved, wooden bowls displayed in the restored kitchens of historic homes. Finding very little in the literature about how these bowls were made or on the tools used to carve them, I decided to teach myself, and after collecting a kit of tools I went to work. The only real problem I encountered was in learning how to use the large, curved bowl adz. When I realized this is really a "slicing" tool rather than a chopping tool, I had no further trouble and have had lots of pleasure carving bowls and demonstrating to others how they are made.
The bowls to which I am referring, commonly called "Dough Bowls," are always handcarved from one piece of wood. They may be oval, round or rectangular in shape and vary in size from 24" to 36" long, 10" to 18" wide and 3" to 8" deep. They may have small handles or grips on either end.
Traditionally, this type of bowl was used for bread making. The ingredients were mixed and kneaded into dough in the bowl, then covered with a cloth and left to rise. Wooden bowls were preferred as the wood held the heat generated by the fermentation of the yeast. Besides being used for bread making these bowls had other uses, such as chopping bowls, salad bowls, and I remember my Mother working butter in a large round wooden bowl.
A dough bowl may be carved from almost any fine textured, straight grained wood that is free from knots, shakes, and other defects, and which has no toxic characteristics. I have made bowls from cottonwood, soft maple, cherry, butternut, river birch and buckeye. Buckeye is a favorite bowl wood as it carves easily and is light in weight, a characteristic which appeals to the housewife. My preference is cherry because of its interesting grain patterns and the beautiful finish it will take.
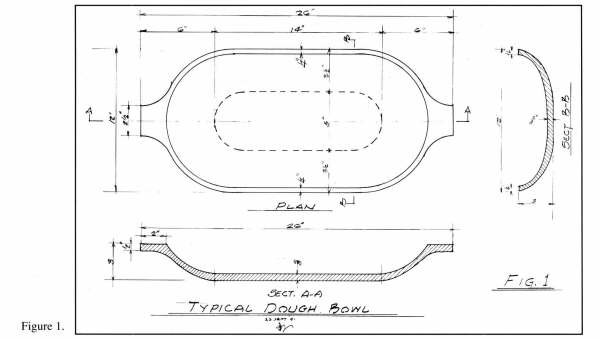
Figure 1.
[30]My bowl wood is obtained from the local saw mills. I may select a log from the mill's stockpile or ask the sawyer to lay aside a good straight grained log with no knots or visible defects to be sawn when I need it. I have the sawyer saw the bowl timber as far outboard from the center of the log as possible to get the size timber I need. This eliminates possible ring or heart shakes and some of the denser heart wood. The remainder of the log goes into 1 ." or 2" boards which wind up in future woodworking projects.
Before placing the bowl timber in my lumber rack, I wrap the timber tightly in plastic to prevent drying and to keep it green as long as possible. I carve bowls only from green wood since it is soft and easily worked. When doing demonstrations onlookers are always amazed to find that I am carving green wood and this immediately brings up the question of cracking and checking. These two evils are caused by uneven drying and built up stress within the wood itself. Avoid using timber that has a squirrely grain, knots or other defects and you will eliminate this type of checking. Cracking caused by uneven drying may be avoided by carving out the cavity of the bowl first and then chopping away the heavy waste wood on the sides and end of the bowl blank.
From the time the bowl blank is cut from the bowl timber, it should be kept tightly wrapped in a plastic bag, except when being carved. As I may work on a bowl intermittently for several days, each day I take the bowl from the bag, dump out the accumulated water, dry off the bowl and bag and return the bowl to the bag and seal it. If the bowl does not feel dry and there is still some moisture accumulating in the bag by the time I have completed the carving, I leave the bowl in the bag, taking it out and releasing the accumulated moisture every two or three days until the bowl is thoroughly dry. The secret of this process is to keep the thickness of the bowl as near the same as possible so that there is less moisture differential between internal and external surfaces and to slow the drying process down by use of the plastic bag. Some bowls have a tendency to twist slightly when drying and at the point when the bowl is perfectly dry it should be set on a flat surface to see if the bowl "rocks." This unevenness may be corrected by shaving a small amount of wood off the bottom until the bowl sits flat.
Prior to carving I mark out the top and bottom of the bowl blank to the shape I want the bowl to take (Figure 1 ). The blank is then clamped in the end vise of my heavy, old carving bench and with a light double bit axe I begin chopping out a large, rough hole in the blank (Figure 2). This hole makes way for hollowing out the bowl cavity by use of a long
bladed hollowing adz. With this adz, I chop out the axe marks and widen and deepen the bowl cavity to within 3/8" of its final shape (Figure 3). With a wide bent gouge and mallet (Figure 4), I cut back to within about 1/16" of the rim finish line and shape the sides and ends with vertical cuts. I then use the heavy, short bit bowl adz to widen, deepen and smooth up the cavity until the adz "bottoms out." (In other words, until the shape of the interior of the cavity is the same shape as the back of the adz blade (Figure 5). To further smooth up the interior and widen the bottom of the bowl when I can no longer cut with the bowl adz, I use a bent knife in the curve of the bottom. At this point, I check the bottom of the bowl to see if it is flat and cut to the proper depth. This is done with a shop made depth gouge as shown in Figure 6. The bowl is then removed from the end vise of the bench and clamped bottom side out on the backboard of the chopping block and I begin chopping away the waste wood on the edges of the bottom of the bowl and on each end of the bowl. I then smooth up the sides and ends and thin with a broad hatchet and straight bit flat blade adz until the sides are within 1/4" or 3/8" of finished thickness. When sufficient hatchet work has been done, the bowl is removed from the chopping block and clamped in the end vise on the bench. With a scrub plane and an old smooth
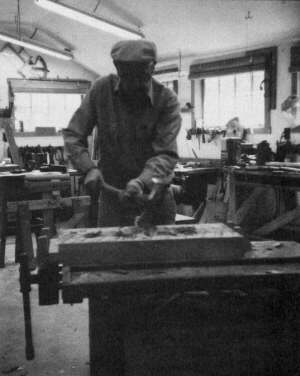
Figure 2.

Figure 3.
[31]
plane, I shape up and thin the sides and finish them off with a spoke shave. The bowl is then removed from the end vise and clamped bottom up across the bench with a Chinese vise. With a straight adz and spoke shave, I finish off the ends (Figure 7). I then turn the bowl over and clamp with the Chinese vise, carve the handles, and finish shaping them with a spoke shave (Figure 8). I remove the bowl from the Chinese vise and with my hands and an old caliper, match the inside with the outside of the bowl. The bowl is then returned right side up to the end vise on the bench and scraped smooth with an old Stanley No. 82 scraper, using blades made from an old handsaw blade to fit the contour of the cavity (Figure 9). A light sanding with fine sand paper completes the job.
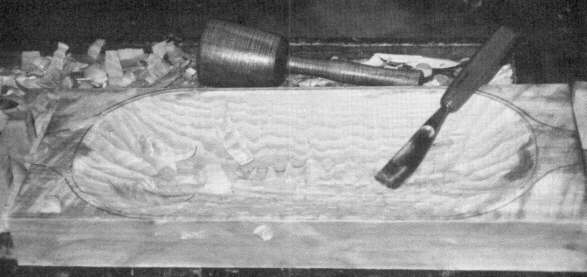
Figure 4. |
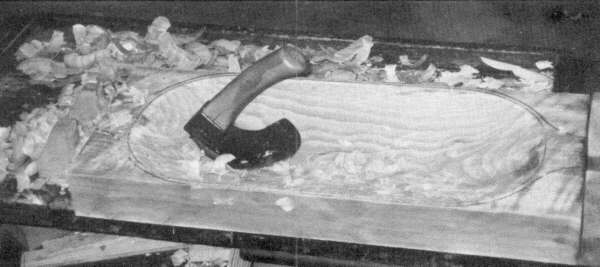
Figure 5. |
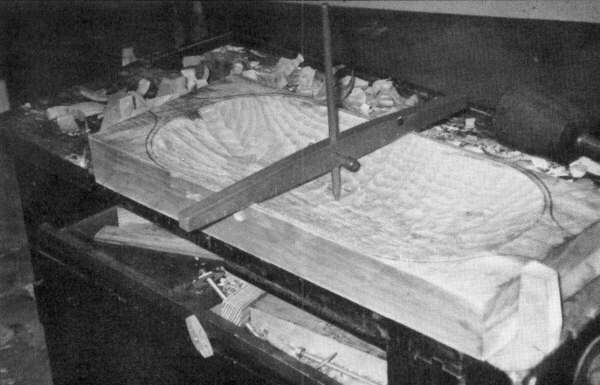
Figure 6. |
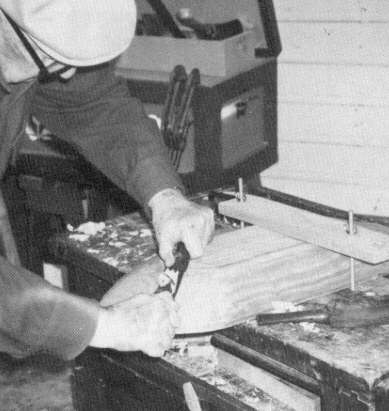
Figure 7. |
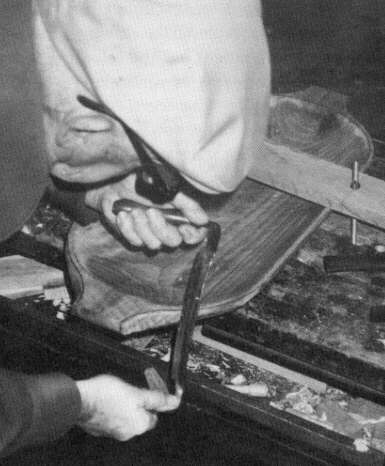
Figure 8. |
|
[32]
The end product looks like the top bowl in Figure 10, which is carved from buckeye. The other is a chopping bowl made of river birch.
For a protective finish I use Martens Wood Preservative or Behlen's Salad Bowl Oil Finish. Both are non-toxic and are excellent finishes. Ordinary mineral oil from the local drug store or pure cold pressed walnut oil, available at most health food stores are also satisfactory. I hand rub in four or five coats. As the bowl is used an occasional additional coat will be needed.
A beginning carver will be faced with the problem of obtaining the right tools for this work. When the demand for bowls diminished, apparently the specialized bowl carving tools were discarded and lost. A few museums display these tools--usually marked "coopers tools"--and occasionally a bowl adz or scorp will show up in an antique dealers catalog. It is rare to find a bowl adz in good condition with properly shaped blade and with the correct handle. Remember it is the shape of the adz that governs the shape of the bowl.
It is important that all hand woodworking tools be kept razor sharp if one is to produce good work and get the maximum satisfaction and enjoyment from working with wood.
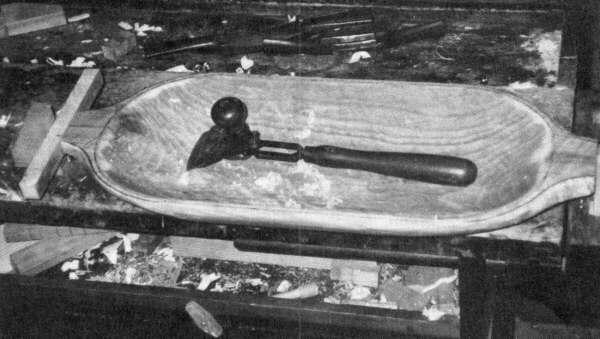
Figure 9. |
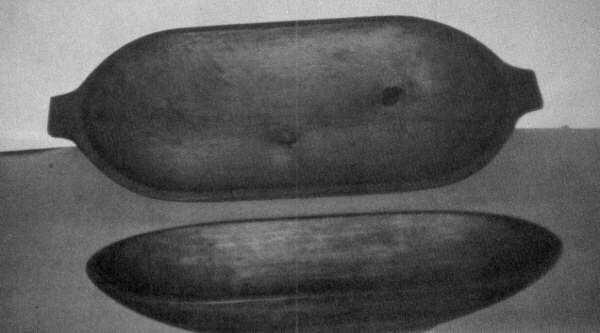
Figure 10. |
Author's photos.
[42]
Copyright -- OzarksWatch
Next Article | Table of Contents | Other Issues | Keyword Search
