 |
Volume IV, No. 1, Fall 1976 |
PIECES OF THE PAST
by Caryn Rader, Diana Foreman and Teresa Maddux
Photography by Caryn Rader
The basic patchwork technique came to America long ago in the seventeenth century with the early colonists, but it was far from being the art it later became. The frugal nature of American women combined with their love of beautiful things, caused them to develop quilt making to a sophisticated art practiced by most women as early as the eighteenth century. In early American homes quilts were a necessity of vital importance to all, especially in the northern settlements where the winters were cold. The pioneers' poorly heated log houses made it necessary for an adequate supply of bedding for protection against cold air.
To make the great amount of bedding needed for the large families in unheated sleeping rooms, every scrap and remnant of leftover fabric from rare manufactured material was saved. The best parts of worn-out garments were carefully saved and cut into quilt pieces. Women eagerly exchanged different colored pieces with one another, storing every scrap in boxes or special bags to sew later into colorful quilts. The main idea though, was to produce a quilt that was warm and would withstand the greatest amount of wear possible. Necessity demanded their continual usage, causing them to be patched and repatched. The older ragged quilts were even used to fill newer ones when they had become past use. Nothing was wasted.
[25]
Even though the piecing and quilting had to be done, it was enjoyable and a favorite pastime of both old and young. In both rich and poor homes the women and young daughters would sit in their rocking chairs close to the fire, piecing and quilting after the housework and chores were finished for the day. This was a period of relaxation and a time of visiting.
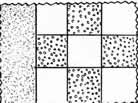
Piecing was one of the first things a young girl learned, for in a large family quilts were always needed in abundance. Most girls would start piecing their first quilt around the early age of eight. Usually the quilt was a simple four or nine patch. This block style quilt was easy for the beginners because of the straight seams of the square blocks which repeat to create a geometric design.
There is a difference between "to patch" and "to piece" as used in connection with the making of quilts. The patched quilts were commonly associated with misfortunate circumstances. All the people had to make quilts out of was just old patches. Patches were cut out of old garments and sewn together not forming any particular pattern to make a quilt, but many of the "scrap quilts," as they called them, were very pretty when made from gay pieces carefully blended of various shades of a color.
The pieced quilts made a special appeal to women who delighted in precise and accurate work. In the pieced quilts the pieces were usually of uniform shape and size and of contrasting colors which made a pattern, whereas the patched quilts were all shapes and colors of material sewn together.
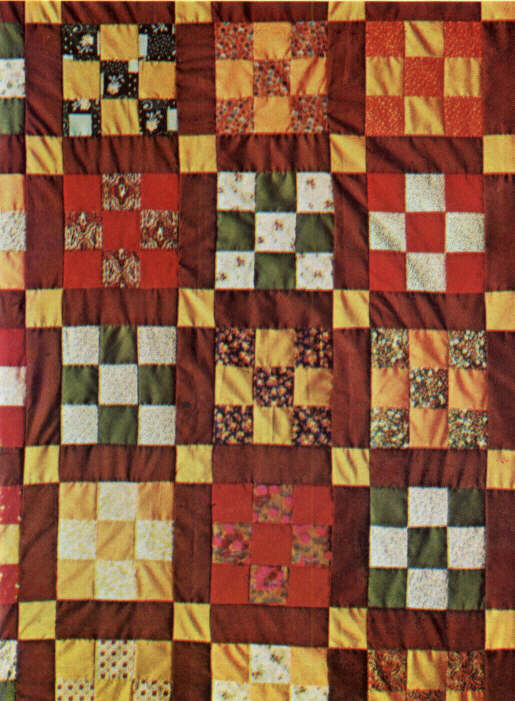
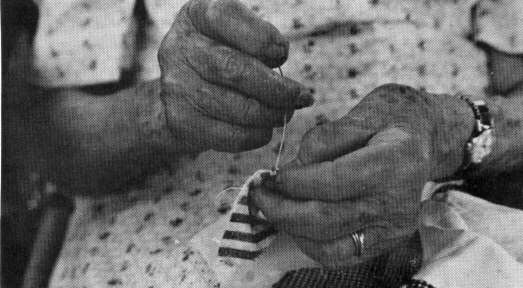
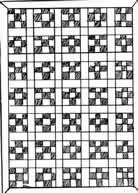
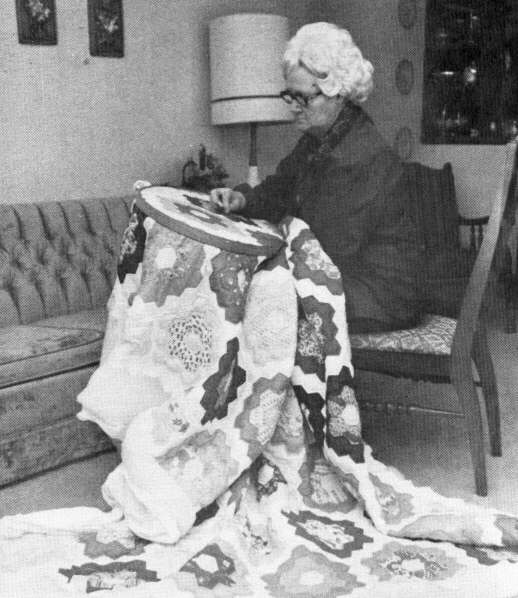
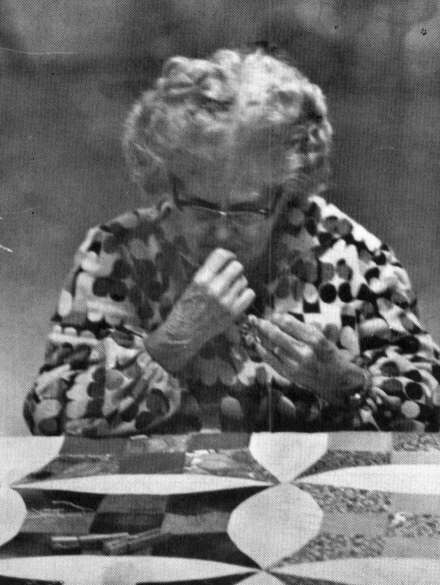
Skillful hands quilt an Improved Nine Patch quilt.
Each woman prided herself in creating a quilt that was artistic whether it was a patched or a pieced quilt. For those who enjoyed making pieced quilts, there was practically no limit to the variety of designs available. Women tried out their own creativeness and would make up their own patterns from the basic Nine Patch to rather complicated patterns like the Mother's Dream.
Among the most fascinating features of a quilt is the great number and variety of names given to quilt designs. The many days spent in creating even a simple quilt gave the maker time to ponder over a name for the new design. Quilt names often reflected the moods and personalities of the people who named them.
Some names were quite humorous, some show sadness.
Some quilt patterns got their names from historical or political events. Fifty-four Forty or Fight, Democrat Rose, Lincoln's Platform, Confederate Rose and Pilgrim's Pride are examples of this.
Roberta McClanahan made this Friendship quilt for her daughter Beulah's graduation from Competition High School in 1939. It has the names of all her classmates on it.
[26]
These quilts with political and historical names show that the women as well as the men were interested in the affairs of the country. Also they gave them biblical and religious names such as Crown of Thorns, David and Goliath, Joseph's Coat, Crosses and Losses, Solomon's Temple, Job's Tears and Star of Bethlehem. They named quilts from outdoor life, recreation and occupations. Examples of these are Flower Garden, Sunshine, Snowball, Four Frogs, Cats and Mice, Eight Hands Around, Hands All Around, Baseball and Carpenter's Wheel. The subject of love was not left out--Hobson's Kiss, Lover's Link, Wedding Ring and Wedding Knot.
Women who were artistic delighted in changing and improving the designs using old patterns as a foundation as they worked out new designs. From the Nine Patch pattern new patterns and names were derived such as Improved Nine Patch, Split Nine Patch, Double Nine Patch and the Nine Patch Star. Therefore, it is not unusual to find patterns of the same design having many different names.
The pattern Crown of Thorns is also called Georgetown Circle, Rocky Mountain Road and Memory Wreath. When called Memory Wreath it was made from pieces of clothing worn by the departed with their names embroidered in the center. Crosses and Losses is sometimes called Fox and Geese, Triple X and Hovering Hawks. Missouri Rose is called Rose Tree and Prairie Flower. Jacob's Ladder is called Stepping Stone, Wagon Track and Underground Railroad.
Even the everyday quilts not particularly beautiful perhaps, but nevertheless needed, were also considered worthy of names. The grown-ups were not the only ones who had to do with the naming of quilts. Children named them, too, and the results were quaint names such as Pig Pen and PinWheel. They were delighted when they were able to name a quilt and to pick out the blocks of material that were once a part of their own dresses or shirts.

White Oak Pond Church ladies are about to finish another quilt.
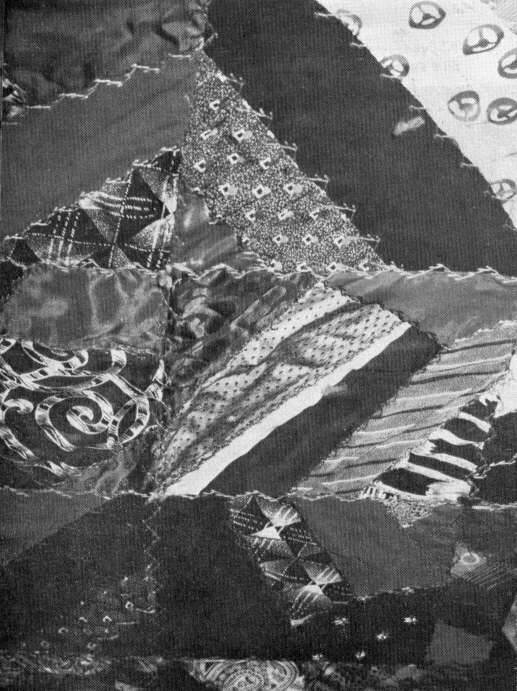
Irene Strickland's crazy quilt is made of dress scraps and old ties.
[27]
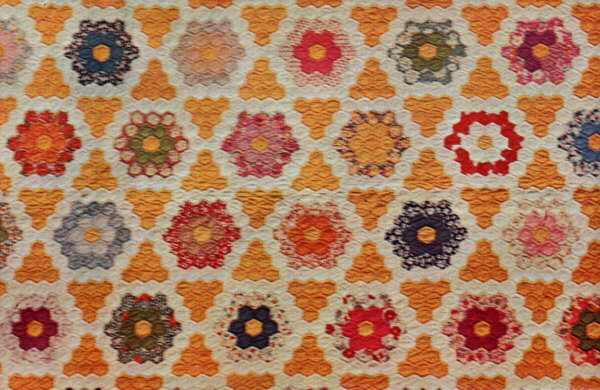
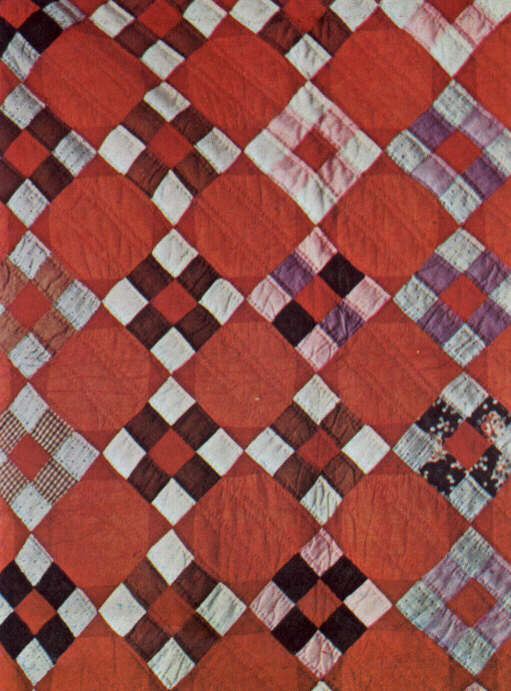
Flowergarden made by Ray O'Dell and Kate Smith in 1935.
Nine patch piece by Caryn Rader, Diana Foreman and Teresa Maddux in 1976
Quilt made by Hattie Simpson in 1925.
When one woman would make up a new pattern she was anxious to give it or trade it for another one with her friends or relatives. They would meet at one an\-other's homes and discuss new patterns and names, sometimes accumulating a hundred or more different patterns until even the most ambitious quilt maker could not hope to make a quilt like every design she admired.
All year in their spare time women and girls cut out quilt blocks and pieced them together. When the quilt top was all pieced together it was then ready for quilting. Quilting means to stitch together the pieced top, filling and lining making a sort of cloth sandwich. The lining is usually a whole cloth stretched over a quilting frame. Then the filler of wool or cotton is laid on and the finished top is stretched on last. The three layers are then stitched through following lines marked on the top. Quilting keeps the filler from shifting and bunching up.
Social life in the settlements was usually very limited and some of the social pleasure of the pioneer women was due to their widespread interest in quilts. A quilting bee was a special occasion not only for women, but also for the whole family. On a warm summer day the women would rise very early to set up the quilting frames under a big shade tree out in the yard. They stretched the lining, filling and pieced top in the frames and would start marking the design on the top of the quilt.
Then women and girls of every age would gather around the quilt, happily visiting with busy fingers working. They would talk of all the important happenings such as the new minister, a new family moving into the community, the latest baby, the next marriage or a house burning. When these events happened, neighborhood women, friends and women of the church would often have a quilting bee to make the newcomers or fire victims a quilt.
At noon the women stopped to spread out their basket dinner on tables, calling in the children from their games. After putting away left over food, they would again gather around the quilting frames. The quilt was to be finished by suppertime because sometimes the menfolk came from the fields to supper and later played games, danced or sang songs. The quilting bee was a day of work and fun for all, as a social pleasure second to a religious gathering.
Quilting bees were also occasionally neighborhood or church projects as a way of raising money. Quilts for family use though, were usually quilted at home. Many women had frames set up in a room of their house or later some had smaller lap frames on which to quilt. When it was time to put a new quilt into the frame, a neighbor would come to help and sometimes stay to help quilt. Helping each other quilt made the work go faster and more pleasantly. Tongues would work as rapidly as the busy fingers.
Skill and speed in quilting could only be acquired through much practice. Quilting was a slow process especially if the quilt was to have lots of fancy designs. One of the most popular used quilting design was the feather design. Patterns of quilting are not as plentiful as designs for pieced tops of quilts. Only about eight or ten standard patterns are in general use. These designs are arranged in wavy lines and circles and when the work is well done, they are beautiful.
The finest quilts that the women had with fancy quilt designs and color coordination were sometimes taken to county fairs. The women would bring jars of jellies and jams, homemade breads and needlework to be exhibited and judged. The exhibits gave the women a chance to display quilts from new designs they had made themselves. Each hoped to win the blue ribbon for the best stitching, best color coordination and design. The exhibit aroused enthusiasm among the viewers to start a new quilt that would surely win the blue ribbon at the next year's county fair.
Mothers and grandmothers made special quilts for each child in the family for the time they would set up housekeeping, boys as well as girls. Cherished heirloom quilts were sometimes passed down to the grandaughters as a wedding gift. Most quilts were used everyday. However, the best quilts were often saved for special occasions such as when the minister or other special guests stayed overnight. Sometimes to protect the quilt an extra binding like a slip cover would be placed over the top of the quilt that would be near the face. This would cut down the number of washings needed, because though quilts are washable, washing is hard on them and they rarely look as nice afterwards.
[29]
In pioneer times and in some areas up through the first two or three decades of the twentieth century, women in rural areas had no access to nor knowledge of formal art forms such as painting and sculpture in their isolated homebound lives--nor would it have been possible for the women to have spent time on them had they been available.
But far from being artistically starved, the American woman has continually turned the producing of basic necessities into works of art, using a skill that has been traditionally hers--needlework. In addition to making rugs, crocheting, knitting, embroidering, tatting and needlepoint, perhaps the finest, most accomplished and sophisticated, as well as most widespread endeavor, was the making of quilts.
From this need she created works of artistic beauty and fine craftsmanship which at the same time afforded her a means of expression, an enjoyable individual pastime and a reason for neighborliness and social gatherings. She accomplished all this from tiny scraps of waste material.
Quilt making epitomizies the best of the American woman's pioneer spirit of conservation, ingenuity and appreciation for fine things in deprived circumstances. And the quilts they made do one more thing for us today. They give us pieces of the past.
C.R.

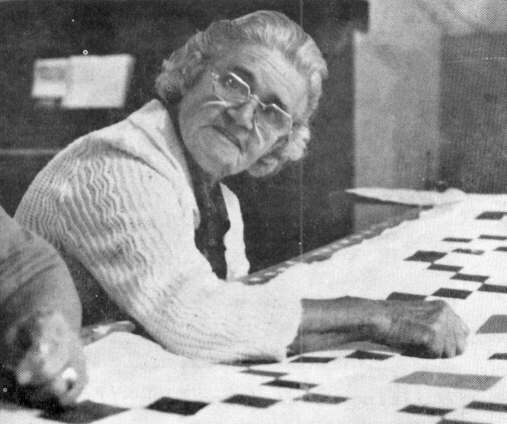
At a favorite spot Ray O'Dell spends many pleasant hours piecing quilts she will later quilt.
Piecing the Top
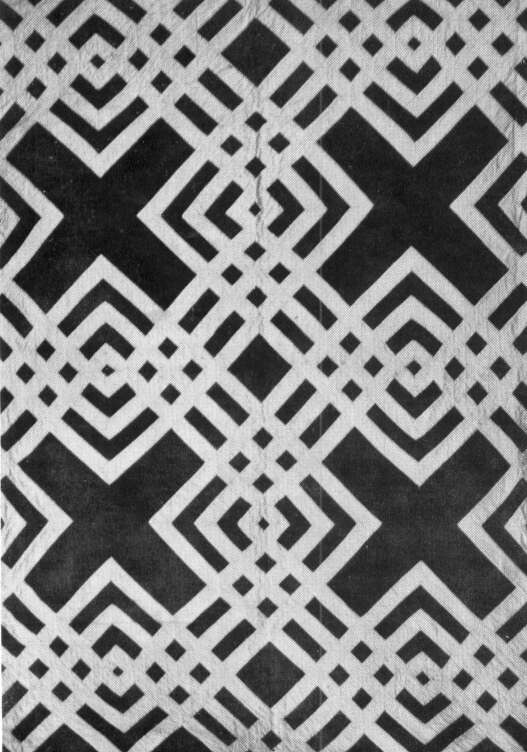
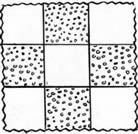
The Nine Patch quilt is one of the oldest and probably the most popular of the quilt patterns. Though there are many variations, they are all based on the basic simple Nine Patch pattern which we are describing here.
Some patterns have a variety in the size and shape of the squares, changing from the straight squares to rectangulars and to the more difficult curved sides, but most of the variety in the quilt is in the color arrangements of the blocks. There are endless possibilities for originality even within the simple square Nine Patch, ranging from a hodge-podge of colors with no pattern at all to the stylized arrangement of our quilt. Each person piecing a Nine Patch will create her own design. This is the one we created.
Since the Nine Patch is perhaps the simplest quilt to piece, it is a very good one for beginners. It is easy to piece because it is based on the square, all the seams are straight and there are only two basic sizes of blocks to cut out.
EQUIPMENT
The equipment you will need is a hem gauge, scissors, tailor's chalk, needles, thimble and thread.
The hem gauge is used to measure each seam to be sure it is exactly 1/4 inch. If seams are not all the same the block will not be square, and if the blocks are not all square, then the finished quilt will not be square either.
The scissors and tailor's chalk are used to cut out the quilt pieces.
The needles and thimble are very important parts of your equipment. You need size 7 or 8 quilting needle and a thimble that is comfortable, but not tight on your middle finger.
The thread used to piece and to quilt is a special kind called quilting thread 70. It is stronger than regular sewing thread and will not fray so badly. You will need two or three spools of thread to piece this quilt.
FABRIC
The fabric for your quilt should be all the same texture so that the quilt will be uniform and will piece smoothly. The best fabric available to use today is a cotton blend of 65% polyester and 35% cotton. 100% cotton will shrink, which means you will have to wash it before making your quilt, necessitating ironing to prevent it from being wrinkled and old looking. The polyester and cotton blend will not shrink and will not wrinkle since it is permanent press.
In earlier years women used what material they had from left-over scraps. As manufactured material became available, they began to purchase white and solid colors to set the blocks together, but they rarely thought of purchasing all the fabric needed. The real reason for piecing the top in the first place was to use up scraps on hand. Today, however, quilt makers often purchase all their fabric to make the quilt.
[31]
To piece a 72" x 96" quilt following the Nine Patch pattern described here you will need the following solid colors:
Fabric for Nine Patch
1/2 yard each of 3 colors for piecing the blocks (we used olive green, maroon and orange)
3/4 yard of a 4th color for piecing blocks and for setting them together (we used gold)
11/3 yards of a 5th color to set the blocks together (we used brown)
It is advisable to purchase all of the solid colored fabric at the same time to ensure that the colors will be the same. It will not matter so much on the print, unless you plan only to use four prints.
In addition to the above, you will need print or figured fabric to coordinate with the solid colors. A very good place to get the print is from scraps of new fabric Left over from garments that you have made, if you sew, or if not, perhaps from a friend or relative who does. This will also give a quite interesting variety to the quilt. If you wish to purchase this material and use only 4 prints, you will need 1/2 yard of each. Remnant counters are excellent places to find material.
This complicated Carpenter's Square quilt was pieced in 1860's by Lizzie O'Dell. All corners are mitered.
PATTERN
There are only two sized blocks needed for this Nine Patch pattern--a 3 1/2 inch square and a 9 1/2 x 3 1/2 inch strip (used for setting the blocks together). The two patterns should be cut out of a thin stiff cardboard. Some women use a piece of sandpaper for the pattern as it will stick to the material and keep it from slipping. Make several of each pattern piece because the pattern edges become frayed from marking and they become incorrect in size.
CUTTING
Press all fabric smooth. Pull a thread on the edge of the fabric to get it straight and trim away uneven edges. Also cut off the selvage. It will not stretch the same as the rest of the fabric and will make your quilt top pucker if it isn't removed. It is also harder to sew through. Place the square pattern on the wrong side of the fabric, keeping it with the straight grain of the fabric. Trace around the pattern with the tailor's chalk. Trace 10 or 15 square before cutting them out. Cut with sharp scissors, or if you have them, use pinking shears to keep the edges from fraying.
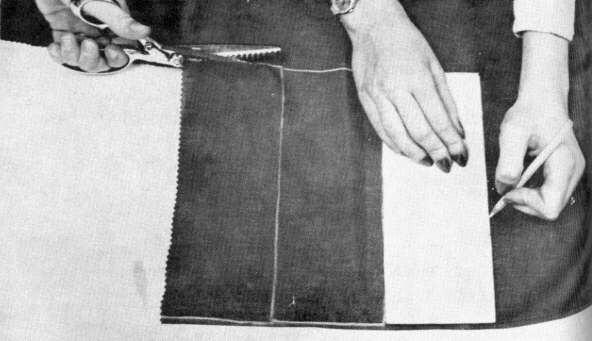
The pattern is marked on the fabric with chalk and cut out with pinking shears.
Cut 40 squares of each of the 4 solid colors and 40 squares of each of the 4 coordinated printed colors. This will give you a total of 320 squares--160 print and 160 solid. When these are sewn into strips 9 squares to the strip they will equal 35 large blocks.
After cutting the squares, place them in a safe dry place. Different people have their own ways of storing their pieces. One good way is to place them in a flat rectangular suit box with each color and design in an individual stack. With this plan you can readily get any color and its coordinate.
This shows how to piece the brown strip on the block. Note the tiny running stitches.
A suit box makes a handy place to store the cut-up quilt blocks until ready to piece together.
Hands keep busy piecing quilts to give to children and grandchildren.
PIECING
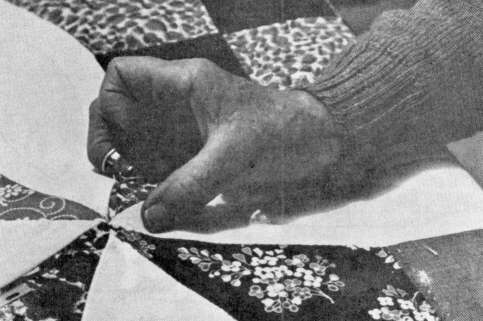
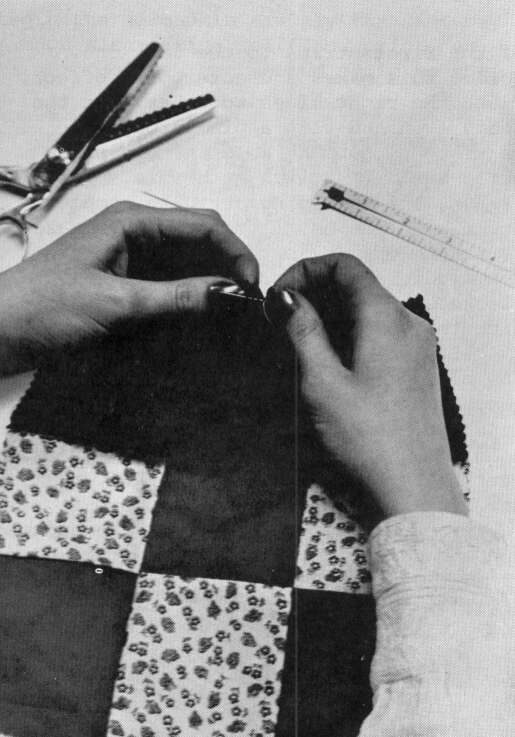
To begin piecing place right sides of a solid and a coordinated colored print square together. Hold firmly together and with a needle threaded with a single thread, make tiny running stitches 1/4 inch from the edge of the fabric. Begin with a small knot in the end of the thread and end with a few back stitches. Be sure the seam is straight and edges are even. Press seam open.
To complete one strip of the block sew another solid square to the other side of the print square right sides together as before. (See opposite page for steps in piecing the Nine Patch from first 2 pieces to finished quilt.)
Repeat the same pattern making two identical strips. Now make another strip reversing the pattern, putting a solid square in the middle.
[33]
Sewing the three strips together to make a square is the next step. Sew one of the first strips to
the last one. Notice this makes a checkerboard effect. Place the right sides together, get the seams
even and slip a pin through the seams to be sure to hold them in place while sewing. Stitch as
before. Then sew on the remaining strip to complete one block. Press all seams open. Make 17
more blocks with the solid block in the middle like this and then make 17 blocks with the solid
and print reversed, with the print in the middle.
 |
 |
 |
 |
 |
 |

The step by step process of piecing a Nine Patch, from the first square to the finished quilt.
It is very important when setting the blocks together that the seams match exactly. If the blocks are cut true and are sewn with exactly 1/4 inch seams, the seams will match. But when putting the blocks together, always match the seams first and if there is any irregularity, let it be on the end where the extra material can be trimmed even. Seams matching exactly give straight lines to the quilt patterns. Every block that is not true will show.
After completing all 35 blocks, you are now ready to begin setting the blocks into quilt length strips. First these pieced blocks are set together with the rectangular blocks (9 1/2 x 3 1/2") of a basic coordinating color not used in the blocks (we used brown), and 3 1/2" squares of one of the solid colors used (we used gold).
[34]
Cut out 58 strips 9 1/2" x 3 1/2" and 24 of the 3 1/2" squares just as you did the first blocks.
To set the blocks together sew one brown rectangular strip on the left side of the first block. Next sew a gold square to the left of another rectangular strip. Now sew this strip to the bottom of the pieced block. This is one complete block. You will need 7 of these to make one strip the length of the quilt.
Continue sewing the strips and square to each block and then sew these blocks together until the first strip of 7 blocks is complete. When setting the big blocks together into the long strips, alternate blocks with solid and print patterns in the center. A rectangular strip is not sewn to the top or bottom of the first or last blocks in the strip because the border added later when the top is all pieced makes the pattern symetrical.
After you have finished one strip, begin the second in exactly the same way except alternating solid and print centers. Then sew the second strip to the left side of the first strip, continuing until all 5 strips are together. Do not sew a brown strip or gold square to the left side of the last quilt length strip because the border will go there.
To stagger the colors and achieve a pleasing effect, before you sew the blocks together, lay all of the individual blocks down on the floor or on a large surface to determine which pieces to sew together. Be careful not to put two of the same color together. When the pieced blocks are arranged in the design that is pleasing to you, pick them up in order and stack in piles so that you can sew them together in that order.
When you have sewn all 35 blocks together, next sew the border to all 4 outer edges of the quilt, mitering the corners. The quilt we describe could be finished with a 3 inch border of brown all around. But there are a great variety of borders you can use. Each plan will make your quilt unique.
You have your quilt top pieced.The next step is quilting.
D.F.
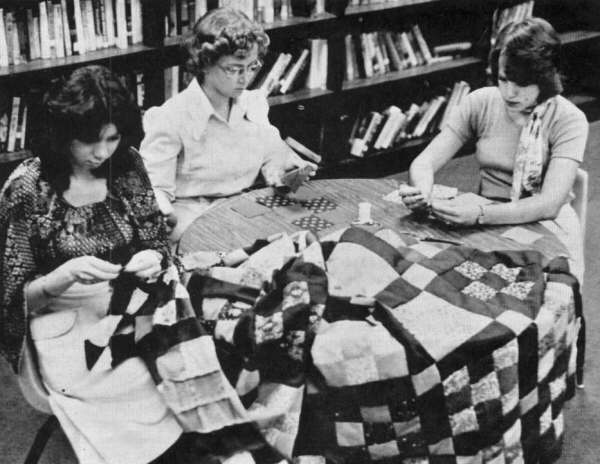
Quilt making has always been a favorite occupation for some young women. Here Caryn, Teresa and Diana are continuing the tradition.
[35]
The QuiltingQuilting has been practiced for hundreds of years. In the earlier years during the warm summer the women and girls would quilt their petticoats as a protection against the drafts of cold air in the winter. They quilted backs of chairs, fireside benches, and coats as well as coverlets for the bed. The quilting is necessary to hold together the three layers of cloth used to insulate against the cold. But as the tops were beautiful as well as functional, so was the quilting decorative no matter what pattern was used. Many quilts were quilted With rows of stitches in horizontal and vertical lines (or diagonal lines) without regard to the pattern of the top, or the quilter could follow the pattern of the top, quilting inside each block.
More ambitious quilters created fancy quilting patterns to fill the larger solid blocks set between the pieced blocks. Usually the same basic pattern was repeated in every block, but sometimes quilters would put a different design in each block.
The finest quilts are prized not only because of the beautifully pieced together colorful top, but for the underside which has a less obvious, but just as ornate design created by thousands of tiny running stitches. The appeal of the quilting is enhanced by the three dimensional effect the soft filling creates as it fluffs up in the spaces between the tight stitching.
Today to save time, more and more women are quilting by machine, but there still remain a few who share the self-pride that their mothers and grandmothers had in being able to create something by hand that was of use to their family. Therefore, we have written the following directions for the growing number of people who still wish to learn to quilt by hand.
MATERIALS NEEDED
lining slightly larger than the top
quilting frame
one roll of cotton or polyester batting
C clamps pins
quilting thread 70
quilting needles size 7 or 8
thimble
scissors
Years ago the lining or back of the quilt was often unbleached muslin or domestic homespun. For a warmer cover wool was sometimes used. When they became available, some women purchased broadcloth or finer muslins for the lining. During the '30's, '40's and '50's, the days of cotton feed sacks, many women sewed four of them together to use for the lining of their everyday quilts. Preferably the lining should be in one piece and should be slightly larger all around than the batting and the top. Most people prefer a solid color, usually white, though beautiful effects are created with colored backs. This way the quilting design is on the top and bottom--a multicolored design on one side enhanced by the quilting and a single color on the other emphasizing the quilting. But women supplying the needs of a home have always been resourceful, and, though they might prefer a fine muslin backing, realized print feed sacks or the earlier flour sacks would be just as functional. Since quilts were made basically for use, the backing was made of whatever was at hand.
The batting or filler was used originally to add a third thickness to the quilt--an insulation which would add more warmth and comfort. The batting itself was often wool which was home produced and hand carded into a fine thin layer which was then spread over the lining of the quilt. Some people grew cotton and made carded cotton batts for the filler instead of the wool. Later most quilters bought the prepared cotton batting stocked in country stores and available from mail order houses. Today polyester filling available at most fabric stores is used more than cotton mainly because it can be quilted more easily.
[36]
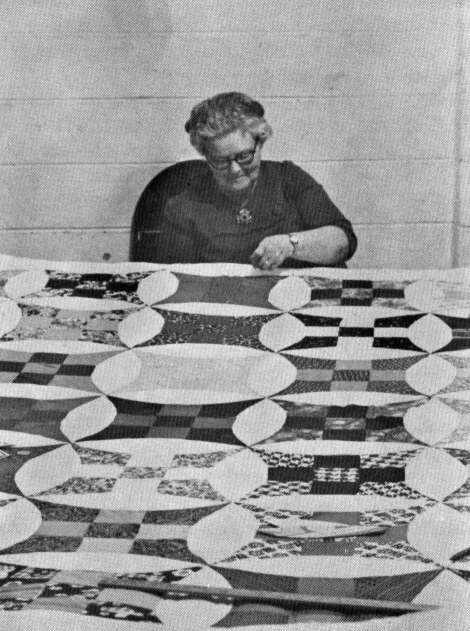
The ladies at White Oak Pond Cumberland Presbyterian Church quilt every Thursday. Here they are just beginning work on an Improved Nine Patch.
After the top is completely pieced, the three layers are then ready to go into the frame.
THE FRAME
The purpose of the frame is to stretch the three layers together tightly while the quilting is being done. The frames are usually nothing more than four narrow boards, 1 x 2's or 1 x 4's sometimes with holes drilled every 3 or 4 inches. The most common lengths are two 103" long and two 72" long. The four sides are placed at right angles in a rectangle clamped together with C clamps or some other means. When the frame is put together, it then can be placed on handmade stands or even on the backs of four straight chairs. Another way of positioning the frame is by screwing four hooks in the ceiling of a room and running ropes down to each corner of the frame. This way the frame can be lowered to working position or raise to the ceiling out of the way.
Another type of quilting frame is the lap frame. This type can be purchased from hardware stores or mail order houses. The lap frame works in the same way as an embroidery hoop does. You can move the quilt to the area you want to work on and clamp on the outer rim to make the tension for quilting. It comes on a stand with adjustable frame for tilting to a comfortable angle. It can be moved and stored easily unlike the other type of frame. Before using this kind of frame you must baste together the three layers all over.
STRETCHING THE LINING IN THE FRAME
When putting the lining in the frame, it is important to get it stretched evenly and squarely, for it is the basis of the quilt. The filler and top are fastened to it. If there is a right and wrong side to the lining, put the right side down.
There are two methods of fastening the lining into the frame--dewing it in and pinning it in.
[37]
To sew the lining in you will need some kind of heavy thread or thin cord, and a big needle. With these you whip the thread through the lining and through the holes drilled in the frames. Secure the long length of the lining to one of the side frame pieces first, stretching it as tightly as Possible. Then secure the lining on the other side. This can be done on a table. Now clamp on the end pieces with C clamps forming the rectangle. Then stretch and fasten the ends of the lining to the frame. (For more detailed directions see "Tacking for Comfort," Vol. I, No. 3, pp. 43-47.)
If you wish to pin the lining in the frame, you wilt first need to tack a long narrow strip of sturdy fabric along the four pieces of the frame. Then spreading out the lining inside the frame, pin the edges of the lining to the fabric on the frame.
After the lining has been sewn or pinned into the frame, roll out the batting on top of it. The batting is stretched carefully and pinned onto the lining all around the edges. You pin the batting onto the lining even if you sewed the lining onto the frame. Extra heavy pins with big heads hold well and are easy to remove later when the quilting is done; however, they are harder to pin through the thick layers.
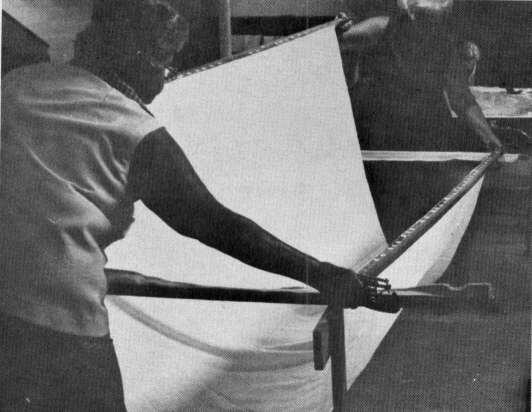
Next spread the pieced top right side up over the lower two layers. Stretch the top carefully and tightly across the whole, pinning the edges onto the batting and through the lining. The hundreds of seams on the top make it essential to stretch the top very carefully to have a smooth, unpuckered top to quilt. After pinning the top all the way around, you are ready to begin the actual quilting process.
C clamps are great for holding the frame together.
Esther Griffin quilts her Flower Garden quilt on a lap frame. The three layers have to first be basted together to hold them in place for quilting.

To put a quilt in the frame first pin each side onto the longer quilt frames.
Place the sides on the ends and clamp.

Stretch and pin ends tightly.
Pin top over filling and lining.
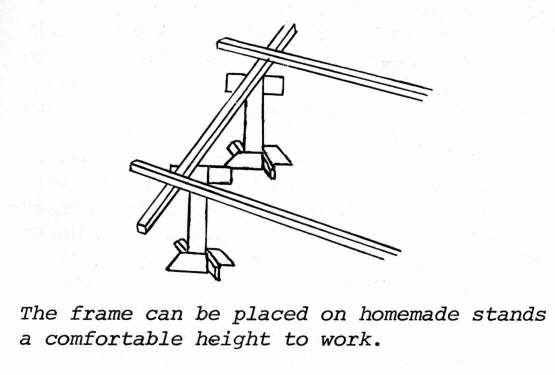
The frame can be placed on homemade stands a comfortable height to work.
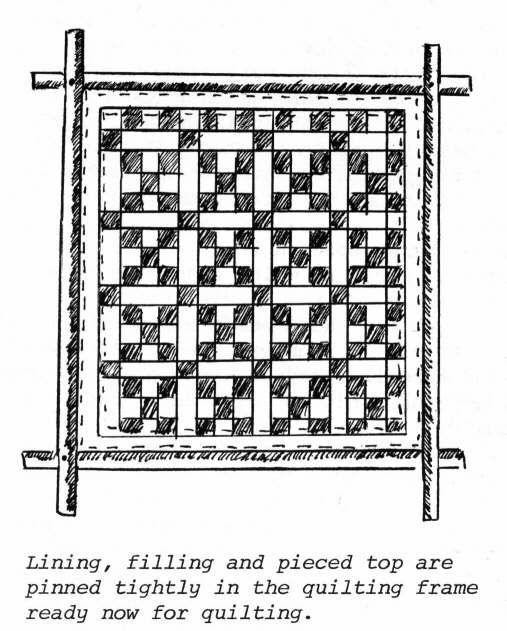
Lining, filling and pieced top are pinned tightly in the quilting frame ready now for quilting.
THE QUILTING
The quilting can be done by home sewing machines or by hand. The quilt that is quilted by hand tends to be more creative than the one quilted by machine, because the designs can be more ornate and varied than is possible on the machine. Quilting on the machine is a skill all its own, requiring a special head to accomodate the huge quilt and frame. Obviously the quilts of long ago were all hand quilted. Even today hand quilted ones are preferred.
[39]
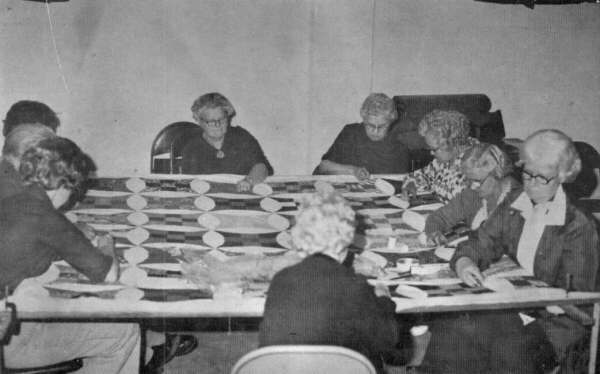
The length of time it takes to quilt a quilt depends on many factors--the size of the quilt, the closeness of the rows of quilting, the number of people who are quilting and the skill of the quilters. The ladies at White Oak Pond Church, who quilt every Thursday to raise money for the church, can quilt one in about twenty-five hours with about eight or nine working together. Ray O'Dell and her sister working together when they were in their seventies would quilt one in a week to ten days working each day until they tired. Bending over and reaching to quilt would make the shoulders ache. Fingers would get tired and the women would be forced to stop because their fingers would get sore. They would prick their thumbs continually on the point of the needle as they use their thumbs to guide the point of the needle to make the tiny stitches. They would sometimes put tape over their thumbs to protect them, then rub them with vaseline afterwards. The ladies at White Oak Pond Church toughen their fingers with rubbing alcohol, which also acts as an anticeptic for the needle pricks.
But all these women are accomplished quilters. An inexperienced quilter would find herself spending three or four times that many hours to quilt an average size quilt.
The choice of needles and thread is important. The short strong needles makes taking tiny stitches possible and the special thread is stronger and does not tangle as much as regular sewing thread. Use special quilting thread 70. Depending on the size of the quilt and the closenss of the quilting, it takes from 250 to 500 yards of thread. Women who quilt for others charge by the yard of thread used.
When the quilt is stretched and all supplies are ready, it is time to mark the quilting lines or patterns. However, some prefer to mark the pattern before it is stretched.
Many geometric quilt patterns like the Nine Patch and Flower Garden need no quilting pattern for the quilter usually stitches just inside each piece. Sometimes quilters draw lines making squares or diamonds, circles, ovals or fans across the whole quilt. Sometimes they use a fancy pattern to get a more artistic design on the quilt. A popular pattern is feather quilting.
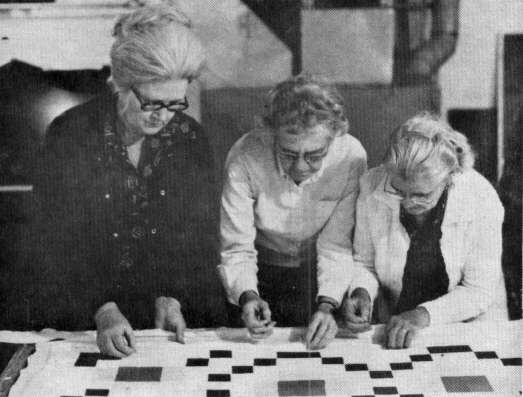
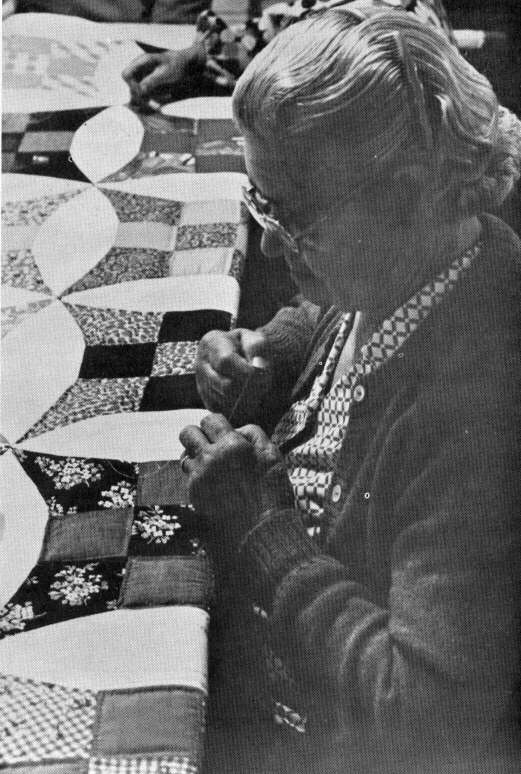
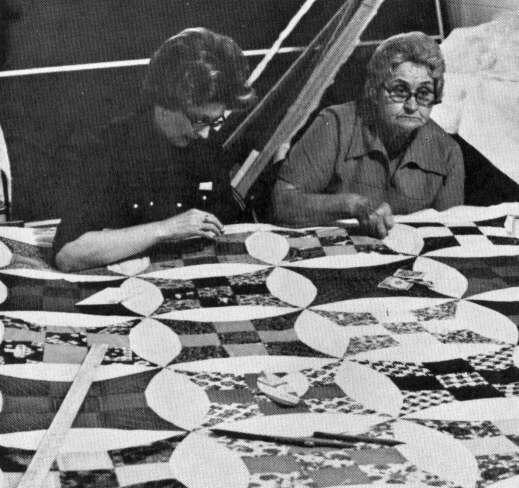
Visiting and working together at quilting.
Letha Simpson
Linda Lewis and Vina Griffin
[40]
Lillian O'Dell

Irene Strickland
Letha Simpson
Margaret Scott.
To mark the over-all quilting lines on the quilt use a hard leaded pencil and a yard stick. Mark the entire quilt before beginning. Since it takes so long to quilt, pencil is used instead of chalk which would soon disappear, but be careful not to mark too dark or the lines will show after the quilting is done.
Quilting patterns can be purchased at fabric stores and transferred to the quilt. To transfer the pattern, cut it out first in cardboard, lay it on the block and mark every line you intend to quilt.
To quilt the Nine Patch, or other simple geometic designs that you do not need to mark, begin in one block about arm's length from the edge of the quilt 1/4 inch from the seam. Make a small knot in the end of the thread, put your needle in the top right corner of the right hand square (if you are right handed). Pull the knot through one layer of cloth to hide it. Then quilt parallel to the quilt's edge taking as many tiny running stitches as you can get on the needle. A good quilter can get about seven or eight stitches on the needle. Be sure each stitch goes clear through all three layers.
[41]
Continue quilting, always keeping 1/4 inch from the seam across the block until you reach 1/4 inch from the first vertical seam of the next block. The best quilters do not quilt across the seams, but slip their needles under the top between the layers to come out 1/4 inch on the other side of the vertical seam on the next block. Continue quilting this same line until your thread runs out or you have gone as far as you can comfortably reach. Then fasten the thread with two back stitches on the last stitch and draw the remaining thread on the needle under the top layer. This leaves no thread ends hanging.
Retread the needle and quilt the next horizonal row nearer you. When you have quilted all the horizonal rows you can reach, then quilt the verticle rows in the same manner, reaching in as far as you can comfortably quilt and work toward you. When you have quilted this entire area, then move your chair to another spot and continue.
ROLLING THE QUILT
When you have quilted all around the frame as far as you can comfortably reach, you need to roll the quilt. When starting to roll, take the pins out of the batting and lining on the side you are rolling (they are no longer needed as the quilting holds it securely), and remove the string or pins holding the quilt to the cross frames as far as you have quilted. Then with one person on each end of the long frame piece, remove the two clamps and roll the quilt inward, turning under the part already quilted. Fasten the frame onto the cross frames again with clamps. Then continue quilting. Most quilters quilt on both sides of the frame until they have enough to roll under. Continue quilting and rolling until the whole quilt has been completely quilted and is ready to take from the frame.
To remove the quilt from the frame unroll the quilt to its original size, unpin all the pins and remove all cords holding the lining, batting and top to the frame.
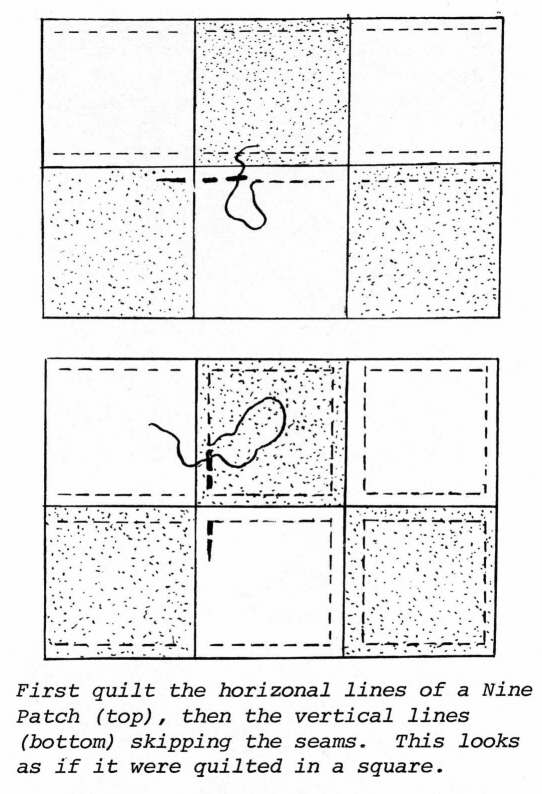
First quilt the horizonal lines of a Nine Patch (top), then the vertical lines (bottom) skipping the seams. This looks as if it were quilted in a square.

When quilting is finished, unroll quilt from frame.
The quilting is now done, but the quilt it not completely finished for the edges are still raw. There are several ways of completing the edges. Many prefer to put a decorative bias binding of a coordinating color all the way around. To do that first trim so that all layers are even. Usually the binding is sewn through all three layers from the top by hand (or with the sewing machine), and then turned and whipped by hand onto the lining.
Now the quilt is completely finished, a useful and beautiful creation from otherwise worthless scraps of material.
T.M.

Above--Eppah Humphreys and Ida Fike unpin a finished quilt while ladies in the background begin a new one.
Below--Fancy quilting patterns decorate large white blocks. These patterns are harder to quilt, but give quilts a beautiful effect.

Drawings for this article by Teresa Maddux, Alexa Hoke and Nancy Honssinger
[43]
Copyright © 1981 BITTERSWEET, INC.
Next Article | Table of Contents | Other Issues
