 |
Volume IX, No. 1, Fall 1981 |
RAIL FENCES
THEIR HISTORY AND CONSTRUCTION
by Todd Waterman
Drawings by James Heck
Opposite photo by Allen Gage
Whether we live in a populated urban area today or settled on a piece of farmland a hundred and fifty years ago, one thing we have in common is building some kind of fencing to separate our land from others and to protect our plants, whether they are petunias or corn, from the neighbors animals.
Ironically, rail fencing, costing only the farmer's labor and once used extensively by settlers in the forested regions, is now paid for handsomely and used by urban dwellers. Years ago rail fences were everywhere in the country, but there were very few rail fences in town where people preferred fences built of pickets, iron work or other more elegant materials. Now a modern farmer seldom builds a rail fence, while many city families prize them for their natural beauty.
In his fence building the early farmer was not in the least concerned with appearances, but only with utility. He built fences of rails because before the invention and widespread marketing of barbed wire, he could not have afforded any other kind. Using simple tools he already had, one man alone could build a rail fence from trees growing on his land. The fences he built were not dangerous to stock, and without needing any bracing, they were too strong for stock to push over.
With all these advantages, why did most farmers quit building them? There were several reasons. Their construction was time-consuming work, demanding hard physical labor. Rail fences needed constant maintenance and repairs. They took up more land than wire fences, and they often burned down. When barbed wire became available and farmers' incomes increased, fencing with rails declined. But for many years until the early 1900s, every farmer regularly split rails and built fences to protect his crops. Most older farmers in the Ozarks today used to build them in their younger days, while a very few still make and use them for their own special needs or to fill the growing demand of city people.
"There are two types of rail fences," Ova Young explained. "There's one that is self-supporting and one that you drive posts. The self-supporting fence is where there are zig-zags, or angles. You see when you 'x' or cross the rails, it's self-supporting. You don't need any posts. But if you make a straight line with rails, you have to have posts to support them. Many people would drive a post, some would drive two posts, one on each side and lay the rails between them."
Today a farmer builds a fence to contain his stock. Not so in earlier days. Jim Chastain said, "You fenced the corn crop or the hay crop in and everybody's cattle out." Before the stock law took effect beginning about 1928, crops had to be protected from free-ranging stock.
The stock roamed freely with bells clanging around their necks. Each farmer knew the particular sound of each animal's bell and could go to the animal when it was time to bring it in. Therefore, with all the stock in the community running loose, the farmer had to build fences around his crops. Often he would plant his crop, then build the fence around the plot before it came up.
Some farmers in the Ozarks would cut their timber for rails between the months of July and September because they believed that if they cut while the sap was up, that worms and insects would not infest the wood. Other farmers preferred to cut and split the rails in cooler weather. Ova said, "It's best to cut the rails in the winter or early spring. If the timber is frozen, it splits better." Also the winter was a slack time. Many farmers worked in the woods all winter cutting rails and other timber products for their own use.

[5]
When the time came for the farmer to cut the timber for his rail fence, he would sharpen his crosscut saw and his chopping ax and gather up or make a number of wedges and a maul.
Many of his tools were homemade, especially his maul and wedges. Often without the money to buy an iron splitting maul to drive the wedges, the farmer would make one. He carved a mallet and handle in one piece from a block of wood about two and one half to three feet in length. Ova explained how to make the wooden maul longer lasting. "The old wooden wagon wheel had an iron band around the outside about two inches wide. You would whittle down a white oak block of wood about six inches in diameter until it was about the size of the outside of the band. Then you built a fire and heated that band red hot to expand it. Then drop it over the head of the maul, stick it in water and the band would draw together so that the maul wouldn't split. That way you had a maul that would last you for a long time."
The type of maul was also convenient because the materials to construct a maul would be readily available. A farmer who broke his mallet could stop work and construct another one. Although this was a time-consuming process, it would save the farmer from having to buy a steel splitting maul.
The iron wedges were also costly and farmers often made a substitute. They made a makeshift tool, called a glut. From a sapling they cut out a section about the length of an iron wedge, sharpened it on one end in the fashion of a wedge so that they could drive it in the log to split out the rails. A glut had another advantage besides the lack of cost. Often the iron wedges were not large enough to open the log enough to split it. Sometimes the steel wedges became embedded in the log instead of splitting it open. In this case the farmer used the glut, which he made wider than the iron wedges, to open the log and remove the wedges.
In the Ozarks rails were most often cut from black oak, post oak, or white oak, but any hardwood would be useable. Most farmers shied away from softwoods because of the difficulty involved in splitting most of them. Even though there are some softwoods that will split, the rails, not having the longevity of the hardwood rails, would soon deteriorate and need replacing.
Carl Lee makes rails on commission and to fence in his milk goats. He uses any kind of hardwood, but he doesn't use just any size of tree. The typical tree that he cuts and splits into rails is about seven to ten inches in diameter on the small end. A tree this size yields four to six rails of favorable size. Any tree larger than this, according to Carl, will produce rails that would be of correct width on the barked side, but too thick from the bark to the pointed end. (Ill. 1) It is more desirable to have equal proportions on each of the three sides, the optimum width of each side being four to six inches. "Anyway," Carl said, "a tree larger than ten inches in diameter on the small end could be cut and sold for a saw log."
Although Carl uses only trees that he can split four rails from, years ago farmers used larger sized trees. Ova said, "If you're splitting rails and it's good timber, the bigger the tree the faster you can split them." He remembered the time when most of the Ozark timber was virgin timber which was a great deal larger than the seven to ten inches in diameter trees used today.
After choosing the trees, years ago two men laboriously cut them down by pushing and pulling a crosscut saw. Today, Carl, Ova and others making rails use chain saws which are much faster and easier. Old timers felled the trees and, with a chopping ax, trimmed off the limbs up as far as the length of the rail--eight, ten or twelve feet. Some good trees might have a trunk tall enough to cut more than one rail length. Carl said that he usually cuts about a foot off from the bottom of the tree to remove the flare at the trunk. Removing this made the widths of the ends of the rails more uniform, thus making the fence more level. But years ago it wasn't likely that many farmers would have gone to that extra effort simply for the sake of making the fence a little more level. They corrected that by switching the rails, putting the big end of one rail on top of the small end of the rail below it.
[6]
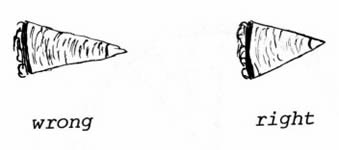
Splitting Rails Ill. 1--Rails should be almost equal proportions of four to six inches. The drawing on the left shows a cross section from too big a log. The one on the right is better proportioned.
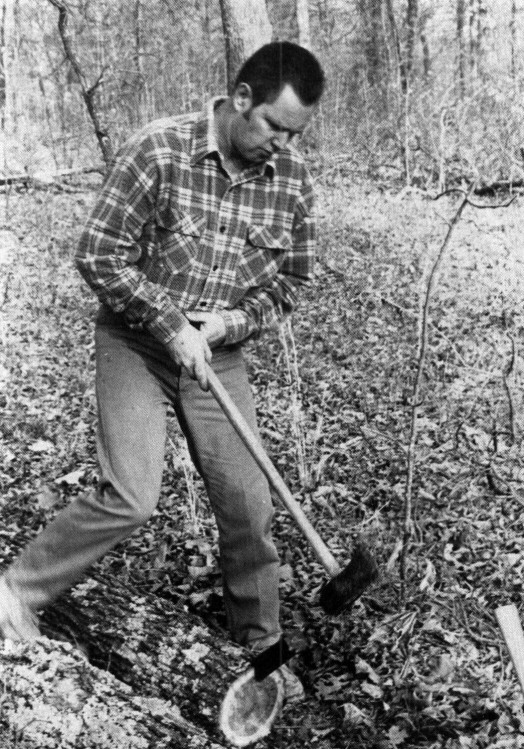
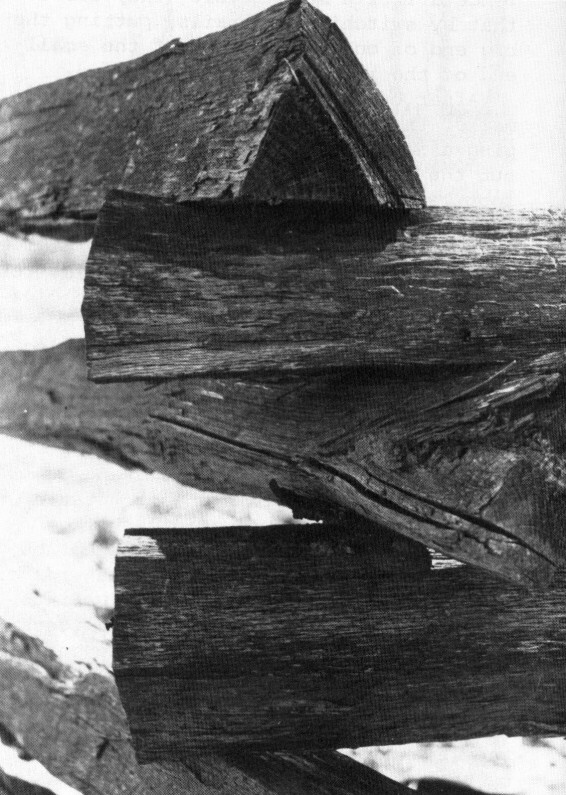
Carl Lee begins splitting a log by driving in a wedge with a splitting maul.

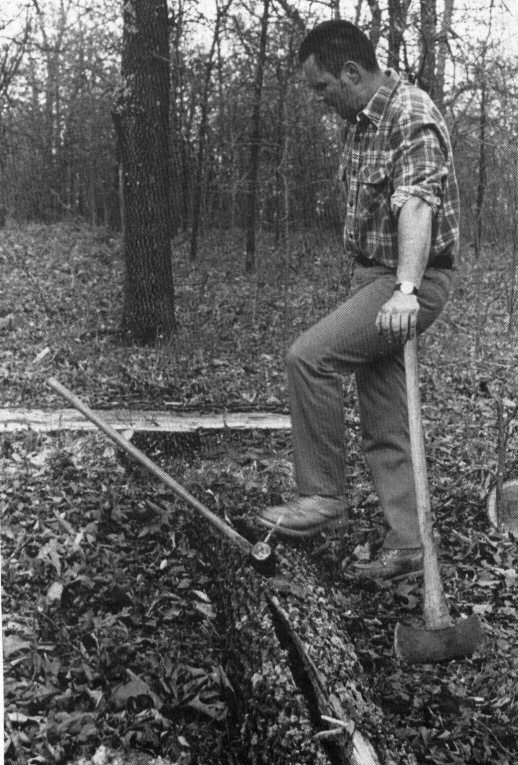
He moved the wedge down the log to keep the split down the center.
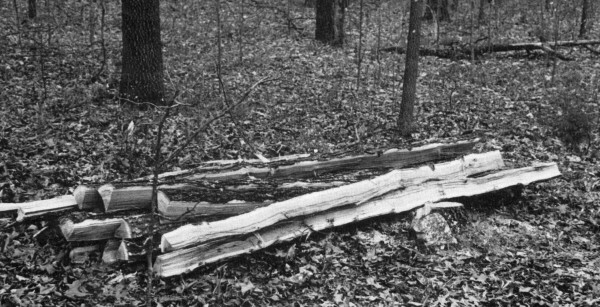
The log is almost split open. Photos by Linda Lee
[7]
Ill. 2--Years ago there was a lot of big virgin timber in the Ozarks. A three foot diameter log might be split into many more than six rails. This diagram shows how it might be split into forty-eight rails by splitting first into eighths, and then splitting the eighths into still more splits.

Carl uses the chopping ax to cut loose the slivers which are still holding the long together after he has split it open with wedges and maul.
A pile of freshly split rails. Photos by Linda Lee
After cutting down the tree, farmers marked the log into rail lengths by chopping a notch with the chopping ax. They cut the rails into eight, ten or twelve foot lengths. Some preferred the eight foot rails, especially in rough timber because shorter lengths were easier to split. Others preferred longer rails for they believed the longer span would give a more solid fence.
The next step was to split the log in half using the wedges and maul. Starting at the cut end, the farmer drove the iron wedge into the small end of the log. Some people say that the log splits easier if started at the small end to prevent the split from running out the side. Driving the wedge into the log causes the log to begin to split up its length. To avoid running out the side of the log, Carl drives another wedge into the log ahead of the split. He directs the split by setting the wedge to one side or the other of the crack. As he drives in the second wedge, he removes the first wedge and replaces it ahead of the second. Again he directs the split by the placement of the wedge. When the log splits into halves, he uses the chopping ax to cut the slivers that usually hold the two halves together. Cutting the slivers requires little effort or skill. The only thing to be careful of is to avoid hitting the embedded wedges with the blade of the ax.
After halving the log, Carl halves each half again in the same fashion. If the tree were of a smaller size (approximately ten inches in diameter) it would need only to be quartered, or split into four rails.
Most of the trees presently growing in the Ozarks are of the size that they yield only the four rails, one from each quarter. But years ago many of the virgin trees were two, and three feet and even more in diameter. Splitting rails from trees of this size was much more complicated. After the tree was quartered, each quarter was split in half. These eighth sections were split again, only this split would be at right angles to the other splits. Instead of splitting from the center out to the bark as in the other splits, the section was split parallel to the outside bark. (Ill. 2) Depending on the tree size, it might take two or three of these splits parallel to the bark across the section. Each chunk cut from the section should be four to six inches wide--the same width as rails cut from the smaller tree. The triangular shaped piece next to the heart of the tree is a completed rail, but the chunks toward the bark had to be split again in the same direction as the radius. As before, each piece should be about four to six inches across the wide side. As illustration 2 shows, one rail length of a tree trunk three feet in diameter might split out forty-eight rails.
After splitting out the rails, the farmer would not spend the time to remove the bark, which would usually fall off within a few months.
Cutting trees that yield four rails, and using a chain saw instead of a crosscut saw, Carl said he can cut one hundred rails in a day. But even with power tools, he said, "You can't spend much time sitting in the sun."
Splitting rails looks easy, but it takes practice unless one has grown up with an ax in his hand. Ova said, "It's a trade of its own. You have to know where to set your wedge, how to set it, when to hit it, where to hit it, and when to use a wedge and when to use an ax."
Experienced hands with an ax, like Carl who makes hundreds of rails each year, say it isn't too hard to learn. Carl said, "Actually it doesn't take a great deal of intelligence to split rails after you've seen it done a time or two. The only trick to it is getting your wedge to go toward the center of the tree. Even people that are very good at rails, they lose them occasionally. You just can't tell how they're going to go. That's all right. They make good firewood."
When the rails were made, the farmer would pile them up with something between them and the ground, unless of course, it was time to build the fence. The rails do not have to dry before using them.
[9]
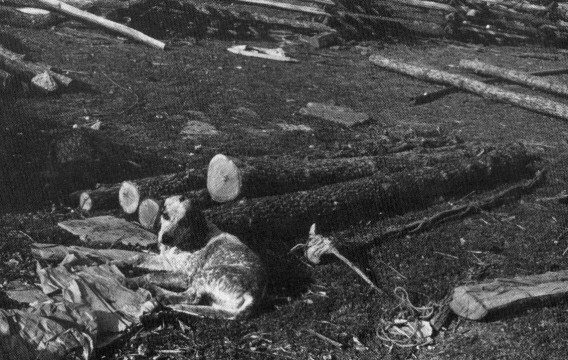
To build the fence the farmer needed more than just the rails, for there was more to it than simply stacking up the rails one on top of another. First he had to stake out the fence row. For this some cut a sapling about two or three inches in diameter and five to six feet long. Then with the chopping ax, they would strip the bark off of two opposite sides of the sapling to reveal the light colored wood below, making the pole more visible. They jabbed these poles into the ground along the desired fence row about sixty feet apart, or closer if the fence line ran over a hill. They jabbed the first pole in the ground at the beginning point. They placed the second pole at the other end of the fence row. To get the straight line between the poles, someone held a third pole between the two poles, while another person, squatted beside the first pole. He sighted down the line, motioning to his partner either to right or left, to get the pole lined up. That pole was then stuck in the ground. The other stakes to mark the fence row were set in the same fashion. This line dictated the point of the angle of either the inside of the fence or the outside. When using poles in this fashion, there was no need for ropes or strings.
Although this was the most common method, farmers in more recent years or farmers building a shorter fence, would sometimes use a string or rope to mark off the fence row. The string would be stretched between the two end poles. Strung low to the ground, it also would mark either the projected inside or outside of the fence.
Now the farmer was ready to use the rails. At the beginning and end of the fence row where it butted up to a gate, a building or a bluff there needed to be some way of keeping the ends of the log stacked on top of one another. At this point they weren't anchored by other cross logs and cattle could easily knock them down. One way of securing the end rails was by driving two posts into the ground about six inches apart and placing the ends of the first panel of rails between them. A panel was one section of rails however long the rails and however high they were stacked.
Next the farmer had to lay the bottom layer of rails, called the ground worm. The ground worm was a layout or foundation of the actual fence. To do this he would lay down the first rail, putting one end between the posts. He would lay the next rail on top of the other end of the first rail at an angle to the first, leaving a four to eight inch overlap on each rail. He would lay each succeeding rail on the ground worm on top of the one just positioned in a zig-zag fashion the entire length of the fence.
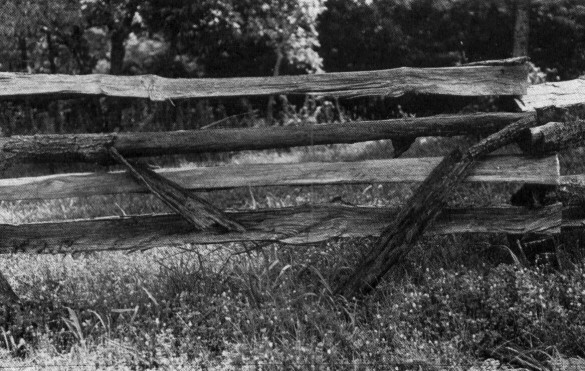
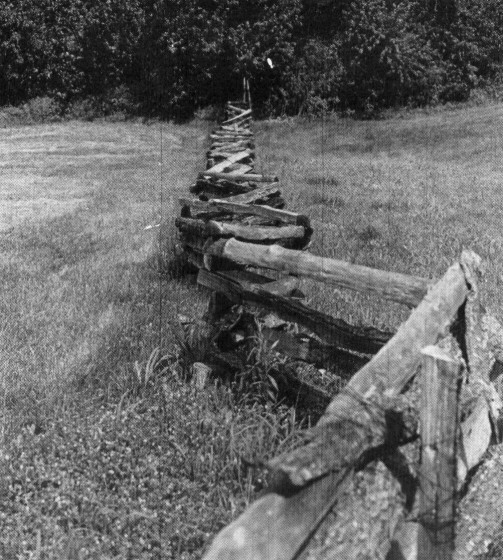
Rail fences cost only labor. Stacked on one another in zig-zags, they are stable without posts or nails.
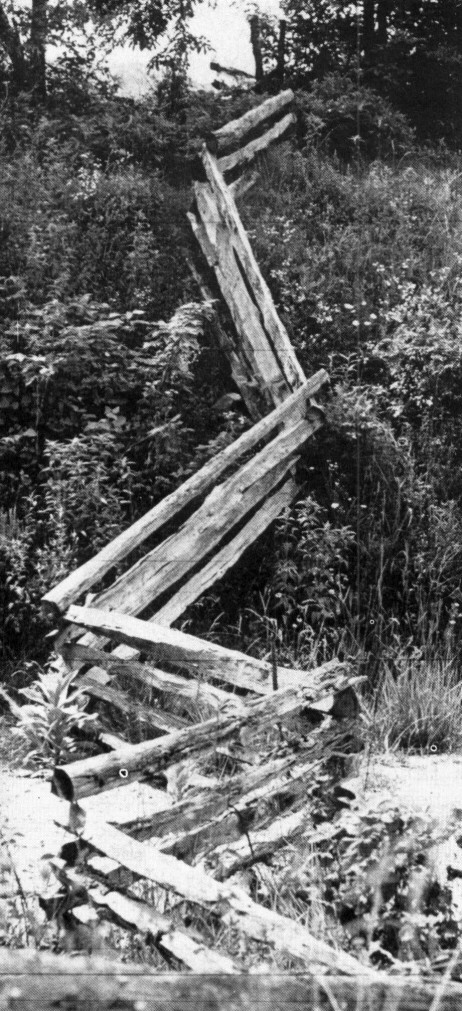


Even after deteriorating , they can be used with barbed wire. Photos by: Allen Gage, Linda Lee, Ruth Massey, David Massey.
[10-11]
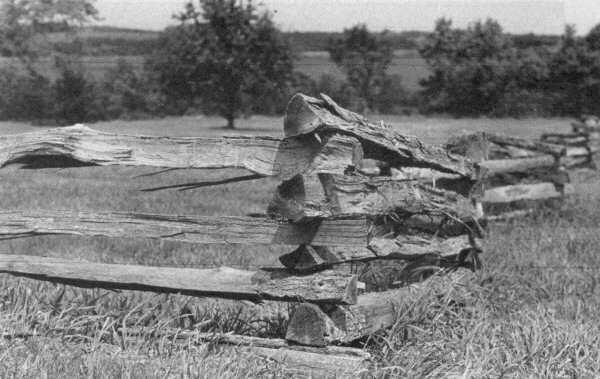
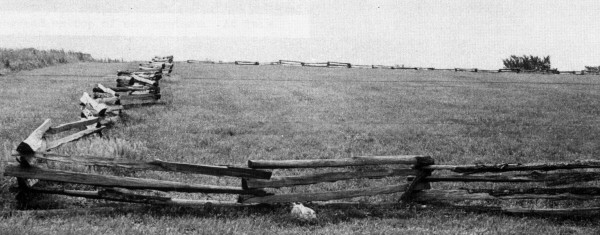
A panel of a rail fence. The bark falls off soon, so there is no need to strip it off before.
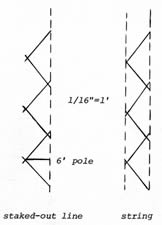
Ill. 3--From the staked-out line, some farmers used a pole to measure the angle.
Ill. 4--Others ran two lines and laid the rails within them to get equal angles.
At a corner, simply turn and continue.
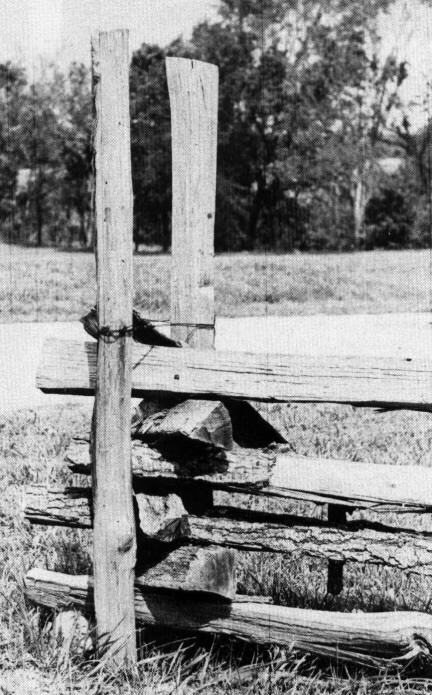
Two posts support the end. Notice the blocks between rails to keep them level. (Photos by Ruth Massey)
[12]
Sometimes instead of using rails for the ground worm, some farmers used small logs because they often lasted longer than a rail might. The logs were usually larger in diameter on one end than on the other. In this case the farmer might set the small end on a rock to keep the ground worm level. A regular rail of four to six inches would last for approximately five to ten years. In comparison, the log might last for eight or twelve years. The other rails, the ones not on the ground, might last for approximately twenty to thirty years. Though it takes more work, some farmers prolonged the life of the fence by setting the worm on rocks to prevent them from sinking into the ground and rotting.
Jim Chastain said he laid the ground worm in the light of the moon, for if laid in the dark of the moon, it would more likely sink down into the soil under the weight of the fence.
The angles of each crossing point of the rails had to be exactly equal at each bend. To assure equal angles some farmers cut a pole which they used to mark the distance between the inside and the outside lines of the fence. If those lines were straight using rails of the same length, the angles would be true. Deciding on the degree of the angle they would cut a pole, for example, a six foot pole if using ten foot rail. They laid the pole on the ground to mark the distance between the angle where the rails crossed and the staked-out fence line. (Ill. 3)
Others simply ran the fence along the marked off fence line and made each angle by sight. Ova marked off his fence line with string on the outside. When he figured how sharp he wanted his corners, he lay another string down to mark the inside of the fence and laid his rails down between the two lines. (Ill. 4) No matter how the farmer measured the distance, the angle had to be sharp enough to make the fence stable. "The steeper the angle the solider the fence is," Ova said.
Finishing the fence after laying the ground worm was a matter of stacking several rows of rails on top. The rails were stacked one on top of the other one row at a time. The end of the second rail rested on top of the first one, the third on the second and so on. Usually when stacking the rails, most farmers preferred to leave an overlap on each end of the rail as an extra precaution to keep livestock from dislodging the rails since there were no nails in a rail fence. Most fences that were built for stock were nine rails high, the ground worm and eight rails stacked on top. Some fences had less rails, depending on need.
Though not as common as the fence just described, there were two other types of rail fences used in the Ozarks. The first type is commonly called the stake and rider fence which had one high rail supported on stakes above the other rails. This fence was built in the same fashion as the common rail fence, but it would be stacked only four or five rails high. When the entire fence was built to this height, the farmer would then drive usually two poles, or stakes, into the ground, one on each side of the corner joint between each panel. (Ill. 5) The stakes would be of sufficient length so that they could be driven in the ground to be sturdy yet tall enough to be two or three feet above the last rail. A small block nailed between the two posts a few inches below the top gave support for another rail to complete each panel. The fence would then contain a space of about two feet between the top, or the rider, and the four or five bottom rails. (Ill. 6) By building the fence in this manner, the farmer used fewer rails to have a fence high enough to keep the livestock from jumping it.
The second type of less commonly built rail fence was also built of rails and posts, but the fence was built in a straight line instead of the zig-zag of the other two rail fences. First, two poles were driven at certain intervals depending on the length of the rails, at the point where the rails would interlock. (Ill. 7) If the rails were eight feet, the distance between the sets of posts would be slightly less than eight feet to allow for overlapping of rails. If ten foot rails were used, the distance would be slightly less than ten feet, and so on. After the posts were driven, the rails were put in place, which meant both ends of each rail had to be placed between the two posts of each set. The rails were stacked down the entire length of the fence, one row at a time in the same fashion as the other types of rail fences. Since the rails were laid in a straight line, there were fewer rails to cover the same distance, but by the time the farmer had to cut the posts and drive them into the ground on each side of the fence, the amount of work was nearly equal. (Ill. 8)
[13]
No matter which type of rail fence the farmer built, he hoped it would last a number of years. Since the bottom rails or ground worm would rot more quickly than the other rails, they had to be replaced before the others. The farmer replaced the damaged rails by prying up the fence and putting a new rail in its place. The fence might last for another five to ten years with a new ground worm.
Modern farmers with high labor costs and huge acreages and large herds to care for, even using power saws cannot afford to spend the time needed to build and maintain rail fences, which when built, would have less than half the life of a wire fence. Perhaps an even greater factor contributing to their decline was fire, especially if built near wooded areas which were usually burned off every spring. Jim said, "One trouble with rail fences, they would catch the leaves in the fall of the year and pile up sometimes two feet deep around them. Then when the fire got out, why to try to keep from burning the fence up, it was just next to impossible. We'd go down through, tearing the rail fence down, throwing the rails out trying to keep them from all burning up."
The art of splitting rails and building rail fences is not dead by any means. Making rail fencing, as other crafts using natural material appeals to many modern people. Today, if you can afford it, anyone can have a decorative rail fence built across his property, but most of them are purely decorative and will hardly deter any animals, even the neighborhood dogs.
The inside and outside lines of the fence are straight. Photo by Ruth Massey
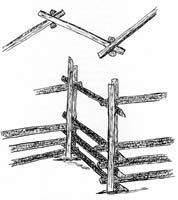
Ill. 5--Top view of stake and rider fence showing posts.
Ill. 6--This fence uses less rails.
[14]
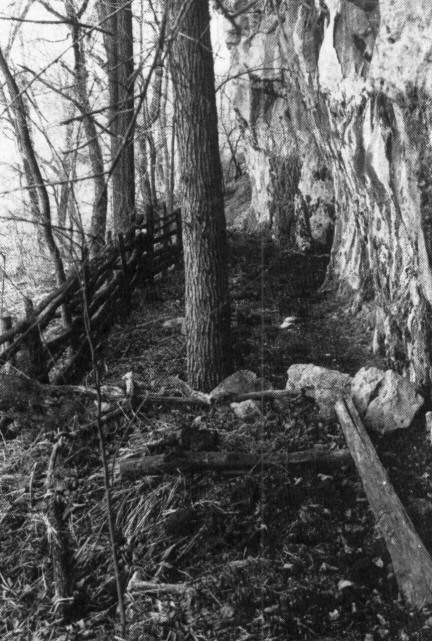
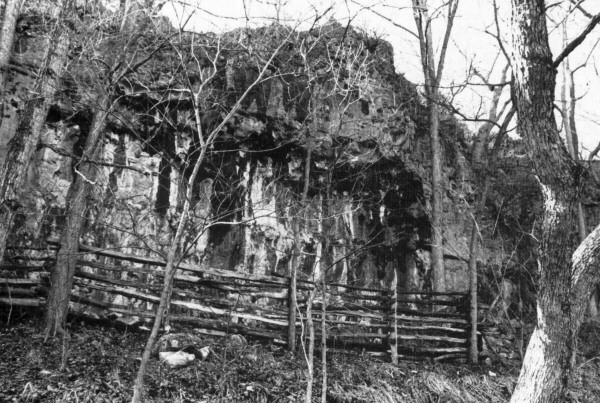
A straight rail fence on this bluff ledge keeps the cattle from being butted off as they gather under the bluff for protection from the weather. Photos by Kathy Long.
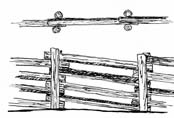
Ill. 7--Showing position of posts on a straight rail fence.
Ill. 8--Details of a rail fence using posts.
[15]
Copyright © 1981 BITTERSWEET, INC.
Next Article | Table of Contents | Other Issues
