 |
Volume IX, No. 1, Fall 1981 |
MAKING CHAIR SEATS FROM CORN SHUCKS
IRENE HAYMES KEEPS ALIVE AN OLD CRAFT
by Terri Heck
Photographs by Gina Jennings, Kathy Long and Jill Splan
When you think of corn shucks, what do you think of--livestock feed, corn shuck mattresses, dolls? Irene Haymes has another use for corn shucks. She makes chair seats out of ropes made of corn shucks. She started doing this years ago when she saw someone shucking and decided to take it up as a hobby.
"Making seats of corn shucks is a very old craft," she said. "It's an example of the pioneers making do with whatever was near at hand. We are told that the Indians taught the early settlers how to make corn shuck seats. We know that the Indians were raising corn when the early settlers came, and we know they all made do with whatever they had. They didn't seem to mind the time they spent, for they had so much time, just as long as whatever they made would last. That makes us believe the story of the corn shuck seats is true.
"This craft has almost been lost down through the years. It's almost gone, really. I don't know of anyone else who knows how to do this. If I knew of anybody, I would go see them. I have never seen but one stool except what I have made myself.
"It would take me about two days to do the seat of a chair working eight full hours. Most people would like to do this for a hobby and wouldn't work for eight hours at a time. One reason I don't work that long at a time is it is awfully slow, and it is awful tiresome on your hands and arms."
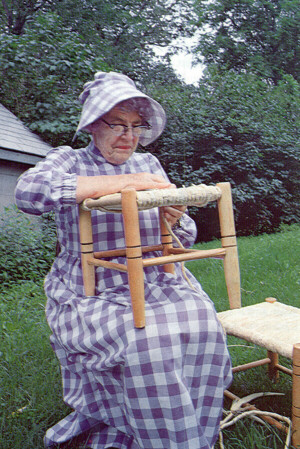
Keeping alive an old craft, Irene Haymes shows how to make chair bottoms using corn shucks. Photo by James Heck
[42]
Mrs. Haymes prefers to work on stools most of the time simply because it doesn't take as much time to do as a chair. The stool she worked on was about a foot tall with a rectangular frame.
To make a seat, in addition to the dried corn shucks and a rectangular or square frame of a stool or chair, you will need some simple equipment such as a container for water, scissors, a spring clothespin and a clamp of some kind.
Obviously the shucks are the most important item in the process. It takes about two and a half pounds of good corn shucks free of silks to finish one seat.
Getting corn shucks is not as easy as it may seem. Mrs. Haymes said, "You can't just go anywhere and buy a hundred pounds of corn shucks, you know. You can get them in hobby shops like maybe ten ounces or something like that, but they're very expensive in small packages. I use field corn mostly. I don't know if sweet corn shucks would work or not. I think they would if they would dry out. One year we had a little bit of Indian corn in our garden. I saved the shucks and I had enough to make one seat. It was kind of spotted in places. The Indian corn is not as good because the shucks are not as tight.
"In the corn country any more they combine a lot of their corn, but I think you could still get it fresh from the fields. Our neighbor calls me sometimes when he cuts down a field of corn. He picks it with a picker, and I go and pick up the shucks before they get damaged by rain or mud."
When you get a sack of shucks you need to cull through them. "The coarse shucks are not very good," she cautioned. "If you get the shucks out of a field, you would probably want to throw away the first layer or two on the ear because that down next to the ear is better than the outside shucks. Looking through the shucks takes up a little of your time, too. I take the scissors and cut off the rough end that joins the stub. If the other end is not damaged, I don't cut it."
If shucks are dry they will keep a long time. "On mature corn they don't need any drying, for they're already dry enough when they come out of the field. I have worked them right out of the field. We have cages for laying hens and we don't have hens in them anymore. I tossed some sweet corn shucks up on top of the cages one day just to get them out from under foot till I could dispose of them, and they dried out just as white as could be."
In addition to the shucks, you need a suitable frame. "You can put corn shucks in just about anything with a rail around it. An old chair that you would like to restore you could even put shucks in to cover the back. Or you could make a frame like a stool or chair or whatever you would like to do." If you used an old frame, you should do any repairing, refinishing, painting or varnishing before putting in the seat.
"My husband makes the frames," Mrs. Haymes continued. "He makes them out of different woods like ash, wild cherry, sycamore, oak and redwood because people like a choice. The frames need to have a rail on all sides. They should be square or rectangular, but not round. The size makes no difference, just make sure you have enough shucks for the stool, a chair or a whole set of furniture that you plan to do."
The first step of actually making the seat is to tear the corn shucks into lengthwise strips about an inch wide. They do not need to be all exactly the same width, for the shucks themselves are different weights and lengths. You adjust to the differences in the winding process.
Soak the corn shucks in water for a few minutes. "You wet the corn shucks because they're stiff when they're dry and they won't work in. The shucks don't cut or hurt your hands when they're damp." Mrs. Haymes advised. (Photo 1)

Photo 1--Tearing shucks into pan to soak.
[43]
Now you are ready to start winding a rope out of the strips of shucks. Begin with about three strips, overlapping the ends together. (Photo 2) Wind the shucks into a thin rope, gradually adding shucks to get the width desired. "The reason I make the rope fine to start with is I've got to make the loop come together and make the two strands into one rope that is about one-half inch thick," Mrs. Haymes said.
Hold all the shucks in a group except one which you wind around the rest. (Photo 3) "I wind them
clockwise, or away from me because I'm right-handed, but if I was left-handed, I would wind
them toward me or counterclockwise. I pull it kind of tight with my right thumb."
You won't be able to wind very far on the rope before you will need to add new strips of shucks.
Begin adding shucks almost immediately or you will run out all at the same place and won't have
anything left to wind into a rope. Before getting quite to the end of the shuck you are winding
with, pick up another shuck from the inside of the rope to wind with and wind the end of the last
one into the rope. Keep adding new shucks often to the inside to anchor them and to keep the
rope the same thickness. Tuck all ends inside as much as possible. (Photo 4,5,6)
Keep the rope tight as you wind or the shucks will fall apart. "They'll loosen up on you and come right in two," Mrs. Haymes said. The width should be consistent throughout the chair for appearance as well as durability. The rope should be about one-half inch in diameter.
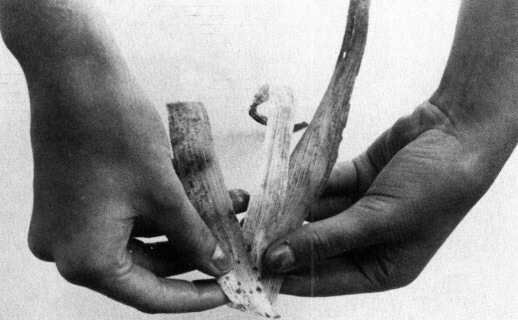
Photo 2--To start the rope hold three wet shuck strips in a group.
Make the rope long enough to wrap around the rail of the seat frame plus about an inch (about four inches) and then fasten it onto the rail. Wrap the beginning end of the rope around the rail (Photo 7) and lay about one-half inch of the end on the loose shucks of the unfinished rope where you stopped winding. (Photo 8) This makes a sort of noose around the rail. Then include this end in as you continue winding the rope.
Wind the single shuck over this end until it is fastened well. (Photo 9) Continue winding a single rope as you did before. Now the rope is fastened permanently to the chair rail. (Photo 10)
"As you wind the shucks into a rope, wind them pretty tight and just go on and on. You could make a rope out of the corn shucks any length you would like or to reach any distance you would like after you get started. It comes natural when you get started, and if you failed to do it, the rope wouldn't stay together."
It is difficult to keep the rope the same thickness. "I don't judge the size of the rope by how many shucks I use," Mrs. Haymes said. "It's how it feels right in my hand, for the shucks are different weights and different widths. Of course, the ropes are not perfect, you know. They're a little bit lumpy, but I try to keep them as near the same as I can."
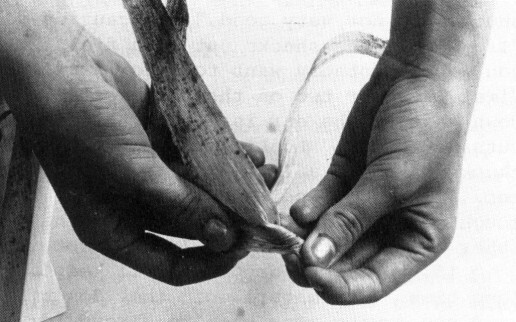
Photo 3--Use the longest shuck to wrap tightly around the rest.
[44]
Adding on new shucks.
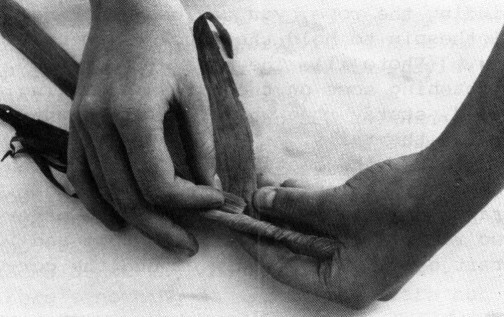
Photo 4--Tuck end of new shuck under.
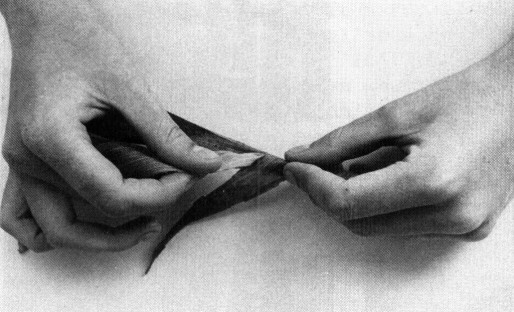
Photo 5--Hold it in with the last shuck and keep winding.
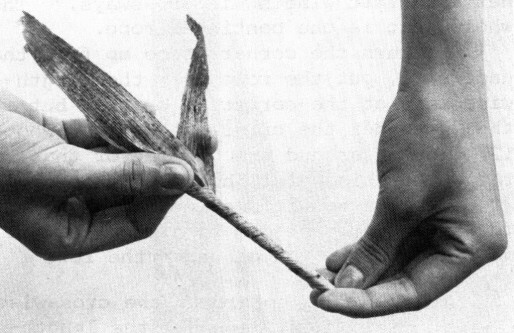
Photo 6--The beginning of the rope.
Fastening rope onto the rail.
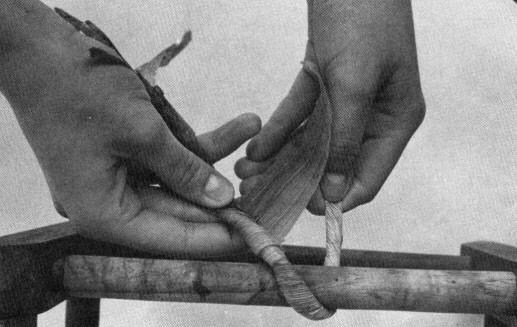
Photo 7--Wrap beginning around the rail.

Photo 8--Make a noose around the rail.

Photo 9--Wrap shucks to fasten rope permanently.
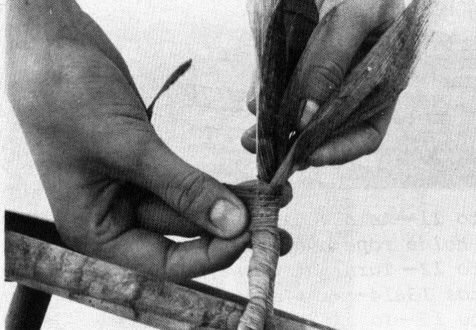
Photo 10--Continue rope with it fastened to the frame.
[45]
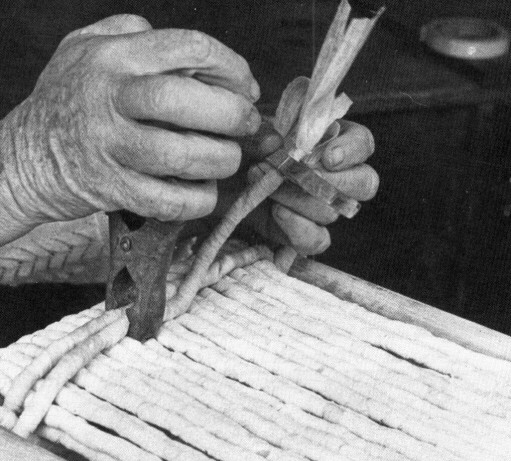
Photo 11--An old clamp and spring clothespin holds rope and shucks in place.
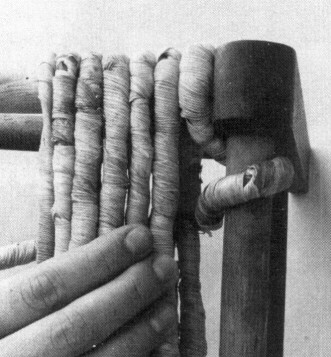
Photo 12--Turn the corner.

Photos 13&14--Wrap around rail on 2nd row.

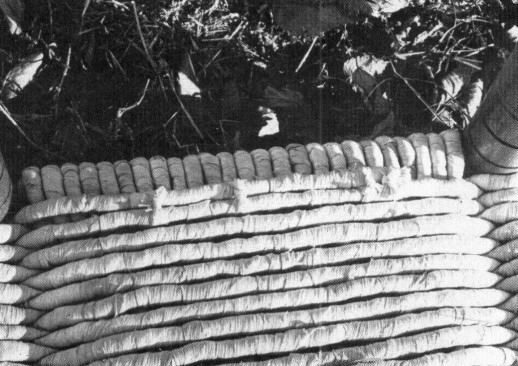
Photo 15--To finish tie ends underneath with pieces of shucks.
When you have a long enough rope, wrap the rope lengthwise around the outside of the rails of the frame until the side is completely full. This makes a double row of rope--one on the top and one underneath. When you need to stop for awhile, you can use the clamp to hold the rope in place until you can resume working. At the point where you stop winding the rope, you can use a spring clothespin to hold the shucks from unwinding. (Photo 11) The rope will dry, tightening some on the rails and making a solid, sturdy rope which will be tight around the rails.
After the seat is completely filled in one direction, the next step is to wrap the rope crosswise around the other two rails. "I don't stop the rope and start over. I just turn around the corner and start winding it crossways." The whole seat is one continual rope.
To turn the corner, come up from the underside, put the rope over the lengthwise rail at the corner as before, but then go under the crosswise rail, (Photo 12) and up around the outside of that rail. At this point the rope is going at right angles to the previous winding. But to anchor the rope and to give a sort of weaving effect, you go under the rows first.
After coming up around the crosswise rail at the corner, go under the lengthwise rows of rope. (Photo 13) At the opposite crosswise rail, come up on the inside of the rail and completely around over the rail on the outside, and then up on the inside of the rail to make the top row. (Photo 14) Continue this weaving pattern at each rail until the frame is completely full crosswise. The last row should be underneath. When finished, there will be four layers of rope on the seat--two lengthwise and two crosswise.
[46]
The last thing to do is to tie the ends. First tie the end of the rope securely with a little piece of corn shuck so it won't unwind. Then on the underside, with little pieces of damp corn shucks, tie the last row to the rope next to it. Tie it securely with square knots in several places to assure it staying in place. (Photo 15)
"You don't have to put anything on the rows of shucks when you're done with the stool," Mrs. Haymes said. "I've had people to ask me what kind of glue I use. I've had them to ask me if I nail them on the frame to start with. There are no tacks or string and there's no glue. There's nothing at all in the seats but corn shucks softened in water.
"Also they are more attractive and last longer if they are left natural. Don't put on varnish or shellac. We just use them the way they are. It'll take them awhile to dry, and then we sit on them and use them. I wouldn't recommend them for patio furniture, however, because the corn shucks will mildew, and they'll eventually rot if they're damp a lot. The seats are very durable. I've had a stool, I'd say five or six years, and I can't tell it's changed any in color at all, and it sets here and it's used. We have five grandchildren, and they'll come in and they'll grab a stool to watch T.V."
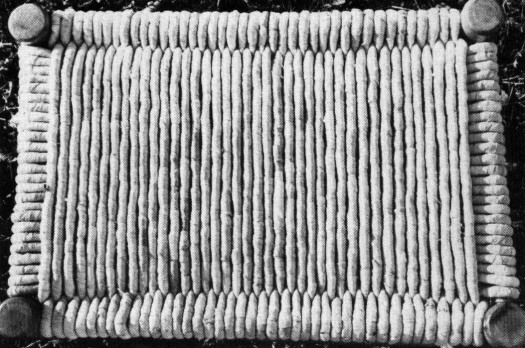
The chairs or stools with seats made properly with corn shuck rope last a long time. The seat is softer than hickory bark, for instance, and will give just a little bit. The main precaution is to keep them dry.

[47]
Copyright © 1981 BITTERSWEET, INC.
Next Article | Table of Contents | Other Issues
