 |
Volume II, No. 4, Summer 1975 |
BY WAY OF THE WHEEL...
Spinning is the process that takes wool fibers of from four to six inches in length and twists them together into a smooth strong, permanently twisted thread. This thread or yarn can then be spun with one or two other threads to form two or three ply yarn, or, if the desired thickness, can be used without plying in knitting, crocheting, weaving or sewing. Before factory made clothes and yard goods were available much of the family's textile needs were made with this carding and spinning process.
Most of the spinning wheels in the Ozarks were the big walking wheels or the smaller sit-down treadle wheels. But for a beginner today an inexpensive and simple machine for learning to spin is the drop spindle. Carl Lee made us several of these simple wheels to learn the basic process. After mastering this, it is much easier to learn to spin on the bigger wheels.
DROP SPINDLE
The drop spindle is quite simple. It is made of wood with two parts--a tapered stick about as thick as your finger and a smooth rounded piece that encircles the stick. (see diagram #1) When you twirl the spindle, the rounded end is the weight that is necessary to hold down the yarn and keep the spindle circling to spin a yarn of consistant thickness. At the smaller end of the stick there is a notch provided to hold the yarn from slipping off.
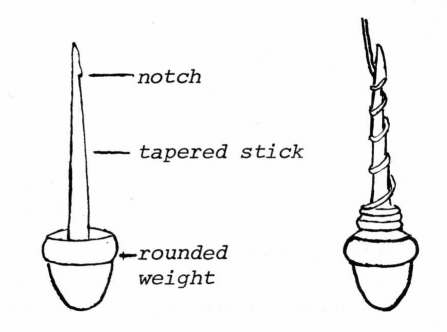
Diagram # 1 - A drop spindle
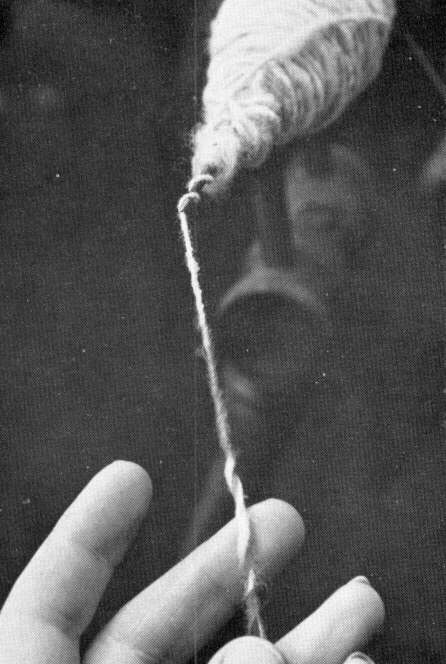
Begin with some already spun yarn or string. Tie it on the spindle at the rounded end, wrapping it around the stick from the biggest end toward the smaller to the notch. At the notch tie the yarn in a half hitch. The notch will hold the half hitch from slipping off. Take the end of the yarn that is hanging loose and fray the very end by pulling and untwisting the yarn.
Now take a carded rolag and overlap the frayed end of the yarn with an end of the rolag and twist slightly with your fingers. You should be sitting or standing at this point with the spindle hanging free.
 |
Diagram # 2 Before learning to spin with a complicated wheel, many beginners prefer to learn with a drop spindle. |
Now place one of your hands on the base weight and twirl it clockwise. Then put one hand below the other so that the lower hand is pinching or holding the fibers in the rolag to keep them from twisting until ready as the spindle twists the yarn toward it. At the same time the upper hand should be pulling a portion of the connected rolag, stretching and smoothing the wool out. (see diagram # 2) When you have stretched a small section of the wool to the desired thickness, then slip your pinching hand upward. This allows the fibers below the hand to twist or be spun. When the yarn has spun up to the hand, the newly spun wool should look like spun yarn. You will continue these two motions until you reach near the end of the rolag, stopping when necessary to keep the spindle turning. As you spin, the spindle will drop lower and lower. When it reaches the floor, it is time to wind onto the spindle shaft the yarn you have spun. Just slip the tied yarn down the stick to the bottom by the weight and begin winding. When you have finished winding up what you have spun, you make another half hitch. You repeat all the steps from the beginning, fraying the end of the yarn and spinning the spindle and winding layer on layer until the spindle begins to look like a ball with a stick in it.
It takes a lot of practice to get a smooth even yarn. Do not be discouraged if the yarn is thick and thin at first, or if the spindle wants to unwind as quickly as you wind it up, or if the wool breaks causing the spindle to drop to the floor. Just begin over patiently. Tell yourself that if I learned to do it, you can, too!
Some people spin with this method entirely. Before investing in a wheel, we'd recommend practicing with this until you can spin easily, for if this discourages you, think how much more coordination and skill is involved with a wheel.
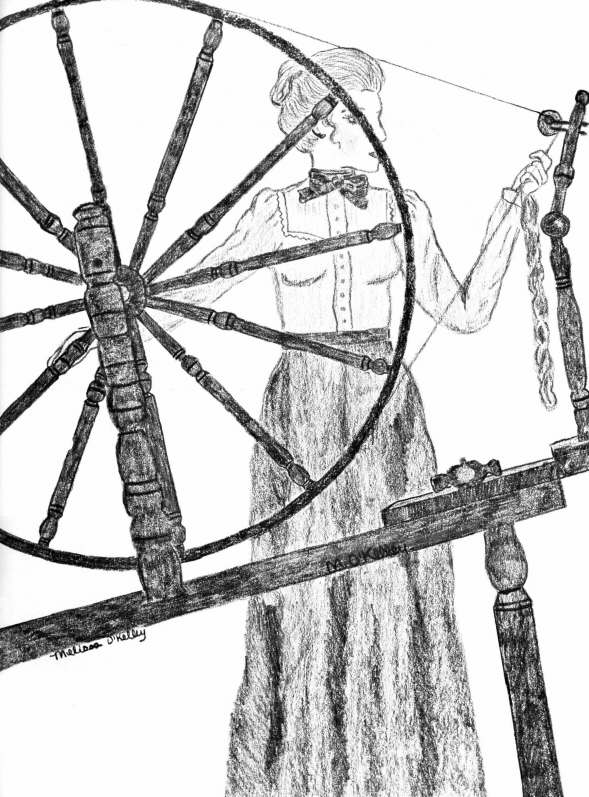
THE WALKING WHEEL
The walking wheel is more complex than the drop spindle, more expensive and difficult to make or obtain and is much more difficult to move around. But it is quicker and more efficient.
It is made of wood usually with beautifully carved spokes in a wheel about four feet in circumference. The spindle has a pointed piece of steel that turns, causing the yarn to twist. A driving or tension band usually a leather band or a cord, runs through a groove that is cut all the way around the wheel and runs over to a groove by the spindle causing it to turn. This is balanced on a tripod-type stand which raises the spindle to a comfortable working level about waist high. This type of spinning wheel is among the oldest used in the Ozarks and was used for many years before that. These wheels will last for years and years if taken proper care of, but will warp and get out of line easily. Most old spinning wheels found in attics and old sheds are not at all satisfactory for spinning because of the improper balance due to misuse.
The wheel is called a walking wheel because the spinner is continually walking back and forth with the yarn she spins. Pioneer women could walk up to twenty miles a day from corner to corner in their cabins while spinning their yarn.
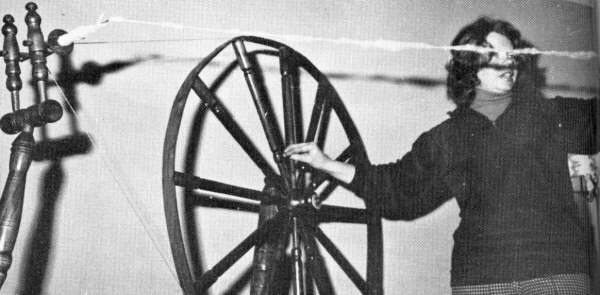
As she slowly turns the walking wheel with her right hand, Carol Lee shows the first step. She stretchs out the rolag to even out the wool in preparation for the next step.
[24]
The point of the spindle as it rotates spins the wool into a yarn. Notice the blending of two colors in the yarn.
Carol now demonstrates how far one rolag will go.

She backs up the wheel to wind up the spun yarn.
[25]
To begin the spinning process, fasten a loosely spun yarn or string to the spindle. Old timers found that wrapping the spindle with a corn shuck before beginning helped in slipping the ball of spun yarn off the spindle.
The walking wheel needs to have the best carded rolags possible. The evenness of the yarn is primarily determined by the condition of the rolags used. The evenness of the yarn will get better as you go along by practicing pulling the wool out evenly before it spins.
To begin the actual spinning, stand with the wheel on your right side as you face the spindle. Connect a rolag on the frayed end just as you would with the drop spindle. Turn the wheel slowly clockwise with your right hand as you run your left thumb and finger quickly down the entire length of the rolag stretching it out as far as it will go. You should be backing up as you pull it out. Now drop the rolag which should be real loose and fluffy and about five or six feet long. Walk up to the spindle, take the rolag with finger and thumb of the left hand and start again, only this time hold the rolag tighter. The faster you turn the wheel, the tighter it will spin the yarn. As you turn the wheel with the right hand, control the amount of twist and desired thickness with the thumb and finger of your left hand as you slowly back away. Stop before you come almost to the end of the rolag. Turn the wheel counter-clockwise to wind up the spun yarn on the spindle. To do this you will need to walk a few steps toward the spindle. Add a new rolag to the unspun end of the yarn and begin again. Walking back and forth like this is repeated with every rolag that is spun.
Making two ply yarn

The one ply yarn coming from the wheel is not strong enough for some uses. Many people wish to make two or three ply yarn for knitting or crocheting. Put two or three bobbins of yarn in the holder. Hold the strands of yarn with your hands. Turn the wheel counter-clockwise for plying. You need to treadle faster and use more brake band tension for plying. Hold yarns separated until ready to spin.
It takes seven good carders to keep one spinner busy.
The thing to watch is to keep the wool coming off the point of the spindle, for the wool is twisted right at the point.
[26]

Carol Lee spins home grown and dyed wool on the wheel her husband built, while her daughter Linda plays with her pet goat. Some breeds of goats have fine wool.
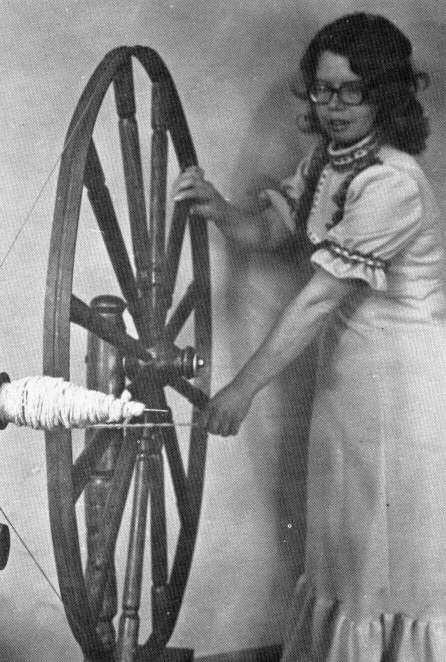
THE SIT-DOWN WHEEL
The sit-down wheel is the most complicated of the three but can be used with little difficulty after practice. It is much faster than the walking wheel, allowing a spinner to spin continuously without stopping if enough prepared rolags or wool is within reach. A good spinner can spin wool without carding, thus eliminating a time consuming job. The thickness of the yarn can be regulated easier, allowing the spinner to spin a very thin and regular thread. Also the two to three foot wheel is much smaller than the walking wheel, making it easier to move and to tuck out of the way in the house. Some spinners say the sit-down wheel is not tiring to spin with, but it is just what a person gets used to.
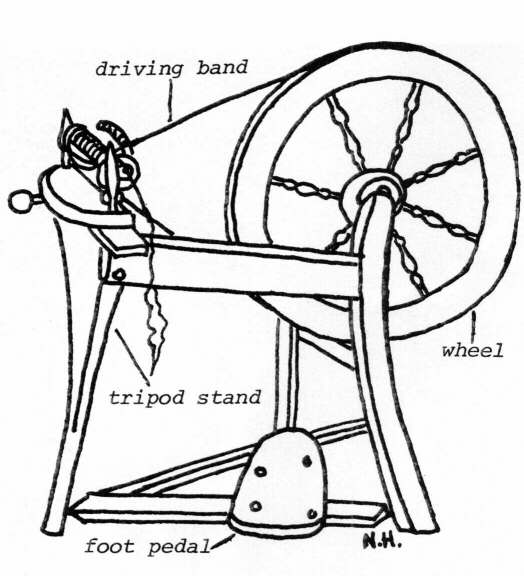
The basic principle of the two wheels is the same. There is a wheel with a driving band which turns the spindle. Both are supported by three legs. The sit-down wheel, however, is operated by a foot pedal which turns the wheel round and round. The spindle is more complicated and turns at a much faster pace. It has no visible point but spins the yarn by rotation of the spindle shaft. The driving band also winds up the spun yarn onto a bobbin, thus eliminating a step. (see diagram #3)
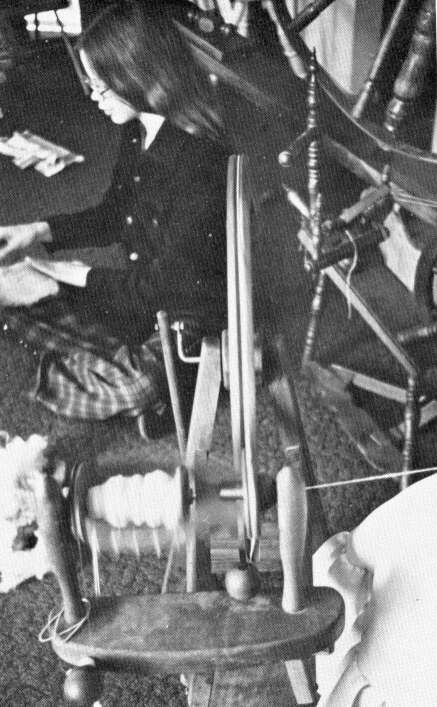
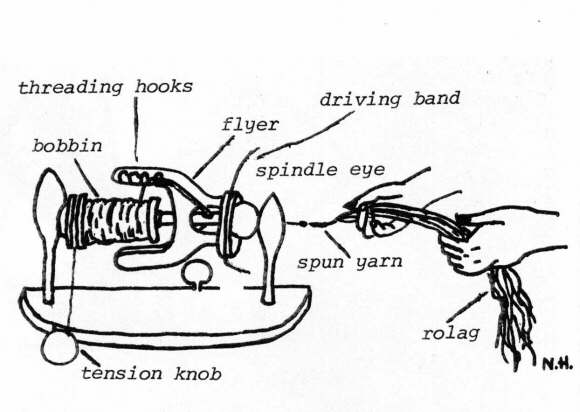
The yarn is threaded through the spindle eye onto guide hooks on a flyer which winds the spun yarn on a bobbin. As with the walking wheel, it takes coordination of left foot and both hands to achieve a steady rhythm. Each spinner has to develop her own speed and rhythm.
The process of spinning with this wheel begins with fastening a spun yarn or string onto the bobbin, next positioning it through the guide hooks on the flyer and then threading out through the spindle eye. You can use any kind of hooked wire or metal for a threading guide. Once you have threaded it through, the end of the wool should be frayed. Overlap the wool rolag and twist slightly as before. With extra rolags handy and sitting comfortably in a straight chair facing the spindle eye, you are ready to begin spinning.
[27]
With your right hand turn the wheel clockwise enough to get it started as you pump your foot on the treadle. Both hands are necessary in spinning on this wheel.
Hold the rolag with the thumb and forefinger of the left hand close to the spindle. This hand holds the wool from being wound onto the bobbin until ready, feeds it into the spindle eye, and controls the thickness of the yarn. The right hand farther away from the spindle pulls the wool out about three or four inches to the desired thinness. Then the left hand slips down the rolag toward the right hand, allowing that portion of wool to be spun. Then both hands now together move toward the spindle allowing the rotating flyer to wind the yarn onto the bobbin. All this time you keep a steady rhythm with the foot pedal. The machine is adjusted with enough slack that the spinner can hold the yarn from being wound into the spindle eye and onto the bobbin until ready.
The sit-down wheel spins faster and is very portable. It spins a thinner more consistent thread and is not as tiring on the spinner as the walking wheel.
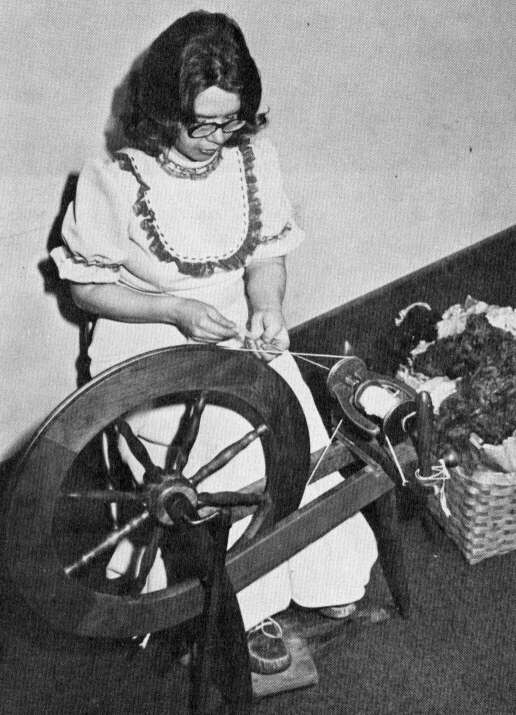
The sit-down wheel spins a thin, consistent yarn rapidly.
[28]
Repeat all the steps from the beginning over and over with a steady rhythm, pumping all the time. When you come to the end of the ro-lag, add another and continue.
The steps outlined here are helpful for a beginning spinner to understand the rhythm. These steps are not obvious with an experienced spinner whose wool seems to flow effortlessly into the spindle and who does not stop spinning to add new rolags.
The sit-down wheel is not only the most complicated, but, because it spins so quickly, is also the hardest to learn how to coordinate all body movements. We recommend practicing with the foot pedal without any yarn to learn the rhythm unless you have used the old fashioned treadle sewing machines. Then practice with spun yarn to learn how to control its feeding onto the bobbin. Take it one step farther and spin with two already spun yarns, plying them together to get accustomed to the twisting. Once you have mastered controlling the wheel so that it continues to turn in one direction with regular rhythm and after you have learned the process of pulling out the wool and allowing it to spin on the drop spindle, you should not have too much difficulty putting all the movements together on the sit-down wheel.
Do not be discouraged if you spend most of your time at first re-threading the wheel or if the product is full of thick places. With patience and practice you will eventually spin an acceptable yarn. I did.
[Ed. Note: Carl and Carol Lee of Ozarks Oaks Farm, of Eldridge, Missouri, do custom shearing, make wheels and spindles and give spinning lessons. We are grateful to them for help on the series on shearing and spinning.]
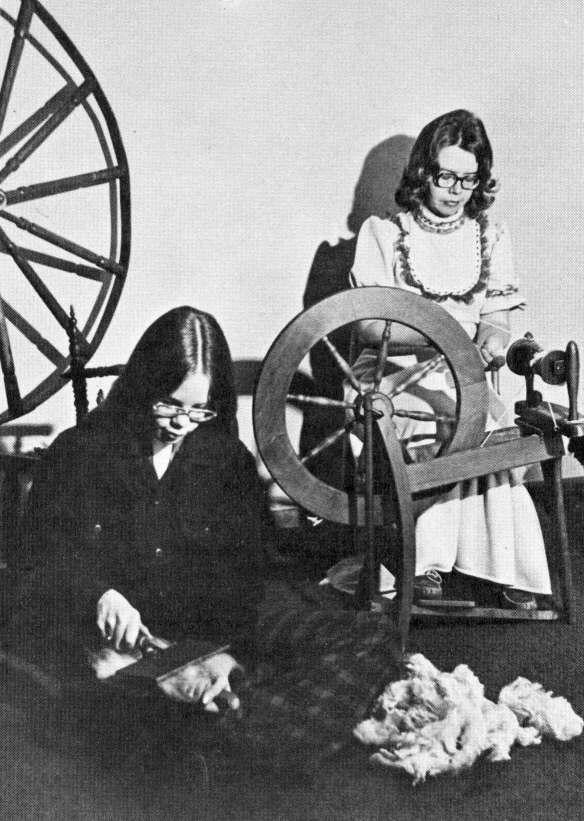
Alexa Hoke cards the raw wool grown by the Lees for Carol to spin. Notice the comparison in size of the two wheels.

Pull out the rolag to the desired thickness before feeding it into the spindle.
[29]
Copyright © 1981 BITTERSWEET, INC.
Next Article | Table of Contents | Other Issues
