 |
Volume III, No. 4, Summer 1976 |
FROM RAGS TO RUGS
by Alexa Hoke, Diana Foreman, Carla Roberts and Kyla Gibson, Drawings by Alexa Hoke, Photography by Staff
In older days the life of a piece of cloth until it reached the rag bag to be made into rugs was long and hard. The cloth, perhaps hand carded, spun and woven of wool or cotton produced on the farm, might start as a small child's shirt. Then it was handed down through the younger children in the family, gathering holes and loosing its original buttons along the way. After serving the proper years of wear as a shirt, it was added to a rag collection of mother's worn out dresses, father's old pants cut down to fit the sons and many other garments which could no longer be mended or remodeled. When the collection was big enough all of these rags would be used in making rag rugs, thus prolonging the life of the material many more years. Since clothes were not worn just a few times in those days, it took years of saving to have enough rags to make a rug, especially enough to weave the four or five room length strips needed to carpet a room.
The many colored and often faded rags by themselves didn't look like much, but when ripped and tacked together and woven through a loom into a rug, they made attractive, useful and durable floor coverings.
Ella Dunn has made many cotton rag rugs and said they would last for years if taken care of properly. Wool rags can last even longer than cotton, often outwearing the warp that held them together. The wool weft, already surviving several years as a rug, could be cleaned and re-woven with new warp to make a new rug.
Edith Fulford showed us some beautiful rich colored wool rags she was going to weave into a rug. Many wool rags came from wool coats, jackets and even old wool blankets. Wool naturally takes dye better than cotton and since the wool was not laundered like cotton when used as a garment, the color tones would still be very warm and rich.
Rugs woven for room sized carpets usually didn't have any real patterns. The rags of various colors and designs, cut into strips, were all tacked together in random order, resulting in a varicolored all-over design.
Though the term was not used then, the rugs were "wall-to-wall." The carpets were usually a yard wide and as long as the room. The weaver would continue weaving, rolling the carpet layer over layer on the cloth beam of the loom. Later she would unroll what she had woven and cut it in lengths to fit the room. She then tied the warp at the cut ends to keep them from raveling, and whipped the strips together side by side with a heavy thread. Some used a strong mending thread called boss ball.
Ella said the parlor or front room was the only room her family used rag rugs as carpeting. Carpeting wasn't for everyday use because of the difficulty of cleaning. She did not use small throw rugs as we do now. "We didn't have rags enough for all the rooms. We scrubbed the other floors every Saturday with homemade soap and sand until they were so clean you would be willing to eat off of them if necessary. We carpeted the best room and saved it for when we entertained our young company."
In her home to save the rug, her family rolled it up in the spring, beat the dust out of it and stored it until the next fall. During the summer they had bare floors. Then in the fall they brought in freshly threshed straw to spread over the floor about three or four inches deep. They unrolled the rug, stretched it and tacked it down around the walls with carpet tacks, turning under the edges to hide the rough edge where the strips were cut apart. The result was a very smooth and soft carpet which blended with any color scheme. Ella remembers her son taking an old coal oil lamp and stretching out on the soft, warm rug carpet to work on his lessons.
There wasn't any easy way to clean the room-sized carpets then, though small scatter rugs could be washed on the board. The daily cleaning was sweeping with a big broom. An interested reader, Lola Garrett, wrote of her childhood experiences with the big job of spring cleaning.
A.H.
HOUSE CLEANING ON THE FARM
At this time of the year when I am washing windows, curtains, and woodwork, I am reminded of spring housecleaning on the farm when I was a child. I am sure it was a strenuous task for my mother and my older sisters who often spent the entire day cleaning only one room. There was no such thing as a $200.00 vacuum cleaner powered by electricity to pick up the dust and dirt. That had to be done by a willing mind, a strong back and a lot of "elbow grease" in using a scrub brush and broom. It was a day of fun and play for us children, since we were too small to do any of the work.
Color photo by Emery Savage
[39]
First of all, we had to choose a clear, sunshiny day when all the furniture in the room was moved out into the yard, where everybody wielded a dust cloth to get rid of the winter's accumulation of dust. Then each piece was rubbed and polished to a shine, or was given a new coat of varnish, and allowed to set outside and dry and air all day.
In the meantime, the hand-loomed carpet which my mother had woven had to be taken up and hung on the clothesline where it was beaten and pounded and flailed with brooms and sticks at intervals all day long to get the dust out, and air in the hot sun.
Taking the carpet up was a difficult task, for it had been tacked down all around the room with carpet tacks. These had to be removed very carefully to avoid tearing. We had no rug pads as of today, but used a thin layer of clean, sweet-smelling straw from the straw stack out in the wheat field. The old straw was carried out and burned, the bare floors were swept and scrubbed with gallons of water and soft lye soap until they fairly shone. It was always my job to keep the scrubbers supplied with another bucket of water, and it seemed there was no end to it. When it was finally finished, all doors and windows were thrown open in order for the floor to dry as quickly as possible, for a lot of work had to be done yet before dark.
Near the middle of the afternoon when the floor was dry, a layer of clean newspapers was laid over the entire floor surface and on top of that a thin layer of clean straw. Then came the task of carrying that big, heavy carpet back into the room and getting it placed just right without disarranging the straw and papers. It was stretched and tacked again all around the room and the freshly cleaned and aired pieces of furniture were moved back into their usual positions.
We smaller children rolled and tumbled on the puffy rug to our heart's content while the older girls and Mother were putting the final touches to the spotlessly clean room with a sense of great satisfaction that it wouldn't have to be done again until another spring rolled around.
THE LANGUAGE OF WEAVERS
Adapted from AMA Weaver TeacherWeavers have their own distinctive and interesting vocabulary. Some of the most common words are given here:
Beater--With the reed inserted in it, it beats the filling (weft) into place.
Bundle--A group of warp threads, usually twenty-four, handled as a unit on the warping board and in threading through the loom.
Cloth Beam--The cloth beam is the roller at the front of the loom on which the cloth is wound.
Cross--The alternating of warp yarns around the pegs of the warping board describes a cross. The purpose of the cross is to keep the yarns in proper order for threading.
Dent--Slots in the reed through which a single warp thread is sleyed.
Harnesses--Two horizontal bars between which the heddles are strung.
Heddles--Lengths of metal, wire, or string that are suspended between the harnesses. They have a center loop, or eye through which the warp yarn passes.
Leash sticks or rods--The narrow sticks or rods placed on each side of the leash or cross and tied together to keep the warp in order when threading the loom.
Loom--A loom is a frame or machine used to hold one set of threads called warp in order while other threads called weft, woof, or filler are interlaced with the warp.
Pick--A single passage of filling thread
(weft) through the shed, also called the shot.
Plain Weave--Weaving over and under, one row. Under and over the next row. Sometimes called tabby.
[40]
Ratchets--Wheels with teeth to maintain the proper tension. Usually one at the back of the loom and one at the front.
Rattle--Toothed board for guiding the warp bundles when threading from the front.
Reed--Comb-like device inserted in the beater. It spaces the warp in slots called dents. Reeds come in various sizes. The size indicates the number of dents per inch. For example, a reed with 12 slots is called a 12 dent reed and means 12 threads per inch if single dented.
Selvedge--Woven edge of cloth.
Sett--The number of warp ends per inch.
Shed--The V-shaped opening formed by the raising or lowering of warp ends through which the shuttle carrying the filling thread (weft) is passed to make a row (pick or shot) of weaving.
Shot--Refer to pick.
Shuttle--The stick or the boat-like container which holds the thread when weaving. Shuttles come in various forms. The stick shuttle is long and flat. The boat shuttle has center rods on which to wind the weft. Some have a steel pin in its center section which holds a removable bobbin or quill.
Sleying--Threading the warp through the dents in a reed.
Spool Rack--Wooden rack with holders for at least 24 spools of warp thread.
Tabby--See Plain Weave.
Take-up--The amount of warp used up through space taken by the weft. This is important when weft is especially thick or big around, such as large rug yarn or extra bulky rags--these take up more warp than ordinary weft.
Tension--The degrees of tightness to which the warp is stretched on the loom.
Treadles--The pedals or foot levers to which the harnesses of a floor loom are attached to obtain the desired shed.
Warp--Warp threads run lengthwise of the loom on which they are stretched and form the skeleton of the fabric.
Warp Beam--Roller at the back of the loom on which the warp is wound.
Warping Board--Wooden frame with spaced pegs around which the warp is measured and wound.
Warping a Loom--Stretching the threads for the warp to a desired length, beaming them, threading them, sleying them through the reed, tieing them down. Sometimes called dressing the loom.
Weaving--Weaving is the crossing and interlacing of threads or fibers to form cloth.
Weft--The weft is put in at right angles to warp and binds them together, thus completing the cloth. May be called woof or filler.
Woof--Refer to weft.
Expressions you will hear:
Open the shed - close the shed - change the shed - refers to manipulating the threadles to form the V-shaped opening. When there is no shed or opening, the threads are said to be in a neutral position.
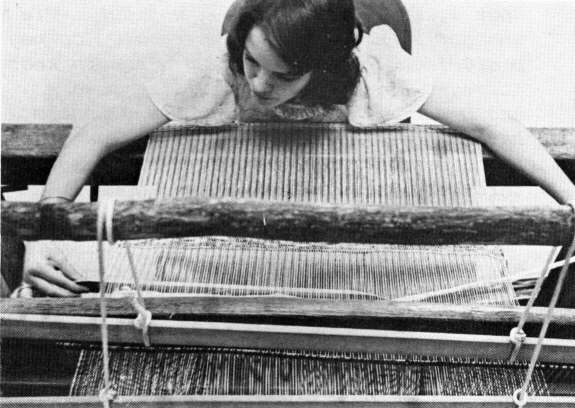
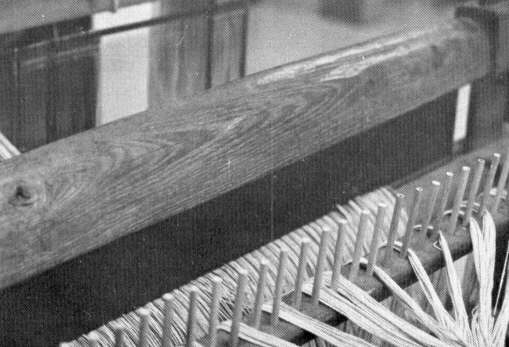
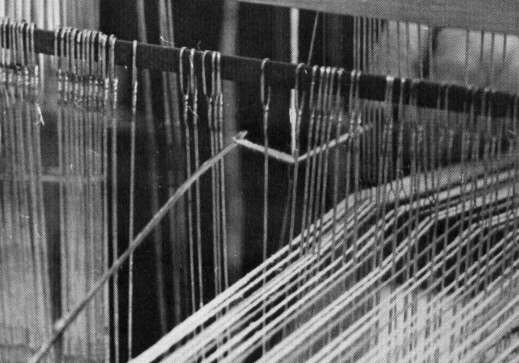
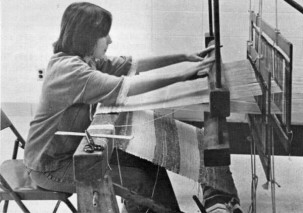
Diana begins a new rug. Photo taken from above the loom.
[41]
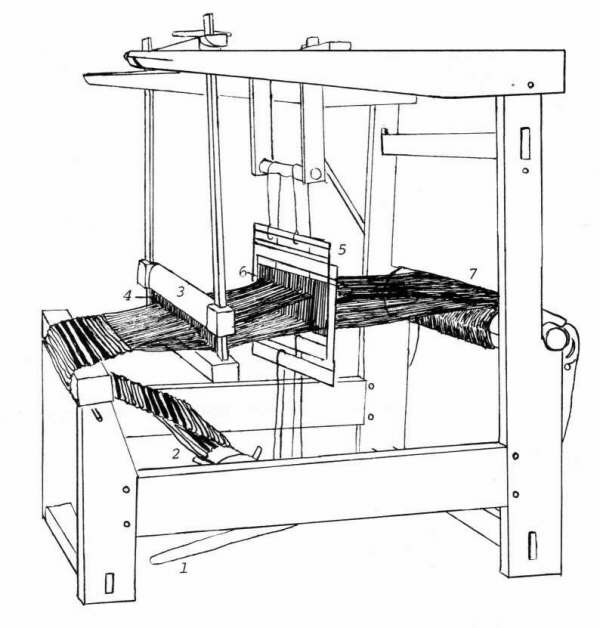
Parts of the Loom
1.Treadles
2.Cloth beam
3.Beater
4.Reed
5.Harnesses
6.Heddles
7.Warp beam
MAKING STRING HEDDLES
Put pegs or nails on a 12" board as shown. The two center pegs should be no more than 1/2 inch apart. Begin with a warp string at least 24" long. Loop the center over peg A. Tie a square knot against peg B (on peg C side). Tie another square knot against peg C (on peg D side) and finish by tying a square knot at peg D as shown. The loop at pegs A and D will slip over the top and bottom harness boards. The hole created at pegs B and C is the eye to thread the warp through. For a 28" wide rug, you will need to tie 336 of these string heddles.

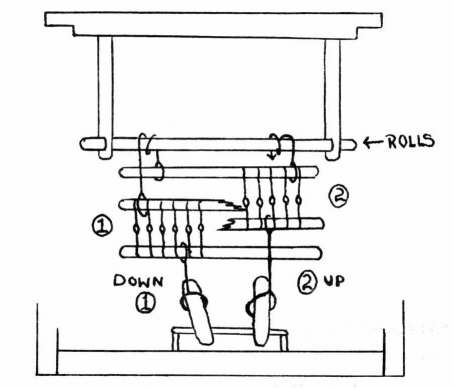
TREADLES AND HARNESSES
As pedal #1 is pushed down, harness #1 lowers, separating half the warp. Simultaneously, harness #2 raises since this harness is fastened on each end with a rope looped over a rolling wooden bar to harness #2. Pressing pedal #2 reverses the position of the harnesses and crosses the warp for weaving.
[42]
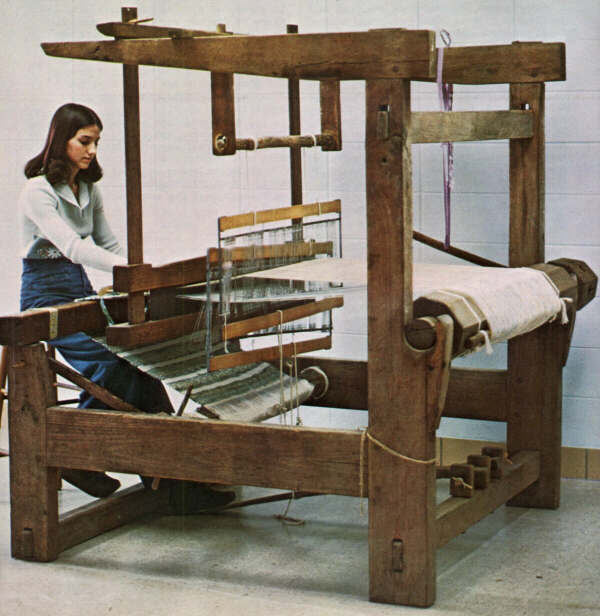
History of the Old Loom
The old loom pictured in this story was built about 1857 or earlier by Silas Barr of the Russ Community of Laclede County, Missouri. According to Sherman Edwards, his great-grandson, Silas Barr was talented in working with wood. He made furniture for his family's use in his workshop and made this loom for weaving rag carpets.
Mr. Edwards remembers his grandmother, Mrs. Marion Barr, (Silas' daughter-in-law) weaving carpets on the loom. After being in the Barr family for three generations, it was sold to the neighboring Alfie Griffin family where it was used for two more generations. In recent years when no one wove on it anymore and the space was needed in the house, Alfie's son Harvie moved it to an unused chicken house where I located it, purchased it and moved it to my house in 1972, just before Mr. Griffin's death.
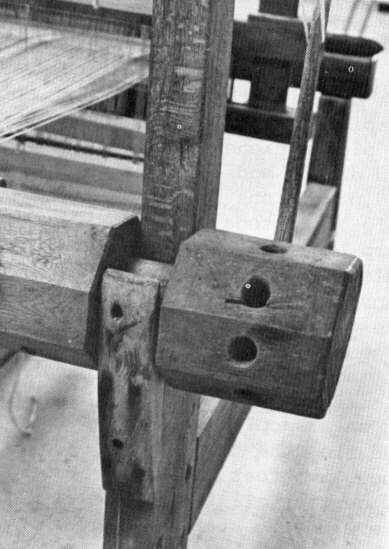
There are no nails in the loom. All the permanent parts are fastened together with wooden pegs. To move or store, the loom is readily dissembled as the warp and cloth beams lift out of their holders and the cross braces all fit into slots. It is made entirely of oak, with no metal parts. Even the cogs and ratchets are carved out of wood.
The original reed was gone, but I purchased a modern reed which fit perfectly into the hand grooved and adjustable reed holder. I am told the reed is like those used years ago. The old wooden harnesses with string heddles were there, though the strings, of course, were rotten. But rather than replacing the string heddles, I purchased metal heddles and a set of harnesses to hold them. With those two exceptions, the rest of the loom is as Silas Barr built it.
E.G.M.
We have learned how to weave just as women did long ago using an original 125 year old loom. Much more goes into making rag rugs than weaving the rags together. There is the warping of the loom to prepare the loom for actual weaving, the cutting and tacking of the rags and finally the steps of how you feed the tacked rags through the warp to weave them into rugs. The following stories take you through these three processes as the first owner of this loom would have done them.
A wall-to-wall rag carpet today would be even more of a luxury than it was years ago, as the labor involved would make it very expensive. Therefore, the greatest demand now is for small scatter rugs placed at doors and other spots to give accents, color and charm to the room.
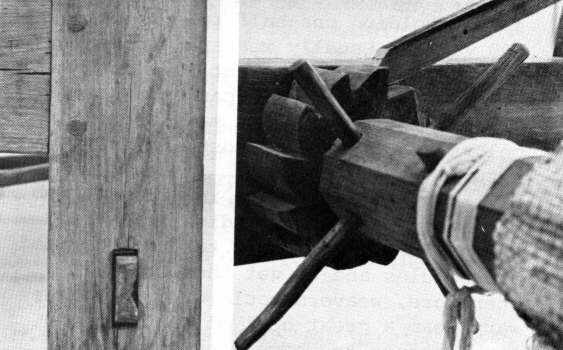
Left--Rough oak lumber joined by wooden pegs and slots Right--Hand hewn ratchet on cloth beam Below--Warp beam wheel and lever for tension
WARPING THE LOOM
Woven rag rugs are made of rags held together by a cotton string or cord called warp.
Though the rags were readily available many years ago, the warp was not. It had to be purchased on four inch spools very much like those weavers use today. Warp is sold by weight with most spools holding one-half pound or about 800 yards. Usually weavers purchase twenty-four spools. That is enough warp to weave many yards of carpet. Today warp can be obtained in many boil proof colors, but years ago most weavers used natural warp.
Preparing the warp is a harder job than weaving. It is tedious to thread the hundreds of threads through the reed and heddles and to get them correct. Therefore, weavers would wind on to the warp beam a great deal of warp at one time, enough to weave many strips of carpeting.
There are several ways of warping a loom. We are going to describe using a warping board and threading the warp from the front. This is the way Ella Dunn remembers her mother doing it and that is the way our loom was designed.
A warping board allows the weaver to handle several hundred individual warp threads and wind them at one time onto the warping beam. This process was used on the old-fashioned handmade loom which we used and on modern looms which have no divided partitions on the warp beam. Most big looms today have divisions on the warp beam allowing the weaver to wind a bundle of twenty-four warp threads at a time instead of the total number needed for the complete width of the rug.
The first step in warping the loom is putting the warp onto the warping board. (ill.#l) To do this, place the spools on a spool rack so that the warp unwinds from the top of each spool. Pull off about two feet of warp from each spool, getting all the ends even. (i11.#2) You are ready to start winding the warp onto the warping board.

Warping boards allow weaver to wind all the warp onto the loom in one process.
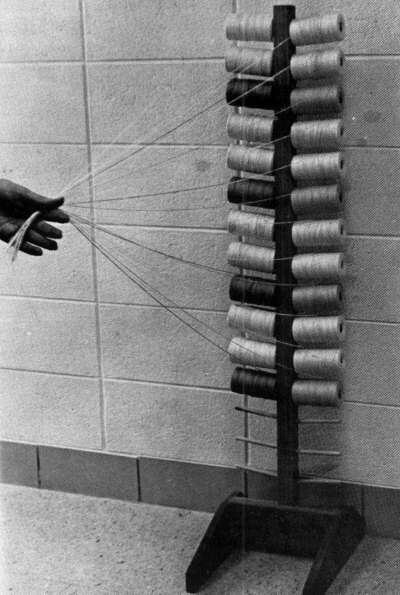
Using a spool rack to hold all 24 spools, collect the ends before winding on the warping board.
WINDING ON THE WARPING BOARD
Place the warping board upright in a comfortable position to wind onto. Usually the boards are fastened on a wall though some prefer to lay them on a flat surface. Whichever way you use, be sure that the spool rack is placed so that winding will not be awkward and so that the threads will not get tangled.
The usual number of spools to use is twenty-four. With the ends of all twenty-four threads together treat them as a unit. This is called a bundle. Tie a slip knot over peg A. (ill.#3) As you wind the warp on the board, make a cross with pegs B and C. The cross is necessary to keep the bundles of warp separate and in the correct order while threading through the reed and heedles. Begin winding by going over peg B and under peg C. Hold the warp in both hands, one to guide the warp and the other to keep the tension. Pull the warp around peg D and go to Peg E. Now proceed to peg F, back and forth until you reach peg Q, or the last peg on your board. Go around peg Q as you have the other pegs, except go back to peg P and retrace the first pattern of warp. Continue up the board to peg D and go around it. But this time instead of retracing the pattern, go over peg C and under peg B--the reverse of the first time. By doing this you have formed a cross. (ill. #4)
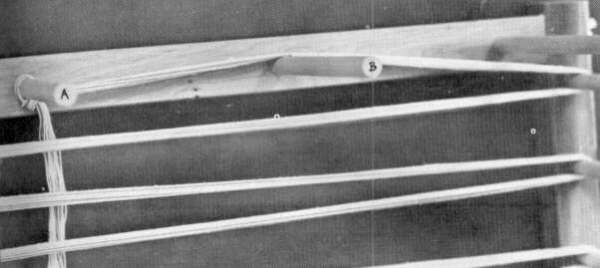
Fasten the ends on peg A, go over B and under C the first time.
Continue around peg A. By this time you have completed one round on the warping board. Now go over B and under C as you did the first time. The rest of the work of putting the warp on the board is simply following the pattern you have made on the first complete round. Be careful not to overlap the bundles on the pegs or let them slip off. Another precaution is for only one person to wind the warp onto the board, so that the tension will be equal throughout the entire length of warp. This will prevent the warp from tangling while rolling unto the warp beam.
Continue putting rounds on the warping board until you reach the desired width of your rug. Cut the warp and fasten with a slip knot around peg A as you did when beginning.
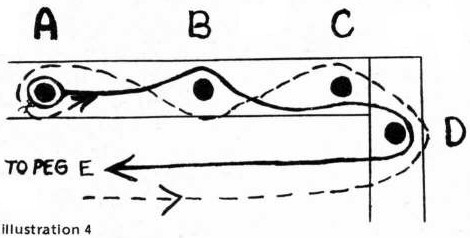
When returning, go over C and under B to form a cross.
[44]
To determine the width of the rug, you must know two things--the sett of your loom and the number of spools you are using. If you have a twelve sett loom, which is most common (that means twelve warp threads per inch), and you are using twenty-four spools of warp, a half round will be two inches, and a complete round will be four inches of warp when threaded on the loom. To weave a rug twenty-eight inches wide, you will need to put seven complete rounds on the warping board.
The length of your warp is determined by the size of your warping board. The one pictured is small and will weave only about fifteen yards of warp.
Since warping the loom is such a big and tedious job, in the older days women warped using much larger warping boards. These might have been as much as nine or ten feet wide and three or four feet high. These boards fastened to the side of the smokehouse or other building could allow many yards of warp to be put on the loom at one time. Warping like this would permit the women to weave for months without having to re-do the tedious job of warping the loom after weaving only a few rugs.
REMOVING THE WARP FROM THE WARPING BOARD
When enough warp is wound on the board to reach the desired width of rug, the next problem is getting the warp off the warping board and onto the loom. This is done by making a large chain of the warp on the board. But first you need to make a few preparations.
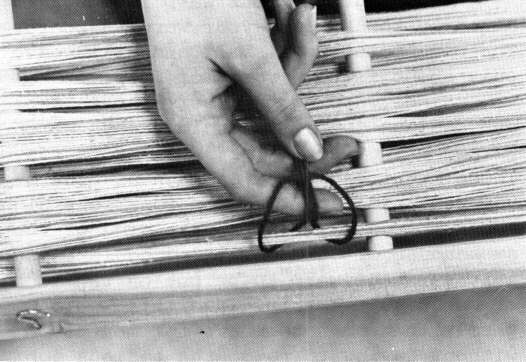
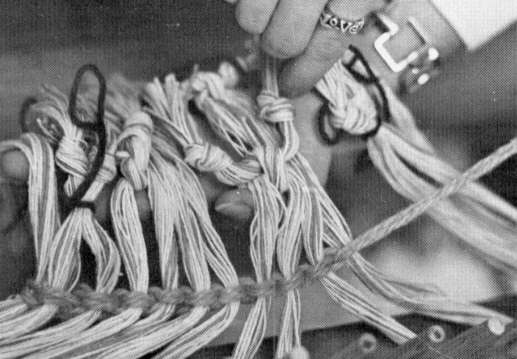
First make a small chain with a piece of wool yarn at the cross between pegs B and C. This is to keep the bundles in the correct order to place on the rattle when threading the loom. The chain resembles that made with a crochet hook, except it is made with the hands.
[45]
Double the yarn, making a loop at one end. (ill.#5-9) Place the loop beneath the first bundle wound onto the board. Pull the double threads partially through the first loop to form a second loop. Do not pull ends through. Tighten. Repeat this chain making a link around every bundle. When you reach the last bundle, pull the ends through the loop.
 |
 |
 |
 |
 |
Before removing the warp from the board, make a small chain with yarn between pegs B and C to keep the bundles separated. Use a crochet stitch made with fingers.
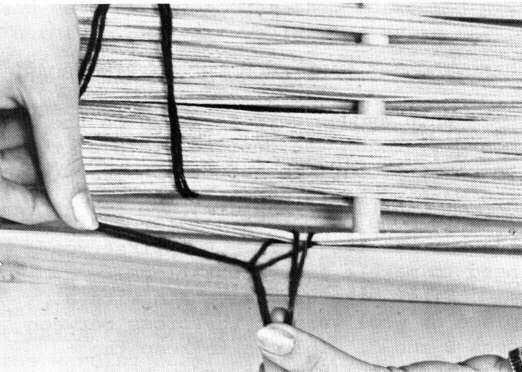
Next tie each row of bundles with a bow knot near each side peg.
[46]
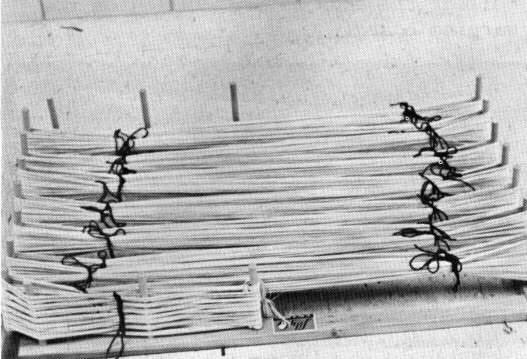
Use more wool yarn now to keep groups of bundles in their correct order while removing the warp from the warping board. Tie the yarn in bow knots around all the bundles, about two inches out from every peg. (ill.#10) A bow knot is best because it can be easily removed. Now you are ready to remove the warp from the warping board by making one large chain of all the warp threads. Tie a piece of yarn at peg Q to mark the center. Begin the chain at peg Q by slipping all the bundles of the warp off the peg together as one unit. Slipping your hand through the loop that was around peg Q, get hold of all the warp bundles and pull them through forming a second loop. (ill.#11-14) Gently slip the hand through the loop that was drawn through the first loop. Continue the chain, removing the warp from the board as you progress up to peg D. At that point secure the chain with a piece of wool yarn so it won't come undone. (ill.#15) Now tie a piece of wool yarn at peg A as you did at peg Q to mark the center. (Ill.#16)
 |
 |
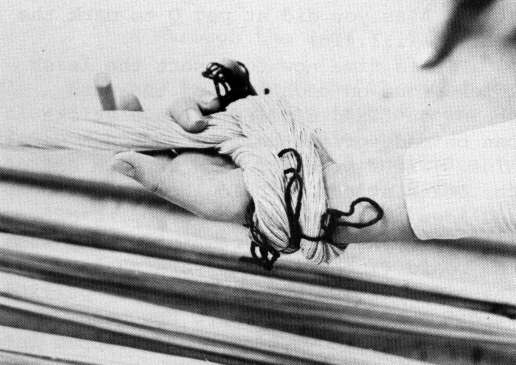 |
 |
Remove the warp from the board by making a large chain with your hands.
When the entire warp has been chained off the board up to peg D, tie the chain in an easily removable bow knot so it will not come undone while handling it and threading it through the loom.
[47]
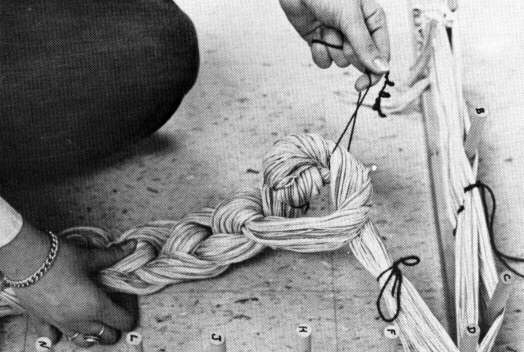
It is time now to insert the leash sticks, one on each side of the yarn chain you fixed earlier. Leash sticks can be made of one-half to one inch dowel pins. Tie a piece of yarn at each end of the leash sticks to hold them together and keep the bundles from slipping off. (Ill.#17) Remove the remaining warp from the board (including the yarn chain, leash sticks and cross) by simply pulling it off the pegs. The warp has been chained off the warping board, looped into a manageable chain which keeps all the threads in place and prevents them from becoming tangled. You are now ready to put the warp onto the loom.
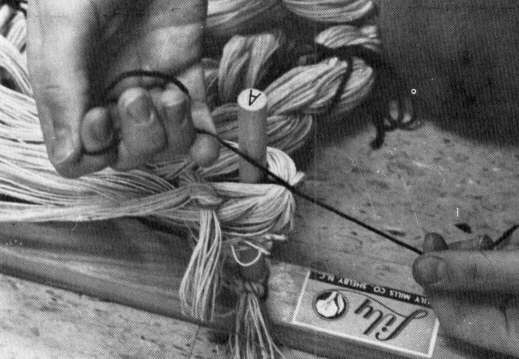
Mark the center at peg A where the warp will be cut to be threaded through the reed.
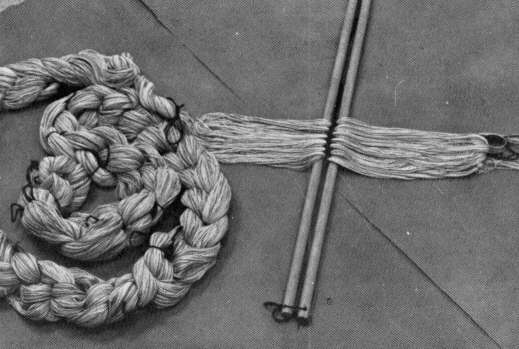
Insert the leash sticks on either side of the small chain before removing them from the loom.
TRANSFERRING WARP TO LOOM
Through the Rattle
The chain from our warp board consists of 336 individual warp threads fifteen yards long. The method we are describing of transferring this chain onto the warp beam of the loom feeds the warp from the front, through the rattle, the reed and the heddles, before being wound onto the warp beam. When the warp is all threaded and fastened to the warp beam, the warp beam wheel is turned. The wheel pulls the warp out of the chain and draws it through the loom, except for enough warp to fasten to the cloth beam. We are describing warping for a two harness loom using plain (or tabby) weave with no pattern in the warp.
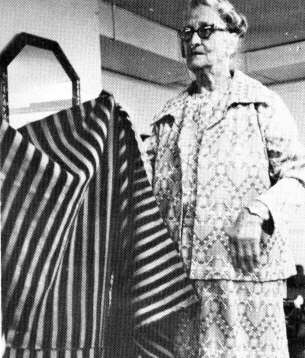
Things other than rugs were woven on these old looms. Ella Dunn holds a blanket her mother wove a hundred years ago on a loom like the one pictured in this article. The wool was hand grown, carded and spun first.
Cut the warp through the center which was marked by the wool yarn. (This was the loop around peg A on the warping board.) In order to keep each unit separated, tie a slip knot at the end of each bundle before taking the chain to the loom. You should now divide the warp bundles, separated and held in place by the yarn chain, between the pegs of the rattle. (ill.#19-20) The rattle fastened in front of the reed helps hold the many bundles of warp in place while threading them through the loom. One can be made easily with nails or pegs spaced about two inches apart on a board as long as the reed.

The rattle helps separate the bundles of warp while still chained together.
When bundles are in place on the rattle, remove the yarn chain.
Place the center bundle between the center pegs of the rattle, spreading out the bundles on the pegs in each direction. To keep them from falling off the rattle, tie two bundles together. Remove the yarn chain. (ill.#21)
The rattle continues to bold the yarn bundles even while threading through reed.
Through the Reed
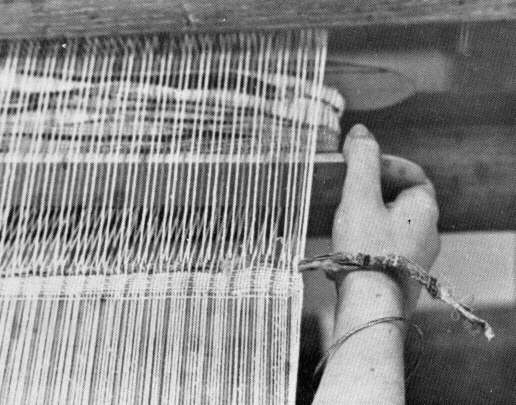
The warp is ready to be threaded (or sleyed) through the dents in the reed. Begin with the center bundle at the center sett of the reed, and individually draw a single warp thread through the reed with the threading hook. (ill.#22) This job goes much faster with two people--one in front holding the correct thread and the other behind the reed pulling it through the hook. Always begin in the center of the reed and work one way and then the other so the warp will be centered on the loom.
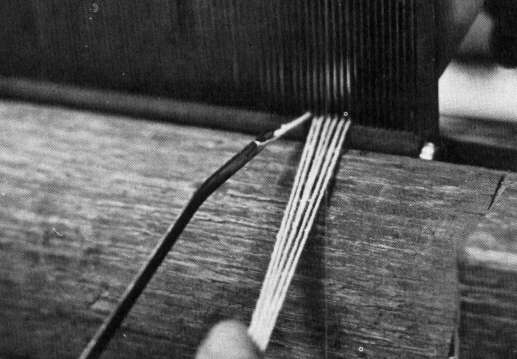
Thread warp threads one at a time through the reed without skipping any dents.
Continue drawing the individual warp threads through the reed until you finish the first bundle. Secure each bundle behind the reed with a slip knot to keep the warp threads from slipping back through the reed. Repeat this process with each bundle until you reach one end. Some people prefer to draw two warp threads through the last dent of the reed to make a stiffer selvedge.
You are now half finished drawing the warp through the reed. Return to the center and draw through the remaining half of warp threads. When sleying, be very careful not to skip a dent to avoid gaps in the finished rug.
Through the Heddles
Next thread the warp through the heddles. Standing behind the harnesses pull each thread through with the hook. Begin with the same bundle that you began with when sleying the reed. Have both harnesses at the same level. Untying one bundle at a time, draw the first individual warp thread through the eye of the center heddle on the first harness and between the two center heddles of the second harness. Draw the second warp thread between the heddle you just threaded and the next heddle of the first harness and through the eye of the heddle on the second harness. (ill.#23-24) It is very important that you do not skip heddles or fail to alternate harnesses for that will cause a mistake in the rug. Every mistake in threading will give an imperfect weave. To correct the mistake you must take everything out to the mistake and retread.
The warp goes through the eye of the center heddle of the 1st harness and between the center heddles of the 2nd harness. The 2nd warp goes between the heddles of the 1st harness and through the eye of the center heddle on the 2nd harness.

Tie the bundles together after threading through the heddles as you did after threading through the reed to keep them safe until ready to fasten them to the warp beam.
Onto the Warp Beam
You are now ready to tie the bundles onto the rod attached to the warp beam. The tension must be the same all the way across the beam. The easiest way to achieve this would be to tie the two end bundles onto the rod with the same tension. Then tie the center bundles on, keeping the tension equal.
Winding onto the Beam
The next step is to wind the warp through the loom onto the warp beam. You will not be able to roll the warp through alone. At least three and possibly four other people are needed to do this. One person is needed to turn the warp beam wheel, one to hold the leash sticks together to put tension on the warp as it goes through the reeds and heddles to wrap firmly on the beam and the others to hold the warp chain, remove the bow knots of yarn in the chain and keep the warp smoothed out as it is drawn through the reed. The warp will sometimes become tangled at the reed but simply comb out the tangles with your fingers and continue turning the warp beam wheel.
Turn the warp beam lever (at rear) to wind the warp through the reed and heddles onto the warp beam.
Fastening to the Cloth Beam
You should wind all but about one foot of the warp through the reed. But before you get that far, cut through the looped end of the warp chain and tie each bundle together as you did at the other end of the chain. Tying prevents the warp from accidentally slipping through the reed. Next, tie the warp that has not gone through the reed to the rod which is attached to the cloth beam. Do this in the same fashion as you tied the warp onto the warp beam by tying both end bundles to get the correct tension first, then tying those in the middle. These ends must be tied carefully with equal tension across the width of the beam. As the rug is woven and wound onto the cloth beam, it should wrap evenly.
You are finished warping the loom and are ready to prepare the rags for the weft.
D.F.
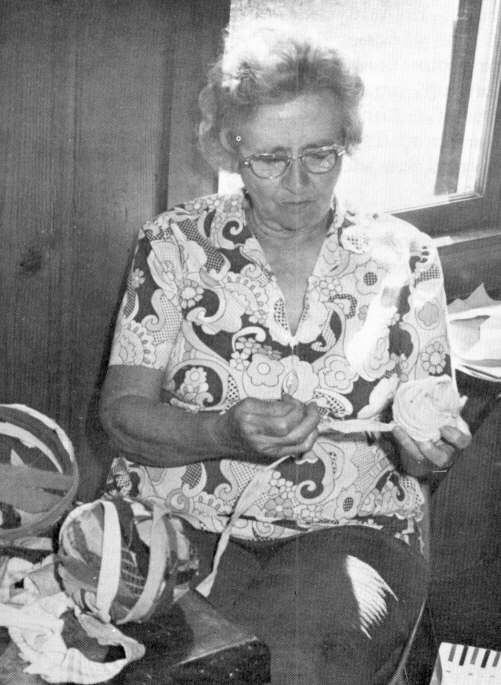
After tacking the rags together, wind into balls. Edith Fulford is winding for a varicolored rug.
Tacking the Rags
The first consideration in preparing the weft for a rag rug is the kind of rags you use. In older days the only types of fabric people had were cotton and wool.
Through the generations, even though it is not so plentiful as it once was, cotton has continued to be the most popular fabric for rugs for several reasons. Rugs made from cotton rags are easy to clean by washing by hand or in a machine and drying on a line or in a drier. They can be washed in very hot water with no fear of shrinking or fading. Cotton is easy to work with since it is not bulky and tears easily, yet it is strong enough to withstand the pulling and pounding of the loom. Until recent years cotton was very plentiful because most of the clothes worn by both men and women were cotton.
Wool, also, makes lovely rugs. Its colors are brighter than cotton as wool takes the dye better and wool weft lasts longer than cotton. (When the warp wears out on the rugs, you can remove the worn and broken warp threads, clean the weft and weave it back into a rug again. The re-woven weft would probably last the life time of the new warp.) However, wool has some disadvantages. Since wool does not tear like cotton, it takes longer to prepare the strips, as each strip must be cut with scissors. Wool cannot be washed as easily as cotton. Rugs made of wool rags should be washed in barely warm water because wool is likely to shrink. Wool rugs take greater care and time to dry. Therefore, most people do not wash wool rugs, but shake and beat them clean.
Today many weavers like to use knits. They make pretty, colorful rugs since knits come in such a variety of bright colors which never fade and hardly ever wear out. They also wash easily, but like wool, knit fabrics are bulky and have to be cut into strips instead of torn.
Whatever kind of rags you use to begin weaving a rug, continue with that kind until the rug is finished. Never change types of fabric in the middle of a rug because different fabrics wash differently than others, and they often don't wear the same. But the main reason for keeping the same fabric is to produce a consistent finished product. Therefore, you wouldn't mix wool or knit strips in with cottons.
Rag rugs are very inexpensive to make because you use material from garments or household linens that are worn out, but the material itself is still too good to throw away. You don't need big pieces, either, for even little scraps of fabric can be used just as well.
When you have collected and sorted all your rags and put them into piles according to the kind of fabric, you next need to sort according to weight. Cottons vary from heavy duck and denims to very sheer organdies. Most of these kinds can be used in weaving rugs, but not together for best appearance and even wear. However, it is possible to use different weights of fabric in the same rug by adjusting the width of the strip. Thinner materials would be cut wider than heavier ones. In that way when woven through the loom and beat down, each row of weft would be the same width.
The next job is to remove all snaps, buttons and zippers. Also, don't forget to take out the seams. Although this is more work, the rags go farther and the end result will be worth it. Seams in the strips make it harder to pull the weft through the warp and cause hard or bulky spots in the finished rug.
Next, tear the rags into strips. To do this cut a little strip about two inches long with the grain of the fabric and tear (or cut) it the rest of the way. The ravelings don't matter as they will be folded into the weft and those that do stick up through the warp soon wear off. However, fabric that does ravel greatly can be cut instead of torn.
The length of the strip is determined by the length of the scraps. There is not really any certain width in tearing the fabric for that depends on how thick you want the finished rug. Most people cut cotton rags about one inch wide and the wool or knits narrower.
The wider the strips, the heavier the rug and thicker the width of each row of weft. Edith Fulford said, "You just take your garment and work with it and whatever it says to do, why, you do it."
How wide you cut the strips depends on the fabric. If it is heavy, it should be torn narrower than a thinner piece. In the knits and wools the width of the strip would probably not be more than three-fourths of an inch.
There is an easy way to make the rags go much farther when you have a few little scraps. Begin at side A of the scrap (ill.#27) When tearing the first strip, do not tear completely to the end of the piece. Leave about a half an inch. For your next tear, begin at side B, and tear up, again leaving about half an inch untorn. Continue in this manner until the scrap is torn. This will produce one long piece which does not need to be tacked.
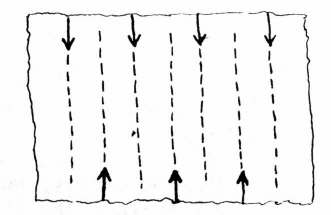
ill. 27--Use even small scraps of fabric by tearing as indicated by arrows. Leave about 1/2 inch at end of each tear for one continuous strip.
[52]
As you tear the strips, put like colors together into piles. Before you tack the strips together, you need to decide on the design. Every rug you take off the loom is different. No two will be alike, unless of course, you use a solid color. Since there are an infinite number of designs you can use, just use your imagination. The design could be very simple--all one color--or more complicated twelve inches of white with an inch of color, then an inch of white, repeat and finish off with one last inch of color and twelve more inches of white. Or you could just mix all the colors together with no specific pattern.
Now after you've got your rags all torn and have decided on your design, you are ready to start tacking the strips together. If you plan to use sections of one color, then another, then tack each color together and wind in separate balls. If you want the staggered effect, then tack a different color on each time in the design you wish.
Rags can be tacked by machine or by hand. In either method the process is the same. Lay one strip on top of another and sew flat, not in a seam. This makes a smoother, less bulky joining. Following is the way Edith sews her strips together. For the first step she overlaps about one inch of the end of one strip over the end of another with the right sides down. Then she folds them over together lengthwise once and then a second time.
Next, she sews diagonally across the folds. Sewing diagonally allows you to work faster and prevents loose ends which get caught or stick up in the rug leaving a rough finish. Also, sewing on the bias allows some give to the strips so the stitches don't break as easily when they are stretched in the loom.
An economical way of saving thread and time when sewing these strips together on the machine is to sew many strips together before cutting the thread. Edith laps them over as shown in illustration #28.
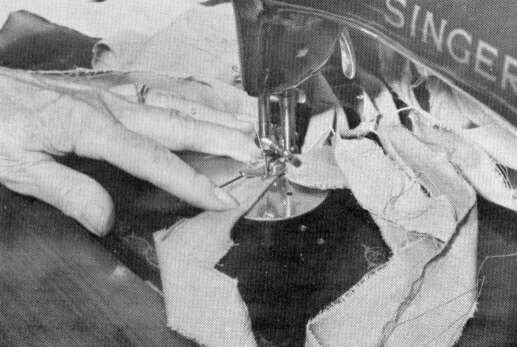
ill. 28--Tacking with the machine makes the job easier. Sew diagonally on the folder strips.
While lapping them over, she loops one string in one direction and the next string the other direction with no space between until she has sewn together as many as she wants. Then she clips them apart and rolls them into a ball.
Even if you sew the strips together on the machine you will need to do some hand tacking. While at the loom if your strip breaks, or if you need to cut it to fix a mistake or when changing shuttles, you can sew the strip back together by hand.
Though machine tacking is faster, some people prefer to tack the strips together by hand, especially in the evening when they are relaxing or in the afternoon when all the work gets done early. The method is just the same, except you will probably not want to fold the strips before tacking if the material is heavy. When hand sewing use double thread and take small stitches diagonally across the strips. Fasten your thread well after each strip. Some prefer weaving with hand tacked strips since the looser hand stitches do not make such a stiff place in the weft.
Preparing the rags is the most time consuming part of weaving rag rugs, but when they are all tacked, the real fun of weaving begins.
C.R.
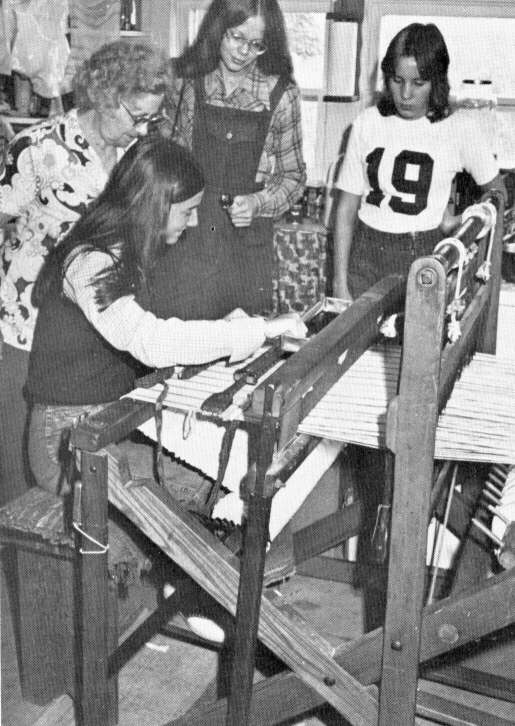
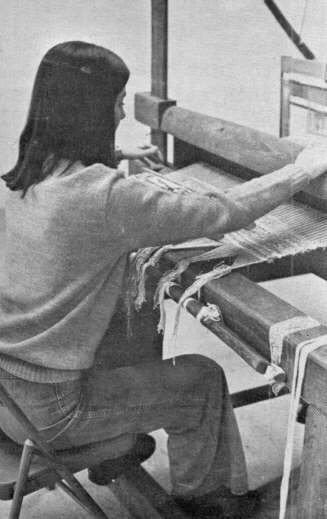
Note changes in modern looms as Edith Fulford (standing left) teaches BITTERSWEET members to weave. Note warp beam.
Weaving the Rag Rug
Weaving is defined as crossing the warp and the weft or interlacing threads. The two harness loom helps the weaver do this process quickly. Every even warp thread goes through the heddles of one harness and the odd numbers are threaded through the heddles of the second harness. Each harness is controlled bY a foot treadle. As one treadle goes down, it lowers one harness and raises the other, thus separating the warp threads. The weft is put through the shed that is created. When the other treadle is pushed, the positions of the harnesses reverses. The warp that was on top is now on the bottom. This makes a cross which produces the weave.
As each row (called a shot or pick) of weft is put through, the beater is pulled forward against the strip, mashing it into a tight string. When the warp is crossed and the beater applied again, the weaving is tight.
By now you have the rags already tacked and the design decided for the rug. But before you start the actual weaving, there are a few things to get ready at the loom.
First you need to wind the rag strips from the ball onto a shuttle. Shuttles designed to carry the weft through the shed of the warp come in several sizes and styles. (i11.#30) Rack or boat shuttles slide easily through the warp on wooden runners and are preferred by most rug weavers. If you have several shuttles and are using more than one color, fill a shuttle for each color.
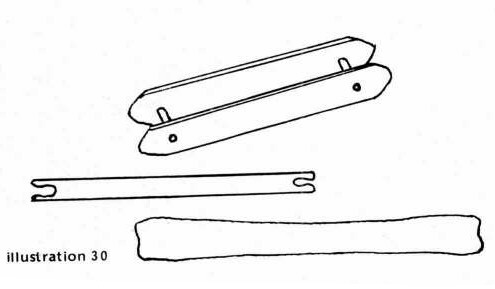
Some shuttles used in weaving rag rugs.
Next you need to tighten the warp. The tension of the warp should always be released when not weaving to prevent stretching the warp. On our old loom this meant tying the lever on the wheel of the warp beam. (ill. #31)
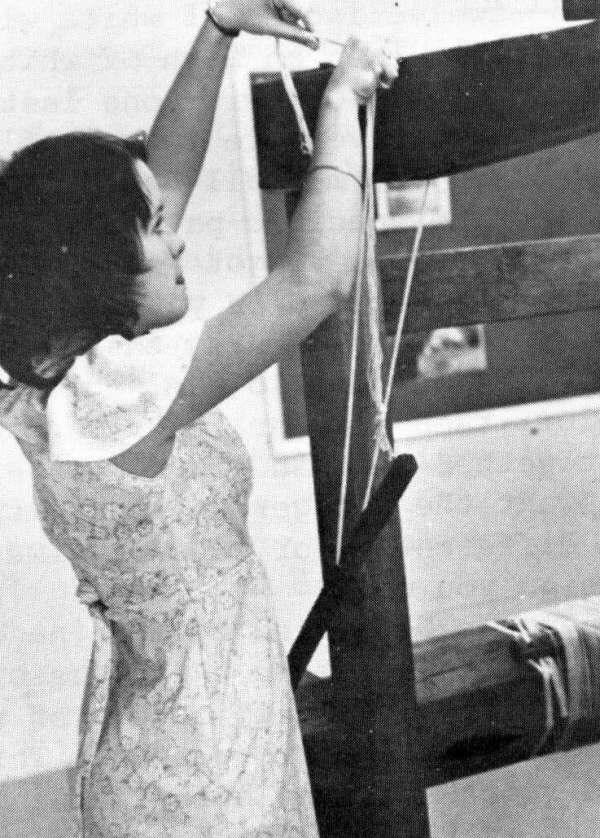
Tightening the tension on the old loom.
You also need to be comfortable and have all equipment handy for efficient and enjoyable weaving. Sit on a stool, bench or chair the correct height to work the pedals easily and to avoid any unnecessary bending and stretching while weaving. The weaving rhythm should be steady and not tiring. Correct position can help prevent fatigue.
Also fix a place for scissors, needle and thread so that you do not have to get up or hunt for them. We fixed a place by taking a scrap of fabric and wrapping it around the front bar of the loom. We made a pocket for the scissors and thread. (ill.# 32)
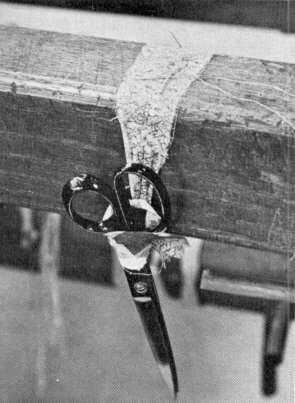
ill.#32 A simple rag pocket keeps scissors, needle and thread always handy.
The basic steps in making a rag rug are simple. Begin with a narrow tight border of warp, then weave the rags in the pattern desired for the length of the rug, and finish off with the same number of rows of warp for the other boarder. Then leave a space of several inches of warp before beginning a new rug.
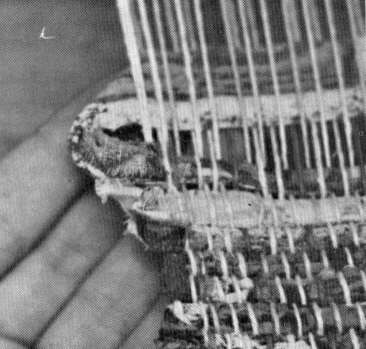
When everything is ready to weave, begin the first rug about six inches from the rod where the warp threads are tied, (ill.#33) or if this is the second rug, leave at least six to eight inches from the rug you just finished. Edith likes to run an old rag strip through as a marker. Tamp it in straight with the beater, cross the warp and run it back through. This is only temporary for starting the rug to get a straight line. You will pull it out once the rug has enough rows on to keep it going without the marker.
ill.# 33 Beginning the first rug.
After you have the marker in place, you are ready for the border. This gives a tight finish to the ends of the rugs. It is not necessary, but many weavers use a few rows of warp thread. (ill.#34)
Leave about eight inches between rugs.
When the border is done, you are ready to run the weft (or rags) through. Push down on one of the pedals, making a shed. Then run the filled shuttle through leaving about four inches of the end sticking out the edge. (ill.#35) Now tamp the rag strip tight against the border with the beater, making a hard line which will eventually contribute to the design of the rug. Now with your feet on the two pedals underneath you, press down the one that is up. This crosses the two rows of warp and holds the rags tightly in place. Once again tamp two or three times with the beater making a nice straight line in the rug.
When beginning and ending the borders and rag strips leave a few inches sticking out. Then cut the excess part of the rag strips thinner and turn it back in the rug with the next row. The crossing of the warp will hold it tightly in place and turning it back will avoid ragged ends sticking out.
Now run the shuttle back through the other direction and repeat the process to make a second row. You keep this up back and forth until you are finished or until you want to change the color. Then cut the line of rags and tack on the other color and continue weaving.
It helps if you try to keep a big enough shed so the shuttle slides through, also do not wind too much weft on the shuttles to make it difficult to slip through the shed.
One important thing in weaving is keeping a straight selvedge, for uneven sides will ruin the looks. When running a single shot through the shed do not pull it through too tightly. Leave a little loop at the edge. When you bring down the beater that looseness will be taken up, leaving a straight selvedge. (ill.#36)
A piece of equipment that really helps keep the selvedge even is called a template. It is a long jointed board, and adjustable to any width with sharp clasps on each end to grip into the rug. (ill.#37) When you have woven about three or four inches you can fasten this on the rug. The nails clasp into each edge, holding the rug taut and straight. It serves as a guide as to how tight or loose to weave the selvedge and helps keep them straight. When you weave another few inches, move it up. The template follows you through the rug, assuring the rug being the same width throughout.
When you make a mistake in the rug, you simply unweave. If your right pedal is down, push the left one down in order to un-cross your cross and run the shuttle backwards, pulling the line of rags back out. Repeat this uncrossing and pulling out all the way back to your mistake. We had to unweave almost half a rug just for a mistake. But it is worth it when your efforts turn into a beautiful rug.
Actually it is personal preference as to how much warp you leave between rugs. Edith leaves six inches. This is to allow for three inches fringe for each rug when you take the rugs off. Other people may want more fringe than that. In deciding the fringe you want, remember that the knots you tie to fasten the fringe will take up some of that length. Mark off the desired length and start a new rug.
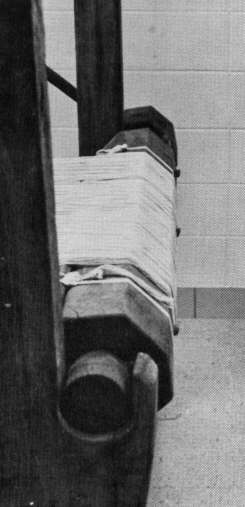
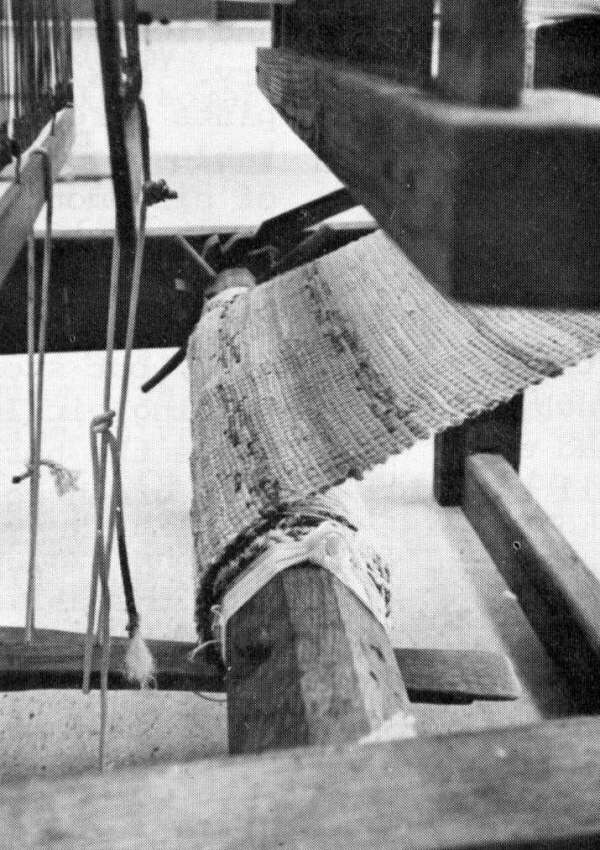
It is better not to cut the rugs apart as you make them, because you waste warp and time, because each time you cut off a rug you have to re-tie the ends back onto the cloth beam. You should leave the rugs until you use up the warp and then take them all off together. As you weave the rugs just wind them onto the cloth beam under the loom until you use up all the warp.
While weaving the rugs, keep working until you have no more room to run the shuttle through the shed or until it gets to be uncomfortable. Then it is time to roll the finished portion onto the cloth beam. First release the tension on the warp beam. Roll the warp off the warp beam and roll the woven rug onto the cloth beam. When you have rolled it as far as you need it, then secure the ratchet on the cloth beam, get a tight tension on the warp beam and resume weaving.
When you need to take the finished rugs off the loom, then release the cloth beam ratchet, cut the warp threads (ill.#38) and unwind all of the rugs onto the floor. Cut with the scissors halfway between each rug to separate them. (ill.#39)
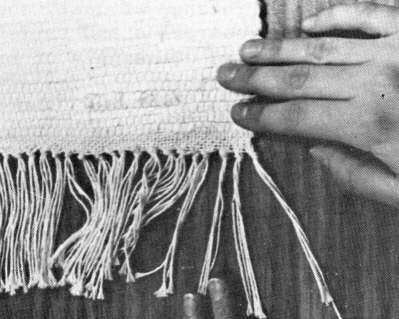
The fringe needs to be tied to keep the rug from gradually unweaving. Lay each rug on a flat surface like a table. Then beginning at one selvedge, tie three to five warp strings into an over-hand knot. (ill.#40) Push the knot securely up against the border to hold the weft tightly.
The rug is finished except for trimming off the ragged ends of the fringe. One easy way is to use a table edge. Lay the straight line of the rug's border back from the edge of the table the length you want the fringe to be. Then cut with scissors the ends sticking over. (ill.#41) This will make a nice looking finished rug.
The actual weaving is a small part of the whole process, but when you are able to sit back and look at the rugs you have woven out of rags most people today would throw away, it is most gratifying. Actually we have found that the weaving is very relaxing. It is exciting and fun to see rugs form and I think more people would enjoy it if they were exposed to learning about it.
K.G.
Appreciation for Information on this article to: Ella Dunn, Marie Corrington, Edith Fulford and Alice Mae Alexander
ill. 36--Getting a straight selvedge is difficult for a beginner.
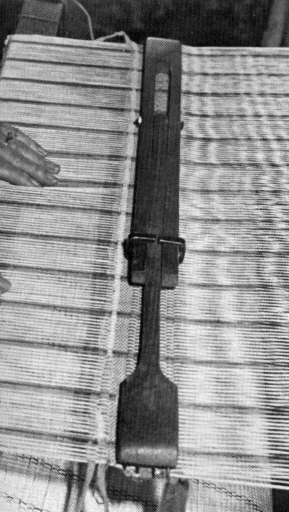
ill. 37--Using a template. Roll finished rug on cloth beam.
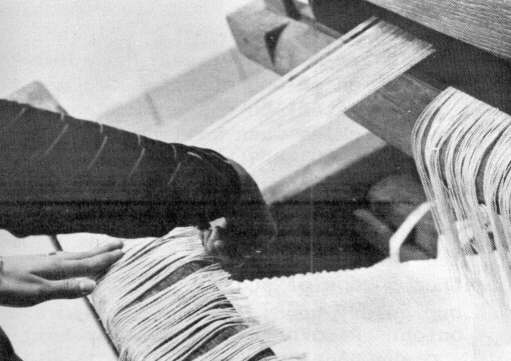
ill. 38--When all warp is rolled off the warp beam, cut the rugs, leaving enough warp for a fringe.

ill. 39--Roll rugs off loom and cut apart.
ill. 40--Secure the weaving by tying small knots in the fringe.
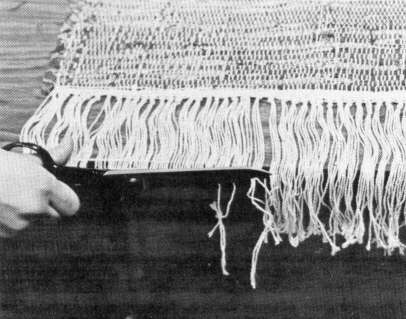
ill. 41. Use table edge to cut the fringe the desired length.
[57]
Copyright © 1981 BITTERSWEET, INC.
Next Article | Table of Contents | Other Issues
