 |
Volume IX, No. 4, Summer 1982 |
HORSE DRAWN BUGGIES
AN AMISH FAMILY ENTERPRISE
by Lisa Goss Photos by James Heck, Gina Jennings and Allen Gage
The house is in a bustle as the famly gets ready to visit their neighbors on a Sunday afternoon. Father is just finishing hooking the mare to the buggy while Mother arranges two hot apple pies in a picnic basket then puts on her bonnet, and while walking out, gathers the baby in one arm as she juggles the pies in the other.
They meet at the barn gate, and after she stows the pies in the back of the buggy, father walks the horse out through the opened gate. Mother grasps her long blue dress and climbs up into the buggy while father holds the baby. Then she smooths out her plain gray apron as she gets settled in. Father hands up the baby and climbs in while the baby is trying to grab the mother's bonnet strings. Readjusting his hat for the winds ahead, he then clucks at the mare.
The ten to fifteen minute drive on the wooded road is quiet, except for the clattering of the windmills in the distance and the rhythm of the horse's gait mixed with the rasping of the wheels on the gravel. Not wanting to disturb the peaceful setting, the parents say very little.
Father had put the top down to enjoy the sunshine of the early summer day to its fullest. Asleep in her mother's lap, the baby's little blue sunbonnet shades the sun from her face.
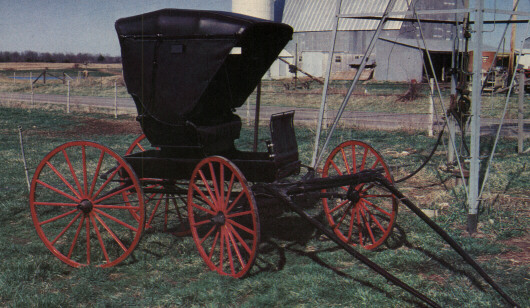
Humming a song, Mother looks lovingly at the baby. Father is proud of the new buggy he has just traded. He glances all over it to see how it is operating on its first ride on the road. The wagon will be used for farm work, but this shiny new buggy with black upholestry will be used only for the family's transportation.
Though this scene may sound like a piece of the past from seventy years ago, it is a scene in the 1980s commonly seen in communities of Amish people whose beliefs proscribe the use of modern technology and dress.
Though the automobile has been in general use only the last sixty years, very few people today would consider using a buggy. Even if they wanted to they would have difficulty finding one. They cannot simply go to a buggy dealer or a used buggy lot to buy one. But in spite of their being outdated, buggies are still being made and sold. A prospective buyer can put in an order with the Chris G. Schwartz Supply Company. This family business has been making buggies for about seven years. Since buggies are not only the Schwartzes' major income but also their way of transportation, they are very knowledgeable about them. They also repair buggies, especially wheels, since they are the part that wears out first.
They have found an increase in work in the last few years because people other than Amish are buying horse-drawn buggies. Some purchase them for entertainment, while some buy just to have the pleasure of seeing a buggy in use again. Since antiques and a bit of nostalgia are popular now, many people are interested in preserving the past. Those fortunate enough to have an old buggy stored in a barn or shed are having them restored.
When a buyer comes to the Schwartz shop, he might see several kinds of horse-drawn vehicles parked in different areas around the shop. Some may be finished and waiting to be picked up. Some are being upholstered and some old ones are waiting to be repaired. There would be nothing unusual at any time in seeing a surrey or two, a log wagon, a dray wagon, a pony cart, a doctor's buggy and a courting buggy.
When buyers of new buggies place an order, they need to have in mind the type of buggy they want. A buyer cannot just say, "I want a buggy," for there are several different kinds of buggies, including a surrey which has two seats. The three most popular are the doctor's buggy, the courting buggy and the hack. The main difference between the doctor's buggy and the courting buggy is that the courting buggy's seat is narrower--"To be closer to your loved one," Mr. Schwartz said. The buggies are used like a car in the family, while hacks, heavy duty buggies used for carrying merchandise, are used like a pick-up.
[27]
All the Schwartz family members that are able to help work in their business. No one has a special job making only a certain part like an assembly line in a factory. If one knows how, he or she does whatever job needs doing.
If possible, they work ahead on parts to save time on making the next buggy. It takes about seventeen or eighteen eight hour days to make a complete buggy, providing all the parts are in stock. But the Schwartz family does not usually work eight full hours each day. With other obligations and farm work, some days they may work only three hours while other days five or six hours.
Depending on the economy, a simple buggy costs about $1,500. A fancier buggy costs more. Though it takes about 120 to 130 hours to make a complete plain buggy, a fancier buggy with hydraulic brakes and all velvet interior takes much longer. The family recently made a fancy buggy and kept a record which showed 167 hours of work.
The shop is a busy place with family members working in different areas. In one corner one person works on the wheels while in another area, another hammers on the wooden buggy body. A corner in the shed is blocked off to make room for cutting the upholstery. At first glance it all looks like one big ball of confusion, but the family knowing where everything is, works quickly and efficiently.
Their shop is a large metal building with windows and a large door on one side opening to where the horses are harnessed to the turn shaft. (Photo 1) The building is very simple but it serves the purpose well. Down the center of the shop stand two rows of various types of machines which can be hooked to a long crank shaft that runs the length of the building.
Since the Amish do not use electricity or fuel-powered motors, they have to find other means for power. The Schwartzes use a pair of horses hooked to crossbars, which they call sweep-poles. They supply the power by pulling the sweep-poles as they walk in circles. (Photo 2) The horses, eleven year old Queen, and three year old Doll are trained by voice command. When one of the family is ready to use a machine, to start the horses walking he yells, "Get up there, Queen!" Gears are located on the base of the crossbar. (Photos 3 & 4) When the horses walk, the gears turn a crankshaft which runs into a larger gear box located in a shed at the side of the building. (Photo 5) On the gear box is a small gear that hooks up to another crankshaft. This crankshaft runs along the ceiling across the whole buggy shop, providing power for all the machines in the shop by hooking a pulley belt from any machine on to the rim of the crankshaft. (Photo 6) As the crankshaft turns, the pulley turns the machine. If the Schwartzes do not want a certain machine running, they simply pull the pulley off the rim. There are several machines run by the crankshaft, including the drill press, table and band saws, spoke reamers, emery stone, sander and wood lathe. Mr. Schwartz said that they have even hooked up a grist mill to the crankshaft.

Photo 1--The buggy shop has many different machines to make parts for the buggies.

Photo 2--Horses turning the sweep-pole provide power for the different machines.
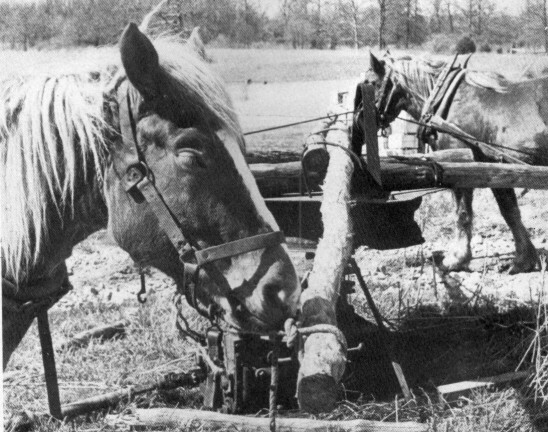
Photo 3--Queen and Doll wait patiently for the command to start.
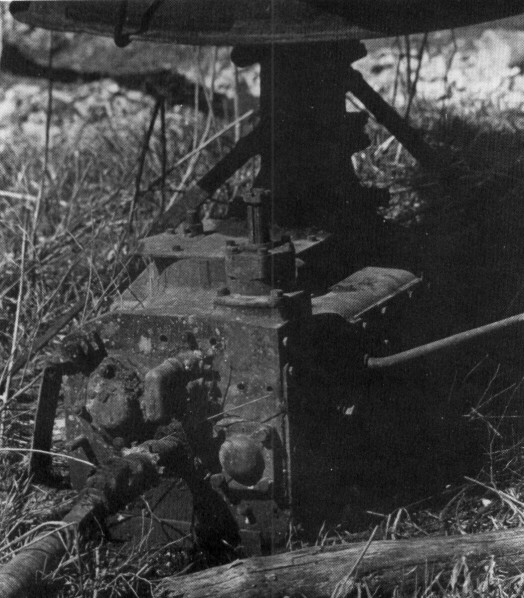
Photo 4--The gearbox of an old tractor is located at the bottom of the sweep-pole.
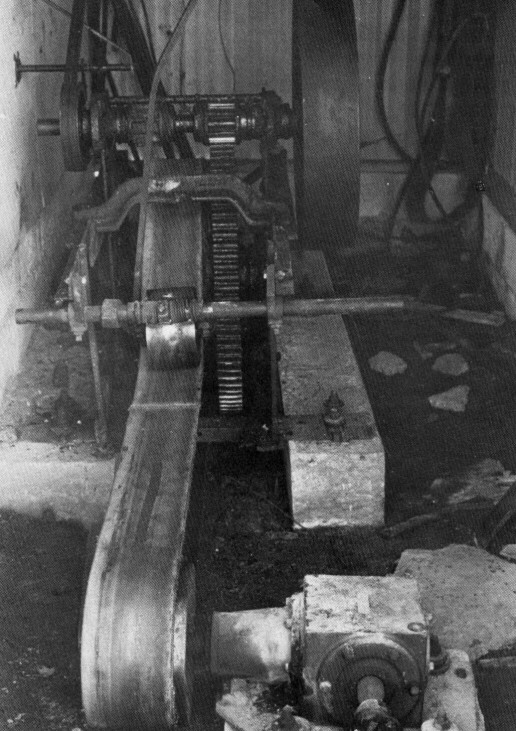
Photo 5--The main gears connect the sweep-pole to the crankshaft in the shop.

Photo 6--The crankshaft runs through the middle of the shop.
[28]
There are also several machines that are hand-powered, such as the metal bender, metal shears, tire bender, forge and the sewing machine which they use for upholstering.
There are many ways to construct a buggy. Mr. Schwartz said that there are as many different types or styles of buggies as there are cars. "I've seen all kinds of buggies. I've seen buggies by Studebaker and by John Deere," he explained. Using their expertise and following the desires of their customers, they make several kinds. The following instructions and illustrations show their methods.
WHEELS
The wheels are a very important part of the buggy. In the past year the family made 238 wheels. They work many hours on wheels since they repair them as well as make new ones for their buggies. Sitting in one corner of the shop are usually a few sets of wheels just completed or some needing to be repaired. (Photos 7 & 8)
A wheel can last about five or six years without too much damage, but if the steel rim gets loose, the spokes might work loose. Loose spokes are dangerous because they might cause the wheel to break. Common types of repairs are replacing spokes and putting on new rims.
The wheels vary in height, but the back wheels are always four inches taller than the front. The standard front is 38 inches and the standard back is 42 inches. They are 1 1/8 of an inch wide. The wheels consist of three parts, the hub, the spokes and the rim.
Hub
The basis of the wheel is the hub. The Schwartzes do not make their own hubs, but purchase iron roller bearing hubs from Pennsylvania or Indiana. Wheels are already balanced when bought. (Photo 9) Roller bearing hubs have little metal balls like B-B's to help turn the wheel easier and reduce wear.
Begin the wheel by placing the hub on a special table designed with a vertical metal rod. Lay the center of the hub through the rod. This position holds the hub securely while fitting in the spokes. (Photo 10)
Spokes
The standard spokes are 16 inches long for front wheels and 18 inches long for back wheels. They are round, 1 to 1 1/4 inches in diameter, except at the end which fits into the hub. There they are square, angling in so that it fits into the slot in the hub and each spoke fits tightly against the next spoke. This arrangement makes a circle around the wheel. The fitting of the spokes is very important.
Stick the square end of the spoke into the notches in the hub and hammer it in until it won't go in any farther. The spokes have to be tight against each other or they will start to rub against each other, wearing the wood so they become loose.
Between every pair of spokes, there is a hole in the hub. Drive a bolt into the spokes to hold them tightly in place. Do this all the way around the wheel. (Photo 11)
The next step is to prepare the end of the spokes so they will fit in the rim. First make sure the spokes are a uniform length all around the wheel, and dowel down the ends of each spoke to fit into the wooden rim.
The part of the spoke that fits up against the wooden rim is called the shoulder. It is more important for the shoulder to be measured accurately than the end of the spoke because all the shoulders must fit tightly and uniformly against the wooden rim around the wheel.
At this point the hubs and spokes are moved to the cutting area. To prepare the ends the Schwartzes use a reamer with the hub and spokes positioned on the metal bar of the reamer. (Photo 12) Measure each spoke to the required length and mark it with a pencil. A clamp on the reamer holds the spokes in place as the hand lever moves the machine to the spokes. The reamer cuts the spokes down to the desired diameter back to the pencil mark which is about 1 3/8 to 1 inch. These dowelled down ends are called tenents. (Photo 13) The diameter of the tenents vary, but the most common is 1/2 to 9/16th of an inch.
[30]
REPAIRING AND MAKING WHEELS

Photos 7 & 8--Wagon and buggy wheels needing repairing are common sights in the shop.

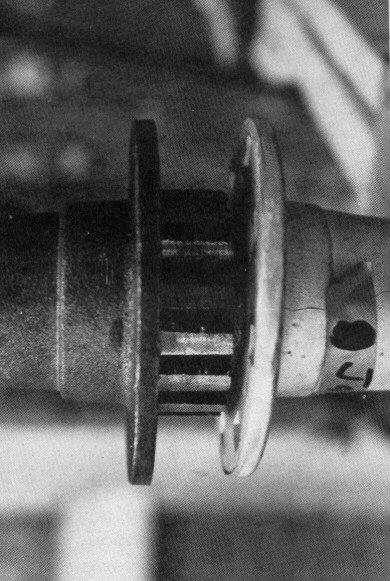
Photo 9--The beginning of the wheel is the roller bearing hub.
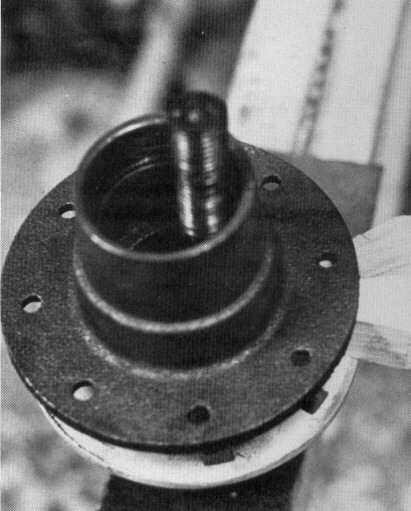
Photo l0--The spokes being hammered in.

Photo 11--Bolts are driven in the spokes to hold better.
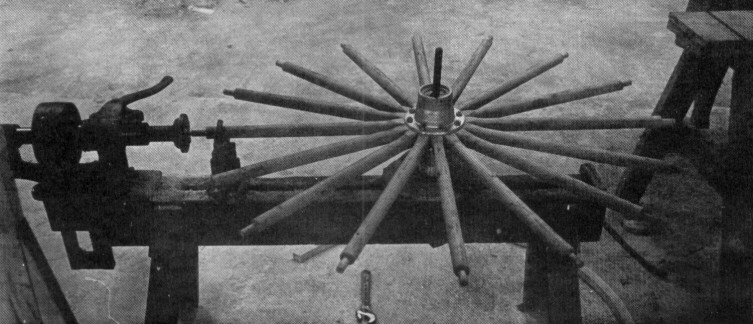
Photo 12--The wheel on the reamer after the spokes have been cut to size for the rim.
[31]

Photo 13--A close up of the reamer with the spoke in the blades.
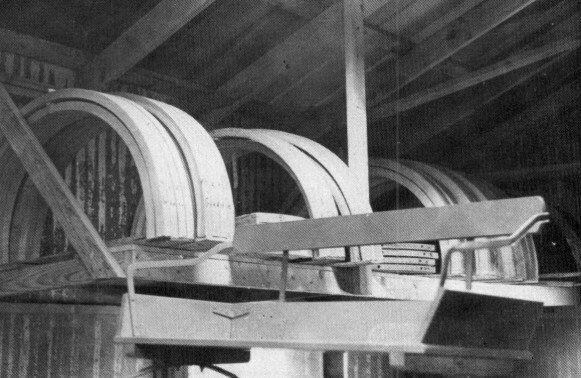
Photo 14--Wooden rims in storage before usage.

Photo 15--The end of the spoke where it fits into the rim.
Photo 16--The felloe plates used to connect the two felloes together.

Photo 17--A wedge keeps the spokes tight in the rim.
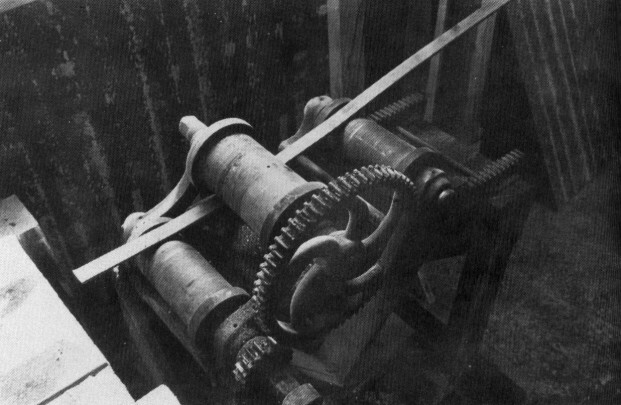
Photo 18--A tire bender bends the metal for the rims.
[32]

Photo 19--The Schwartzes make some of their own tools. They use these tongs and the vise while heating the steel rims and putting them on the wheel.
After using the reamer on all the spokes, then chisel them down for a smoother finish. This will help-the spokes to go in the rim a lot easier.
Rim
Now the spokes are ready for the wooden rim. The rims, called felloes, are made of oak. (Photo 14) There are two felloes to a wheel, with each felloe covering one half of the wheel. The sizes for the felloes vary, but the Schwartzes use felloes that are 1 3/8 inch wide and 1 3/8 to 1 1/4 inch thick.
Drill holes completely through the felloes in regular intervals so that the tenents fit completely through the felloe. Hammer on the felloes. (Photo 15) Next use steel felloe plates to hook the two ends together. (Photo 16) The felloe plates are about 3 inches long and about one inch wide. To hook the ends together, push them together, side by side, and hammer the felloe plate onto the felloes. Then use two bolts, one at each end, to secure it better.
To make certain the spokes fit tightly into the rim after the felloes are fastened in place, drive in wedges from the outside of the felloes through the end of the tenents in each spoke. (Photo 17) A wedge is a small piece of wood about 1 inch long, and about 1/4 inch wide. With this hammered in the middle of a spoke, the spoke will be tighter against the felloe. Hammer in until securely firm.
A wheel could not be used for too long if it was just wood because rocks and hard surfaces would easily damage it. A steel rim fitted around the wheel gives longer life and holds the wooden spokes and wooden rims tightly in place. The wooden rim strengthens the steel and keeps it in shape.
The Schwartzes purchase tire steel, or mild steel rims already cut into widths. The rim for a doctor's buggy is 1 1/8 of an inch wide. They then cut them into the lengths needed, 3/16th of an inch smaller than the felloes.
By using a machine called the tire bender, the Schwartzes bend the metal for the rims to the shape of a wheel. (Photo 18) This hand cranked machine can make rims of different diameters by using different sizes of cylinders. Cranking the handle turns gears in the wheel which turns the cylinder. Place the piece of metal to be shaped in between the middle roller and the second roller which is underneath the first roller. Two smaller rollers support the steel rim while shaping it.
After shaping, weld the rim together before putting it on the wheel.
To put on the steel rims, heat them to a high degree to expand the metal so it will fit over the wooden wheel. The Schwartzes use an outside fire built within a bunch of old car tires, which help to make a hotter fire. After heating the rim, they pry it on to the wood with tongs. Because the metal is very hot, they use a handmade vise for holding the rim. (Photo 19) First pry it on to the wooden wheel and then hammer it in until the center is securely fitted tightly around the wheel.
Next dip the wheel in a water trough, and then spin it around a couple of times to cool it. The metal cools rapidly and tightens against the wood, holding the wooden rim together and the rim tightly to the spokes. If the rim was not dipped in the water, the hot metal would burn the wooden wheel. After this has cooled for a couple of minutes, drive a tire bolt between each spoke to help hold the rim to the wheel. (Photos 20, 21 & 22)
[33]
RIM BOLTS
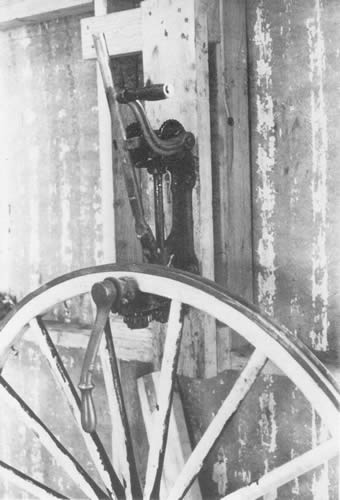
Photo 20--This vise tightens the rim bolts.

Photo 21--Close-up of bolts between spokes.

Photo 22--An almost completed wheel.
CARRIAGE FRAME
With the wheels finished the next process is the making the carriage frame. Begin with the axles which are made of both wood and steel.
Axles
The steel axle, which is usually 61 inches long, needs to be 1 1/8 square to fit through the steel hub. It is held on by a nut and T. On top of the axle is a semi-circular wooden bar with the ends slanted towards the wheels. The point where it slants is called the shoulder. Six clamps attach it to the steel axle--two about 2 inches from the ends near the wheel, two about 18 inches closer to the center and two under the spring. This wooden part of the axle helps to reinforce and strengthen the steel axle. (Photo 24)
The front and back axles are different in several ways. The back axle doesn't have shaft couplings, any type of steering mechanism, nor does it have a head block.
On the front axle there are two shaft couplings for hooking up the shafts the horse is harnessed to. (Photo 25) The shaft bolts onto the couplings which are bolted to the axle. (Photo 26) The shafts are connected with a wooden circle bar which provides extra stability. This bar is located behind the horse when the horse is harnessed to the buggy. There is approximately 30 inches between each shaft. The Schwartzes order the shafts already slightly bent. The shafts are made of hickory because it can bend easier than other types of wood, will not split as easily. The shafts are not hooked to the buggy until the buggy is finished because they are in the way. They can be stored until ready for use.
[34]
Reaches
Two wooden reaches 56 inches long, connect the front and back axles. They meet in the middle on the front axle on the steering mechanism and spread out into a V, attaching to the back axles under the spring. (Photo 23) This length is standard with the Schwartzes for the type of steering mechanism they use.
Two metal reach rods brace the wooden reaches to the back axle to reinforce the frame. These metal reaches fasten to the outside of each of the wooden reaches and extend to the rear axle, fastening about 2 inches from the hub.
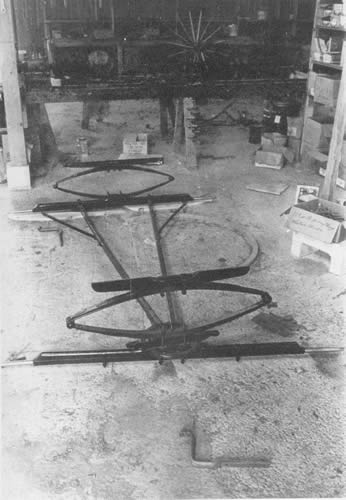
Photo 23--The frame for the buggy.

Photo 24--Showing front axle with fifth wheel, head block, springs and spring bar.
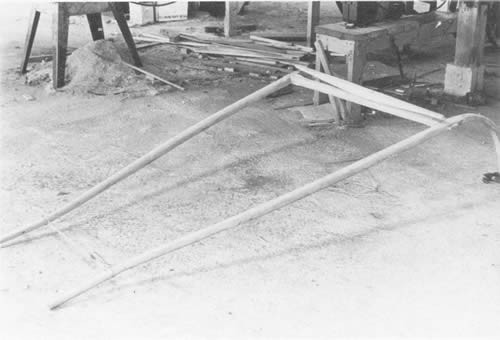
Photo 25--Shaft ready to be attached.
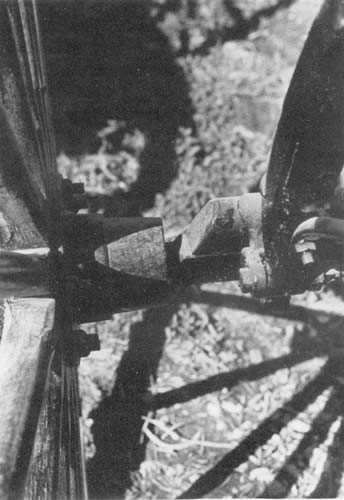
Photo 26--Shafts bolted onto the axle.
[35]
Fifth Wheel
The expression, "I was as useful as a fifth wheel," implies that one was useless. But a fifth wheel is necessary for a type of steering mechanism on a buggy. The Schwartzes use two kinds of fifth wheels. (Photos 27 & 28) The newer fifth wheel, bolted between the reaches and the front axle, consists of two semicircular metal plates on curved shanks.
A nut and bolt becomes the pivot for the plates to turn on. The bottom plate is bolted to the axle, allowing the front axle and wheels to turn sharply, while the top plate is bolted to the head block and spring and remains stationary, allowing the buggy body to turn gradually. (Photo 29)
Head Block
The head block is usually wood and is on top of the fifth wheel on the front axle. The purpose of the head block is to level off the body because the back wheels are four inches taller than the front. (Photo 30 shows head block and springs in place)
Springs
On both front and back axle there is a spring to absorb the shock from a bump in the road, making the ride more comfortable. The Schwartzes order the springs from Indiana.
All buggies have springs. This is one main difference between a buggy and a wagon. Hacks are heavy duty buggies with springs. One buggy spring is about 36 inches long and can hold up to about 500 pounds. It is almost impossible to break the spring because the axle would break before the spring. The longer top and bottom leaves of the springs are joined together. There are three other leaves of metal which flex slightly as the buggy wheel hits a bump. Though the standard is four leaves, the Amish often use a five leaf spring for their buggies.
Spring Bar
Clamped on the top of the spring is a wooden post almost the same width as the spring called the spring bar. The body loops, hooked to this serve as supports for the box, or the carriage body. (Photo 31)
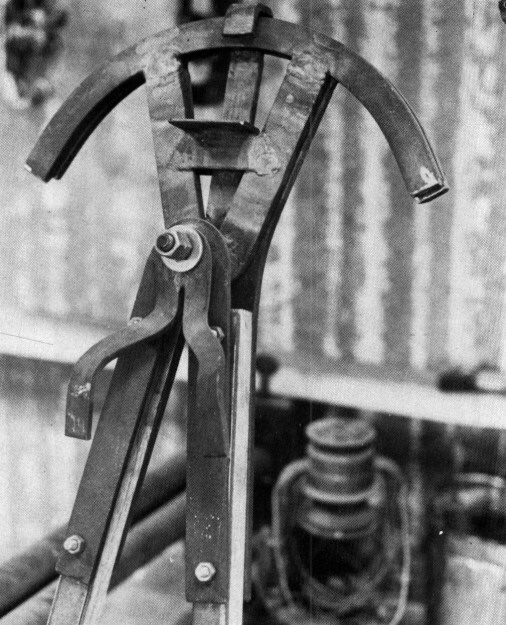
Photo 27
Photos 27 and 28 show two different types of fifth wheels. The older type, pictured in Photo 28, uses two circular plates. The Schwartzes use the newer type fifth wheel shown in Photo 27. This type fifth wheel uses two semicircular plates.

Photo 28
[36]
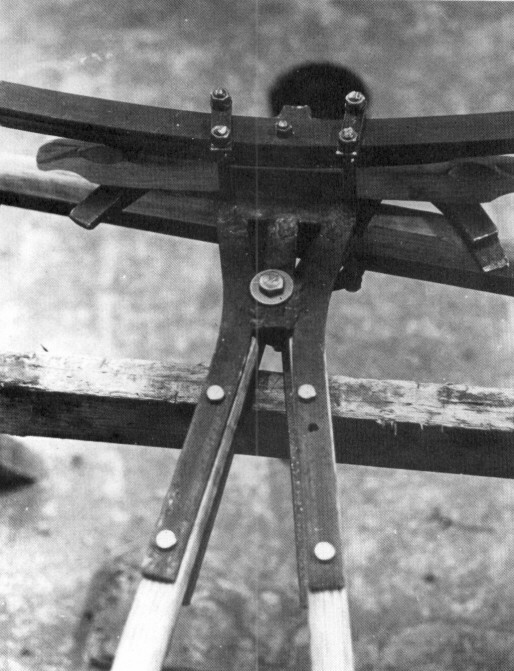
Photo 29--The head block, located between the fifth wheel and the springs, levels the front wheels with the back.

Photo 30--The complete front axle and running gears. From the axle up is the wood and metal axle, fifth wheel, head block, springs and spring bar.
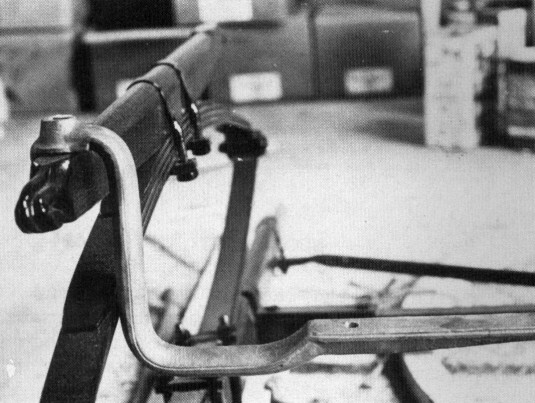
Photo 31--Metal spring hangers on top of the spring bar connect with body loops which support the buggy box.
BUGGY FRAME AND WHEELS
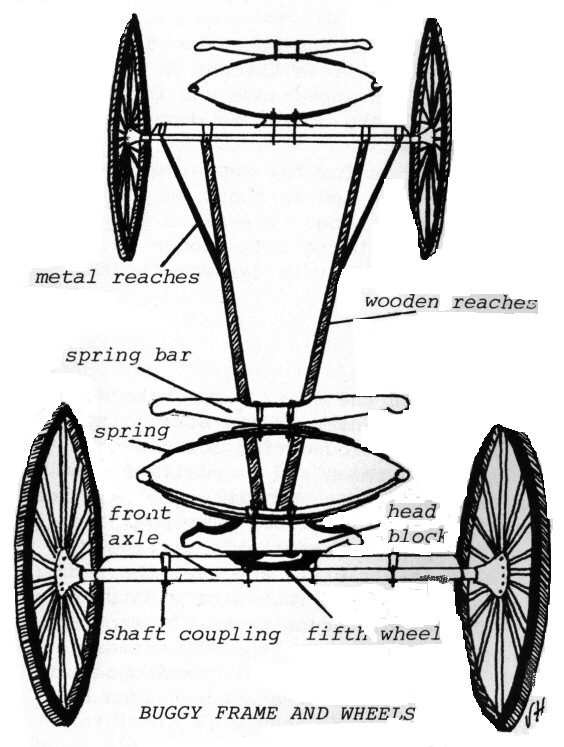
Body Loops
Two metal rods, called body loops or spring hangers, depending on what the manufacturers call them, run from each side of the front spring bar to the back spring bar. These are bolted on underneath the buggy box which actually holds the passenger.
[37]
BUGGY BODY
With all the running mechanism and supports in place, it is time to assemble the buggy body. The foundation for the body is the box.
Buggy Box
The wood for the buggy box is tapered so that it is thicker at the bottom both for appearance and for more support since the bottom is connected to the frame.
The box is for the passenger's feet and merchandise and is about 28 inches wide by 5 feet long. The sides are about 8 inches tall, being tall enough to block the wind. The seat is fastened to the box. (Photo 32)
Seat
To begin the seat, first make a platform or foundation and attach it to the box. This foundation for the seat looks like a bench and is positioned on the box about 3/4th of the way back, thus providing more leg room. The seat is high enough for comfortable sitting. The seat itself will hang over the side of the box about 6 inches on each side.
To get different types of sizes and styles for the buggy, the Schwartzes look through books and old catalogues to get some patterns or samples. Then by using these ideas, they will simulate some patterns and even make some up on their own. They make various new styles of buggies in this fashion.

Photo 32--The body box is about five feet long.
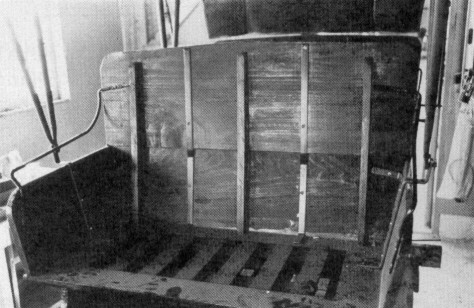
Photo 33--The storage box in the seat is below the metal rods used to support the seat.
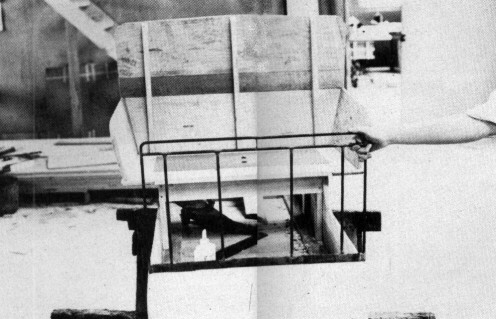
Photo 34--The Schwartzes make their own dashboard frames.
The frame of the seat is simple. Make the chair seat of a flat board usually about 34 inches long, and use another board the same length as the back prop. The seat is not completely solid because there is a storage box built inside the seat. (Photos 33 & 34) There is a slated hinged lid which opens to a shallow 3 inch deep storage area. It is mainly used to store the side curtains of the top when taken off on a warm day. One of the sons explained, "It's said that some old-timers kept their whiskey bottles in there." The storage box is like the old-time automobile seat that you could remove to get to tire tools underneath.
To provide support for arm rest, use two 12 inch boards on the sides of the seat frame. Round off the fronts of these side rests and slant them outward to make the arm rests more comfortable.
Screw these to the seat and back, and put wood glue in all the joints. Use wood glue and screws instead of nails throughout the buggy body for greater strength.
After the glue has dried, add a back prop. Attach another board of about 21 inches to the back to make the seat high enough and glue the joints. When the glue has dried, cut and attach 3 brace boards the length of the base board to the top of the back prop.. These will be spaced evenly and then screwed in. Then space two metal bars evenly between the brace boards and screw them in. The bars, usually 3/4th of an inch wide, provide extra support.
[38]
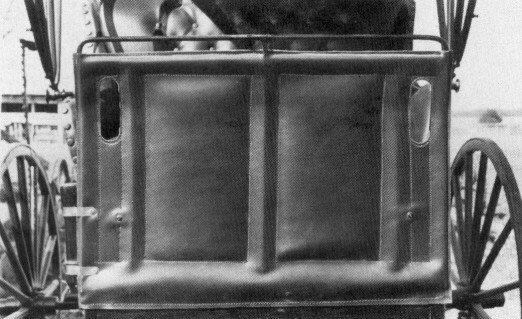
Photo 35--The front of the dashboard, showing the metal rod exposed for the horse's reigns.
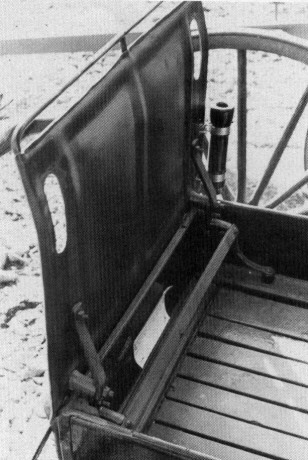
Photo 36--The back of the dashboard, showing how it is connected to the body box.
Next screw a steel arm rest on to the wooden sides of the seats. This piece curves from the top to the bottom and does not show after the upholstery is put on. This is used for resting the arm and also for looks.
Upholstery
This entire wooden seat is the base for the cushioning and upholstery. Attach the springs to a small wooden frame about 1 by 2 inches. The frame looks like a picture frame and can be lifted up to get to the storage box. The springs used by the Schwartzes are not the coiled type, but are metal ones that interweave. Attach the springs to the seat frame onto the back prop of the seat.
Put some sort of cushioning over the springs. The Schwartzes use 2 inch thick foam rubber padding for the seat back prop and 4 inch padding on the seat itself.
Next put some upholstery material over the entire seat and arm rests. Black leather-like material is the most common fabric the Schwartzes use. The leather-like material is not supposed to crack when it gets cold, but to prevent deterioration, it is advisable to keep the buggy inside. If using woven materials, they prefer velvet because it is sturdy, long lasting and available in all colors. But, again, it is advisable to keep the buggy inside because the sunlight will fade the color of the velvet. The velvet-lined buggies are more expensive and require more care than those lined with the leather-like material.
Even if the customer orders a velvet-lined buggy, the Schwartzes use the leather-like material on the buggy top. The top needs a sturdy sunproof and waterproof material.
Dashboard
The dashboard's function is to protect the passengers' legs. The Schwartzes make their own by welding together metal rods with a blowtorch. (Photo 34) They screw it to the front of wooden buggy box and then upholster the frame to match the seats. (Photos 35 & 36) For the doctor's buggy, they make the dashboard 21 inches long by 15 inches high. The metal bar is included in the measurements.
The frame for the dashboard has 2 rods on top. Leave the top rod exposed when upholstering the rest. This rod serves as a surface to lay the horse's reigns on, thus protecting the upholstery. Also, the driver can tie the reigns around it.
[39]
Top
As do all parts of the buggy, the tops vary in size and style. They basically are composed of a covering held in a collapsible frame which consists of bows, bow sockets, knuckles, and brace bars. (Photo 37) The three wooden bows extend across the buggy top providing the support and frame for the material covering. (Photo 38) These bows are bent near each end so they may be inserted into the hollow metal bow sockets which are attached to either arm of the seat. (Photo 39) The top can be folded down because the bow sockets are joined at the arm rest on mounting pins or top mounts.
Near the top of the bows on the outside of the top material, there is a brace bar with joints in it called the knuckle which connects all three bows. This knuckle bar braces the bow sockets stretching the material tight. When the knuckle joints are unfastened, the bow sockets can be folded down. Another brace bar is fastened on a pivot or mount on the middle bow socket and runs down to a mount on the outside of the seat. This brace bar keeps the whole top in position until the knuckle joint is unfastened, allowing the whole top to be folded down. (Photo 40)
The tops are upholstered in different ways. For fancy buggies, the Amish put burlap between the vinyl material and the top. This flap is like a window. (Photo 41) With the flap rolled up, more air comes in, and for greater protection, it can be fastened down. Also for greater protection, side curtains can be snapped on. Photo 42)

James Heck pushes a doctor's buggy back into the shop. Two men can easily pick up a buggy.
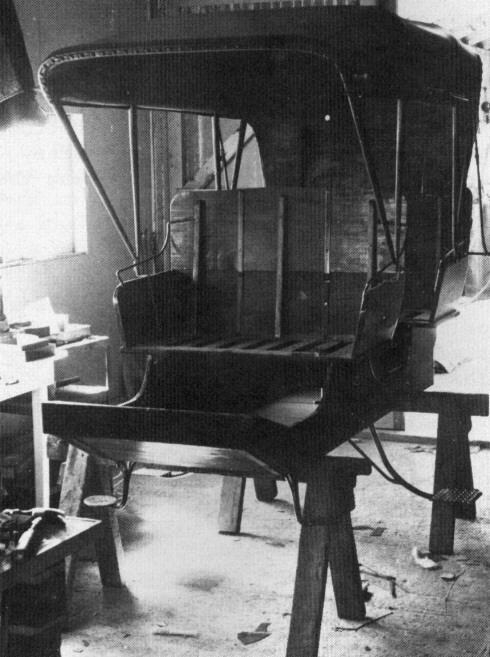
Photo 37--This two-seated buggy, called a surrey, is being upholstered. Notice the step on the right.
[40]
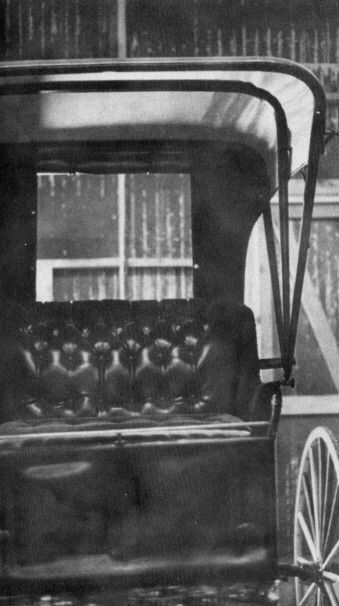
Photo 38--A doctor's buggy with the top up shows the bows inside of the top.

Photo 39--The metal bow sockets are attached to the side of the seat.
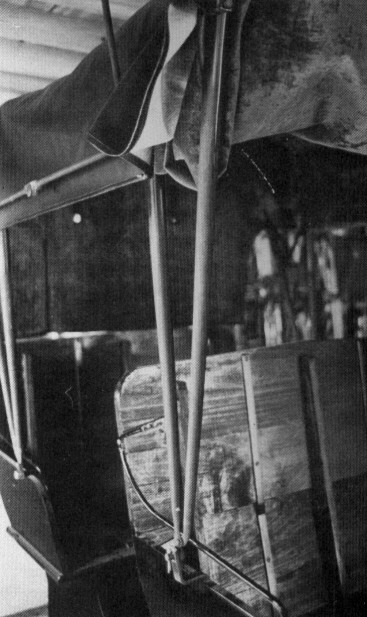
Photo 40--With the knuckle joints unfastened, the top can be folded down.
The buggy top, though always open in front, does offer some protection from the wind and rain.
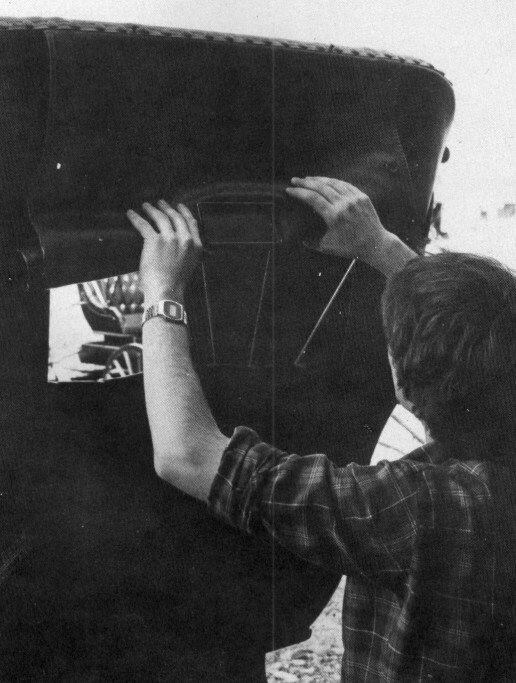
Photo 41--James is putting down the back flap of a doctor's buggy.
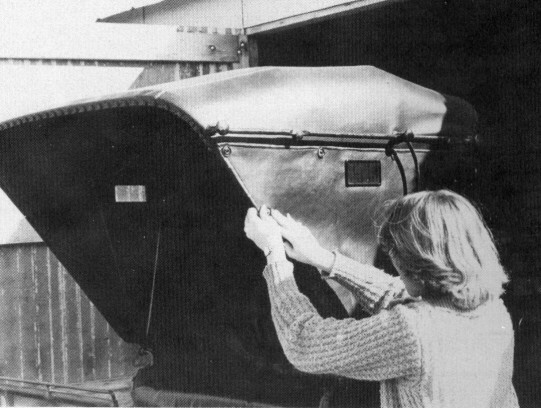
Photo 42--BITTERSWEET staff member, Lisa Goss, snaps the side curtains back on. Notice the tiny windows on each side of the black leather-like fabric top.
[41]
Finish
The Schwartzes apply a finish to the wood. They apply at least three coats of paint--a linseed oil paint for the first two coats and a high gloss oil paint for the last coat.
When we see the Schwartz family or anyone else driving a buggy along a country road, we realize that, though compared to an automobile its technology is simple, still it is actually a finely crafted, functioning machine, well adapted to its uses and needs. The very fact that there are still old buggies left for the Schwartz family to restore demonstrates their durability.
For many; many years people depended on buggies, improving them and making them more comfortable. Their form and structure was very evident in early automobile design. Even today the padded dashboards and the fold-back tops of the most recent automobiles trace back to the fancy buggies of the early 1900s.
Today we can still buy a brand new buggy, which in a way can be considered both new and old. It is new because the chris G. Schwartz Supply Company just constructed it, using new talents and designs and new materials such as foam rubber and synthetic upholstery materials. It is new because there is still a definite need for it, not only for the Amish since it is their only means of transportation, but also for those people wishing to understand and recreate a bit of the past.
It is old because, harnessed up to a horse, it is truly a piece of the past.

A finished wagon and buggy.

An old buggy waits for repairs.
Burr Nagal riding in a finished buggy.

[42]
Copyright © 1981 BITTERSWEET, INC.
Next Article | Table of Contents | Other Issues

![[Title Picture]](9i4p26.jpg)