 |
Volume V, No. 2, Winter 1977 |
Fiddlin' around
Story by Diana Foreman
Illustrations by Stephen Ludwig and Gala Morrow
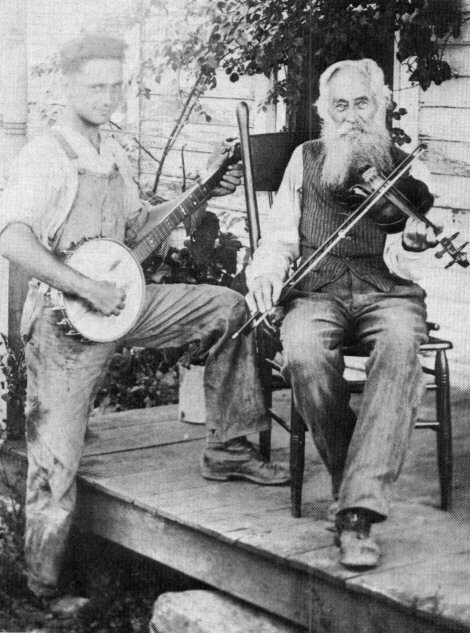
Before radio and television every Ozark community had a fiddler who attended all the parties, dances, barn warmings, pie suppers and social gatherings. Unable to read a note of music these fiddlers, accompanied by a guitar, banjo or mandolin, claimed they could play all night and never repeat the same song. Frequently, they did. Fast tunes like "Cripple Creek" and "Buffalo Gals" set feet tapping and couples jigging. Slower tunes like "Fiddler's Dream" gave dancers a chance to catch their breath and the fiddler a chance to show off his skill.
Today fiddlers still play all night in private jam sessions and bluegrass festivals. Three Ozark fiddlers are featured on our soundsheet [page 70]. James Brown, Jimmy Gage and Violet Hensley learned to play from old-time fiddlers and still play the old fiddle tunes at gatherings.
James Brown, a senior at Lebanon High School, has played for three years. James, like the old fiddlers, cannot read music, but plays by ear. He learned by listening to recordings and playing along. "It just took a lot of practice," James said, "but now I don't have to practice near as much." James plays with the Bill Jones Bluegrass Travelers and plays in fiddlers contests all over the Midwest.
Jimmy Gage, also from Lebanon, started playing the fiddle When he was twenty years old. He had been playing the guitar since he was nine, and "Playing the fiddle just sort of came naturally.'' He performs with the Pomme de Terre Opry during the summers.
Violet Hensley, the "Whittling Fiddler," of Yellville, Arkansas, not only plays, but also makes fiddles. She learned both skills from her father. He made his first fiddle in 1888 when he was fourteen. Violet followed in her father's. footsteps, learning to play when she was twelve and making her first when she was fifteen. "I learned by helping my daddy. He never showed me how to make one when I decided I could make one. I just learned by helping him."

[62]
Violet now plays with her family at local gatherings, at the Buffalo River Park near Yellville and at Silver Dollar City near Branson, Missouri, during its fall craft festival. She gives demonstrations on the construction and techniques of playing at schools and colleges.
Violet has just completed her twentieth fiddle, but she quit playing and making fiddles for twenty-seven years between making her fourth and fifth fiddle to raise her eight children. "I hardly even picked my fiddle up during that time. In fact, it wasn't even strung up." Violet laughed as she showed her first fiddle, "What's left of it. Two of my boys busted it all to pieces."
MAKING A FIDDLE
Violet's father made his fiddles using only a very few common hand tools and native wood. Violet has better tools, but still uses only simple hand tools like saws, brace and bit, scrapes, chisels, knives and sandpaper. Jill. 1] Though some of the parts of fiddles can be Purchased, like the neck, Violet makes most of them herself.
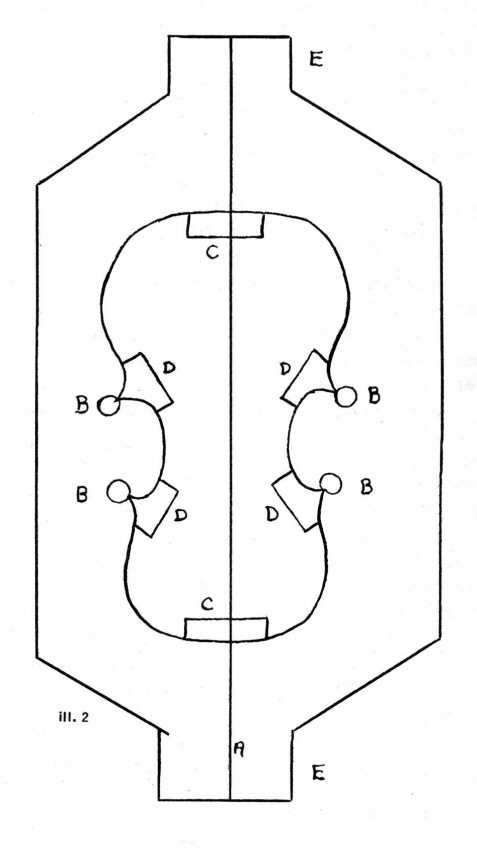
STEP ONE--Making the Mold: To make a fiddle you need a mold to form the outside shape of the ribs. If you do not have one you can make one of 1-1/4 inch lumber. Violet used oak. The mold or press consists of four pieces sawed out into the shape of a fiddle--two for the outside form, each cut in half, and two for the inside. This form can be made by drawing the shape on a board. [ill. 2] Saw all the way through the center length of pattern line A. Drill inch holes at the four points B. With a jig saw cut carefully around the curved lines. At points C, cut out rectangular holes about 1 x 3 inches. Also cut rectangular holes at points D. These holes give room for the wooden blocks to be inserted later in step 2. Sand off rough edges only. Points F are designed to hold the C clamp.
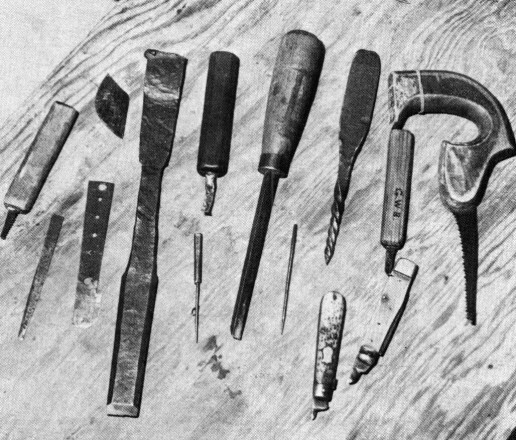
Ill. 1 (above) Violet uses simple tools. Ill..2 (below) Pattern to scale to cut the four forms for the body of the fiddle. Use 1-1/4 inch boards. Each square on the drawing represents one inch. To transfer this pattern mark off one inch squares on a big sheet of paper and enlarge the pattern by following the same curves and lines on the inch squares as in the drawing.
[63]
STEP TWO--Ribs or Sideboards: The rib boards consist of six different pieces of three sizes. The ribs which make the upper curve are 7 inches long, the middle ribs are 4-3/4 inches and the lower are 8-1/2 inches. All are 1-1/4 inches wide and less that 1/16 inch thick.
Use a hard wood for the sides, the same wood as the back if possible. cherry or maple is good. Roughly saw out the six ribs and scrape them to the correct size. Boil the pieces about fifteen minutes or until they are flexible.
Position the wet and pliable ribs in the sideboard press and clamp it together. Put in temporary wood blocks in rectangular holes to help hold the ribs in place. [ills. 3, 4 and 5] Leave ribs in the press for twenty-four hours to dry.
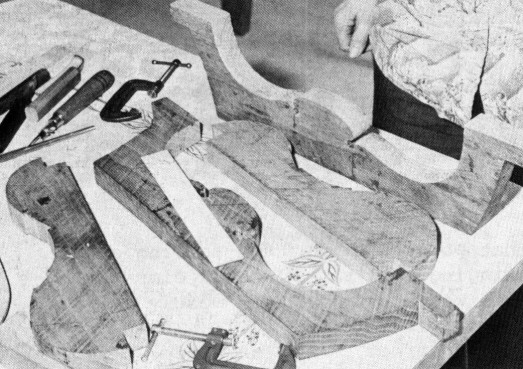
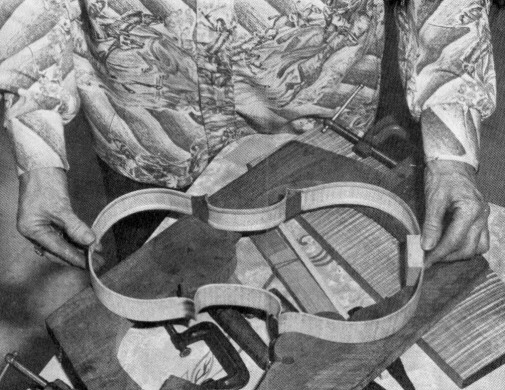
Ill. 3-- Prepare materials for forming the characteristic shape of the fiddle. You will need the forms, 6 ribs and two clamps.

Ill. 4--The ribs or sideboards after being boiled to make them flexible are fitted into the forms.

Ill. 5--Clamp the forms together tightly. Add wood blocks at curves and joints to hold ribs in the shape. Leave in form for 24 hours.
STEP THREE--Corner and End Blocks: After the sideboards have dried in the correct shape, remove the center of the mold, but leave the outside of the frame intact. Permanently glue in four corner blocks cut to shape and one end block. [arrows, ill. 6] Use violin glue for all glueing. The corner and end blocks strengthen the fiddle where the ribs meet to form the curves.
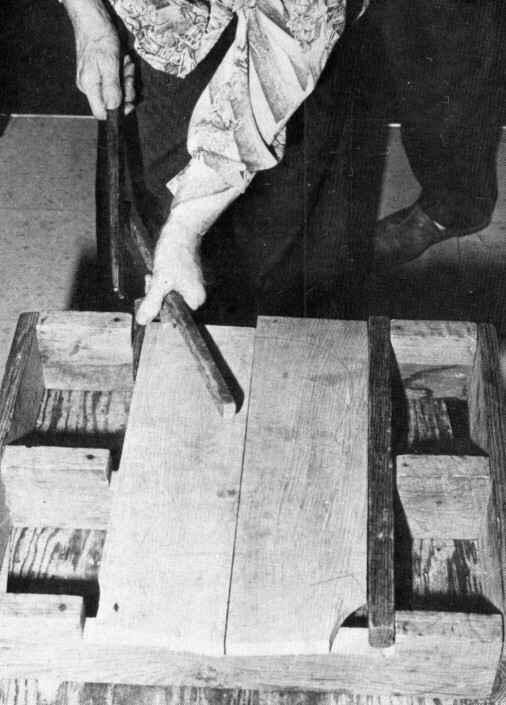
STEP FOUR--Double Line: The double line is made of twelve small strips of wood 1/4 inch wide, 1/16 inch thick and the same length as each of the rib boards. They are glued along the inside top and bottom of each rib board up to the corner and end blocks for support. Split blocks of wood are used to hold the double line in place while the glue is drying. [ill. 7] Raise rib cage slightly from the frame to position these blocks. After twenty-four hours, these blocks can be removed and the finished ribs can be taken from the sideboard press. [ill. 8]
PARTS OF FIDDLE

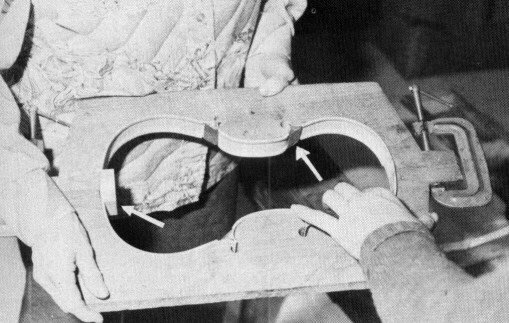
Ill. 6--After removing inner form, permanently glue shaped blocks of wood in end and in the four curves.

Ill. 7--Add a double line on the ribs for strength. Glue and use split wood blocks to hold in place until dry.
Ill. 8--When dry remove from the form the ribs, shaped, strengthened and ready for the front and back.
STEP FIVE--Back of Fiddle: Violet usually works on the back of the fiddle while the ribs are drying in the press. For the back, she likes cherry best, but uses maple frequently. The harder the wood for the back, the better. The wood must be cured because green wood may crack with age.
Use two pieces of wood 3/4 x 15 x 4-1/4 inches. Trace the design on the two boards with the finer grain to the middle and the rough grain on the outside. Violet doesn't like to use one board to make the back because, "If it was in one solid piece, if you didn't have the heart right in the center, your fine grain would be on one side and your rough grain on the other. You may have a strong bass to it and a weak E and A string." The pattern for the back and front are about 1/2 inch larger all around than the pattern for the frame to have an overhang.
Match the tracings and place the boards in the frame. Glue the two pieces together and place the wedges in the frame to hold the pieces tight. Let dry twenty-four hours. [ill. 9]
[65]
STEP SIX--Front or Top: Repeat step five for the front. But, a softer wood can be used for the front.
STEP SEVEN--Shaping the Back and Front: With a small saw roughly cut out back and front. Then carve with a sharp knive both sides of the front and back of the fiddle to form the curved shape. The center is carved from the under side and the ends are carved from the top side to make the desired curve. Violet knows how to shape the back and front because "I've done it so much. You have to turn the wood around and work according to the grain of the wood so it will carve, not split. You can't go the same direction with every shaving," she cautioned. [ill. 10, 11 and 12] After the top and bottom are shaped, use scrapes to smooth down the wood. Then use sandpaper to finish it. In the curves and hard places to reach, put a little piece of sandpaper over your thumb and work it down. On the back and front, put the sandpaper over a small block of wood because "Your hand goes up and down with the bumps. The wood block won't give. The other way you are just sanding the humps and sinks, not working them down."
Ill. 9 (above) The front and back are two boards glued with finer grain to center. Ill. 10 (below) You've heard of the cat and the fiddle? Violet has both.
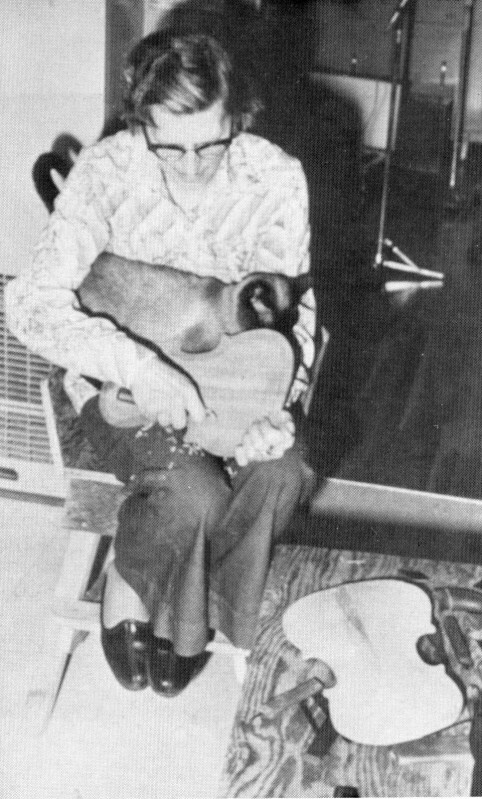

Ill. 11 & 12 The front and back must be whittled to a curved shape bY hand with many hours of patient labor. No shortcuts here.

[66]
STEP EIGHT--Cutting the Sound Holes: Trace the "f" design Jill. 13] on the front of the fiddle in the position shown. Using a small bit, drill a hole at each end and one in the middle of the design. Then cut out with a small saw. [ill. 14] Violet doesn't cut the sound holes completely free, but leaves hers closed near the ends where the end holes are drilled as her trademark.
STEP NINE--Bass Board: The bass board is a pine bar 10 x 14 inches glued on the underside of the front under the bass string. [ill. 15]
STEP TEN--Putting Back and Front Together: Glue back and ribs together using violin glue. Glue front to back and ribs. Use C clamps to hold. Let dry twenty-four hours.
STEP ELEVEN--The Sound Post: The sound post is a thin pine rod 1/4 inch in diameter and just long enough to be wedged between the back and front.
[ill. 16] It is under the first string and bridge. Violet uses a string to put the sound post through the sound holes. Then she used an old-fashioned button hook to set it up. It is not glued in place, but just wedged in place. Violet said, "So far I have never cut one short. I've had to take it out as many as four times and trim it off. But I never cut one too short."
STEP TWELVE--The Neck: Though Violet makes her neck by hand, they can be purchased. Violet begins working on the neck while the back is in the frame and the glue drying. This way, when she has the front and back finished, the neck is ready to put on.
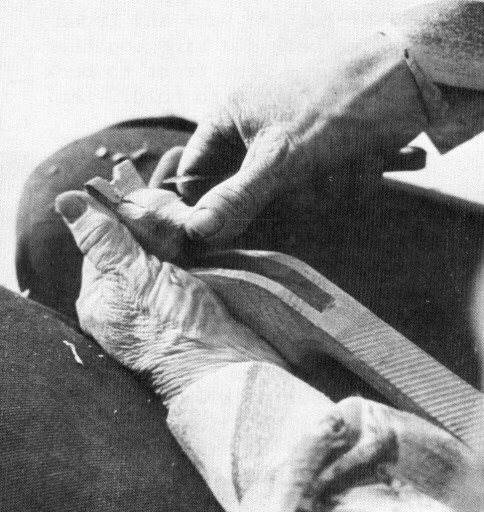
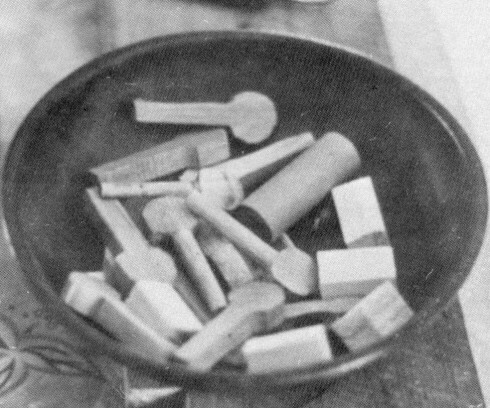
Trace the design of the neck and head on a block of wood 9 x 2-1/4 x 2-1/4 inches. [ill. 17] Saw out the rough design with a small saw. Drill holes for pegs and hollow out peg box. [ill. 18] Violet makes heads of the traditional scroll pattern [ill. 19] and horse's heads [ill. 20]. She has a lion's head sawed out, but hasn't begun carving it yet. Whittle and carve the head and sand it smooth. When the neck is finished, cut out a recess 1/2 inch to fit neck over body. [ill. 21] Glue the neck to the body. Sand fiddle to the desired finish. [ill. 22]
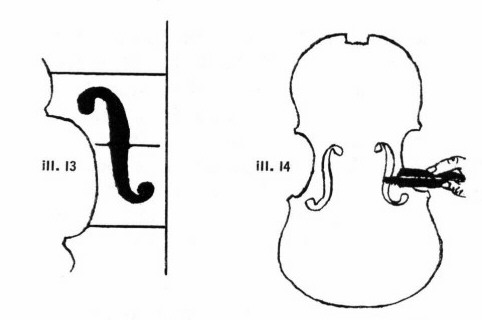
Ill. 13 & 14--Trace the "f" design on the front and saw out carefully.
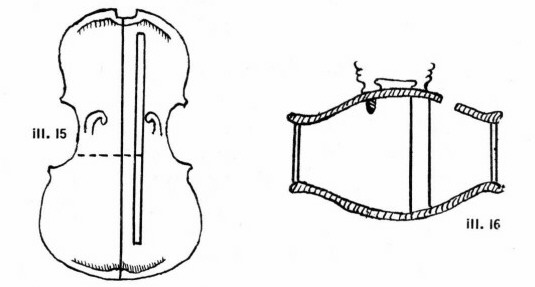
Ill. 15--Glue bass board on underside of the front. Ill. 16--After front and back are glued to the ribs, insert the sound post just under the first string and the bridge.
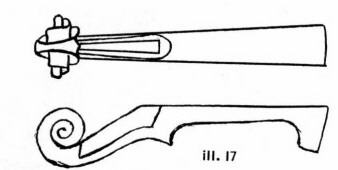
Ill. 17--Top and side view of neck design. Each square equals one inch.

Ill. 18--Drill holes for pegs on the pegboard and hollow out the peg box.
[67]
STEP THIRTEEN--Finger Board: The Ginger board is made of ebony and most are bought pre-cut. The finger board is glued to the neck, but is free floating over the front. [ill. 23]
STEP FOURTEEN--Tail Piece: The tail piece Jill. 24] is made of dogwood. First drill a 1/4 inch hole in the center of the rib at the bottom and insert an ebony end pin. [ill. 25] Attach the tail piece to this pin with a piece of gut. The tension of the strings keeps the tail piece in place.
STEP FIFTEEN--Finishing Up: The fiddle can now be stained or varnished. The pegs, made of persimmon, [ill. 26] are fit into the holes drilled in the neck. These may also be purchased. The bridge is set thirteen inches from the nut and is 1-1/4 inches high. There are grooves cut for the strings. It is carved to fit the contour of the fiddle and is not glued, but is held in place by the tension of the strings. Violet has drawn some designs on some of her fiddles before she varnished them. The varnish then preserves the drawings.[ill. 27]
"It takes me about 240 hours to make a fiddle," Violet said. "Fifteen sixteen hour days if I've got good working wood and no problems. I get $200 to $500 for one."
If anyone is interested in having a homemade fiddle, Violet's address and phone number are: Mrs. Violet Hensley, The whittling Fiddler, Box 484, Yellville, Arkansas 72687.
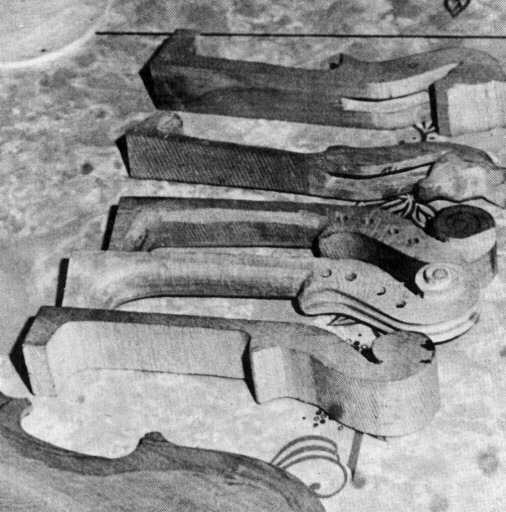
Ill. 19--The traditional scroll and horse horse's head necks showing stages from rough sawed, to partially whittled and the finished neck ready to glue on.
Ill. 20--Some prefer a novelty head such as this horse's head Violet is shaping.
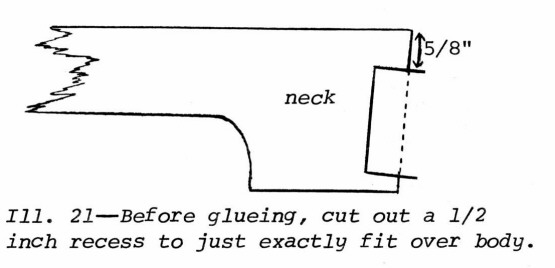
Ill. 21--Before glueing, cut out a 1/2 inch recess to just exactly fit over body.
[68]

Ill. 22--Sanding down all the rough edges, especially where the front, back and ribs are joined, is a time consuming task, but one well worth the effort.

Ill. 23--Gluethe purchased finger board over the neck. It is free floating near the bridge.

Ill. 24--Cut out the tail piece from a hard wood such as dogwood. Fasten to the end pin with gut inserted in the drilled holes in the end of the tail piece.

Ill. 25--Showing where to put the end pin on the body of the fiddle.
Ill. 26--Though pegs can be purchased, Violet cuts out and shapes her own.

Ill. 27-One of the 20 finished fiddles Violet has made. Notice on this one before varnishing, she painted some designs.
[69]
Copyright © 1981 BITTERSWEET, INC.
Next Article | Table of Contents | Other Issues
