 |
Volume VI, No. 4, Summer 1979 |
TATTING
INSTRUCTIONS FOR AN OLD ART
by Leigh Ann Hicks
Photos by Mary Schmalstig, Drawings by Patsy Watts
Tatting has always fascinated me, for I can remember when as a small child, I loved to sit and watch my great-grandmother, Ruth Courtney, tat away the hours. Her speed and skill in putting the pieces together seemed almost magical. She would sit there talking to me without looking at her hands, which were busily making the intricate lace. Her right hand moved the shuttle back and forth with the speed of an experienced weaver, while her fingers skillfully controlled the fine thread as if the shuttle and thread were a part of her.
As the years passed, I looked forward to the time she would teach me how to tat. It was nice to just sit and listen to her tell me the basic fundamentals. She demonstrated the stitches and put her hands over mine to show me when I kept doing it wrong. She was very patient with hopeless me while I was learning the basic techniques, but since she lived quite some distance from my home I also asked Dorothy Deeds to help me. With practice I found I could master the basic stitch and do simple tatting.
Tatting, or frivolite, the French name, originated in Europe in the late eighteenth century. It is the art of making fine lace edgings and material, which are characterized by the tiny rings and picots, or loops, which both decorate the work and hold the rings together. The edgings were sewn on ladies' handkerchiefs, dresser scarves and linens. They decorated dresses, babies clothes, blouses, underclothing and many other places where lace was desired. Whole caps, scarves, tablecloths and other items were made entirely of tatting.

The art faded out of style in America for awhile during the American Revolutionary War, but was still going strong in Europe. During this time many tatting factories were started in Appenzell and St. Gallan, Switzerland. Later there were also some in Plauen, Germany. These factories hired many women to make handmade lace tatting. This was tedious work and took hours to make even a yard of lace.
[44]
Tatting became very popular again during the Victorian period. In Europe and America most all young girls learned tatting from their mothers or their grandmothers. In the Ozarks girls, like my great-grandmother, and sometimes even boys, learned to tat in the one-room country schools. She said, "I had to learn how to tat because all the girls had to learn. We all got a shuttle and started in. I had a lot of fun. The first stitches I made I didn't do quite right. My knots were real far apart because they were on the wrong thread."
Dorothy Deeds learned from her older brother who was one of the boys who learned how to tat with the rest of the children in the country school where most activities and projects included all children old enough to participate. Dorothy said, "I became interested in tatting when my brother started doing it at home. I asked him to show me how and he did!" Then when she grew up and became a teacher herself, she also taught it to her students. She has recently heard from one of those boys she taught. He decided to make tatting to go on the curtains his new wife was making.
After World War I in many places, tatting, like most things Victorian were too old-fashioned for the modern progressive woman. Once again the national popularity of tatting waned, though many older women continued making lace, even teaching it in the Ozarks rural schools. But today with the new interest in all things handmade, tatting is enjoying yet another revival. Though it looks complicated, once the principal is understood, it isn't difficult. The cost is minimal, the satisfaction is great.
The materials used for tatting haven't changed from the 1700's. All that are needed are thread and a shuttle. Tatting lace can be made of different kinds and sizes of thread. Traditionally the thread has been fine white cottons, though tatting can be done with any thread, string or yarn. The thread usually ranges from very fine size 70 tatting crochet thread to the larger sizes such as #5 or #3 pearl cotton.
The finer thread, which is more difficult to work with, makes the daintiest lace for edgings. The heavier thread, best for beginners to learn with, is used for baby caps, purses and other more durable items.
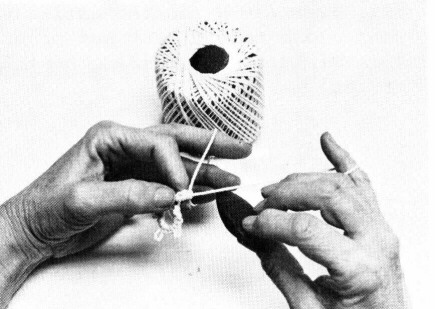
The shuttle is a simple, small hand-held tool on which the thread is wound. It is a flat oblong shape to pass easily over, under and through the thread in the process of making the knots, or stitches, in tatting. It has a point on one end to help take out mistakes and to use like a crochet hook in joining rings of tatting together. Shuttles are very inexpensive and last almost forever. The shuttles used in the earlier days were usually made of ivory, bone, or wood, though wood shuttles were not as pliable as the other ones. Today you can buy a tatting shuttle made of many kinds of material--bone, steel, plastic, and some even of tortoise shell. Some are elaborately decorated while others are very plain. They vary in sizes from three inches to five inches long, with the larger ones being used for the bulkier thread. Smaller ones are easier to handle. Some of the steel shuttles have a removable bobbin on which the thread can be wound with a sewing machine, thus saving the tedious job of hand winding. This type of shuttle is quite handy, but I suggest that beginners use a plastic shuttle as the steel ones get to be quite complicated. Wind the thread on the shuttle by first tying the thread through the hole in the center of the shuttle and winding it full, but not beyond the edge of the shuttle.
Before beginning the actual tatting, it is necessary for beginners to become familiar with a few terms used in the following instructions. The circle thread is a thread wound around the left hand in the process of tatting. The shuttle thread is the thread that extends from the shuttle to the left hand. Tatting begins with a double stitch, which is the basic stitch. It consists of a first half and a second half which are actually half hitches or knots. Even though the French name for tatting changed, one of the French terms was retained. The term picot is French for point. Picots are the small loops made between double stitches that give tatting its delicate decorative effect. The ring consists of a series of stitches and picots pulled into a circle.
[45]
HAND POSITIONS
The first thing to master in learning to tat is how to hold the shuttle and thread. The following positioning of the hands gives the greatest speed and efficiency and even though at first some of the positions may seem unnecessary, a bit of practice will show why it is important to follow instructions carefully. If you are left-handed, reverse hand directions and use a mirror on the photography and drawings to show positions.
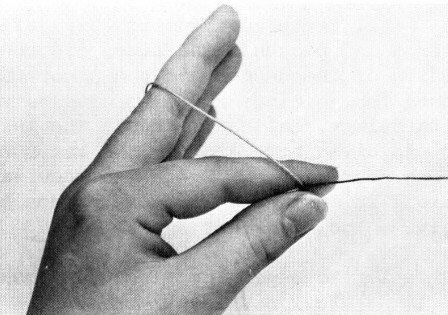
1.Unwind about 15 inches from the shuttle. Holding the shuttle in the right hand, grasp the flat sides between the thumb and index finger in a horizontal position with the point toward the left. The thread should come at all times from the back or far side of the shuttle from you. (Ill. 1)
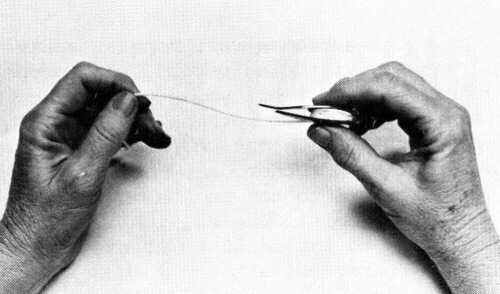
Ill. 1--Holding shuttle thread and shuttle
2.Grasp the loose end of the thread about 3 inches from the end between the thumb and index finger of the left hand. The loose end should dangle down.
3.Spread out the middle, ring and little fingers of the left hand and pass the thread over them. (Ill. 2)

Ill. 2--Wrap around the left hand fingers.
4.Bring the thread around the hand to make a circle, catching hold of it securely between the thumb and index finger. This makes what we will hereafter call the circle thread. (Ill. 3)
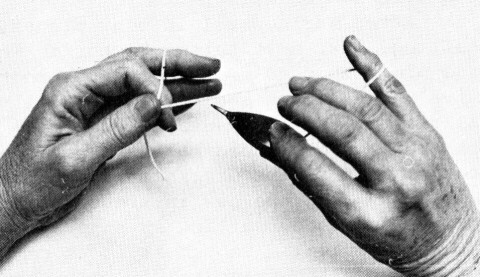
Ill. 3--Hold between thumb and finger of left hand. Wrap around right little finger.
5.Adjust the circle thread so that the fingers are comfortable and somewhat spread out.
6.Unwind the shuttle thread to about 10 inches, keeping the right and left hands at equal levels. The thread coming from the shuttle is the shuttle thread.
7.Reach under the shuttle thread with the little finger of the right hand (or ring and little finger if more comfortable) and catch the thread to control the tension. (Ill. 3)
[46]
BASIC DOUBLE STITCH
1.To make the first half of the double stitch, keeping hands in position, move the shuttle towards the left hand and slip the shuttle point first under the shuttle thread and under the circle thread between the index and middle finger. Bring it back over the circle thread and down inside the loop formed by the shuttle thread. As you pass the shuttle under and over the threads, allow the threads to slip between the shuttle and finger or thumb. (Ill. 4) Inserting shuttle through the loop, drop the little finger's hold on the shuttle thread and draw it out, but do not tighten.
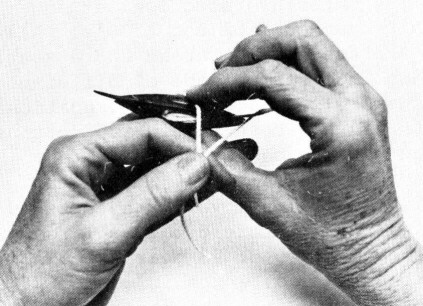
Ill. 4--Slip shuttle under circle thread.
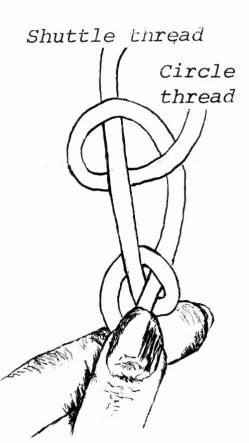
2.Step 1 makes a single hitch around the circle thread, (Ill. 5) but the hitch must be tightened on the shuttle thread. Step 2 is the crucial step and may have to be done a few times until you get it correct. Hold the shuttle thread taut throughout this step. Still holding the circle thread securely with thumb and index finger, drop the three fingers of the left hand which have been holding taut the circle thread. Now tighten the shuttle thread, even giving it a slight jerk. (Ill. 6) This movement should put the bitch or stitch on the shuttle thread.

Ill. 5 & 6--Make single hitch around circle thread. Drop fingers of left hand and tighten shuttle thread, putting hitch on shuttle thread.
3.Move the stitch down the thread to your thumb and index fingers by raising the middle finger of the left hand and pulling downward slightly on the taut shuttle thread. (Ill. 7)
Ill. 7--Draw first half of double stitch down between index finger and thumb.
4.To make the second half of the double stitch, begin again as in Step 1, but this time put the shuttle over the circle thread and bring it back under the circle thread and through the loop this formed. (Ill. 8)
Ill. 8--Make another single hitch by going over the circle thread and under the shuttle thread, but do not pull tight.
5.Relax the three fingers of the left hand, and let shuttle thread slip off little finger of right hand.
[47]
6.Draw the shuttle thread taut with a sharp jerk as you did on Step 2 to put the stitch on the
shuttle thread. (Ill. 9 & 10)
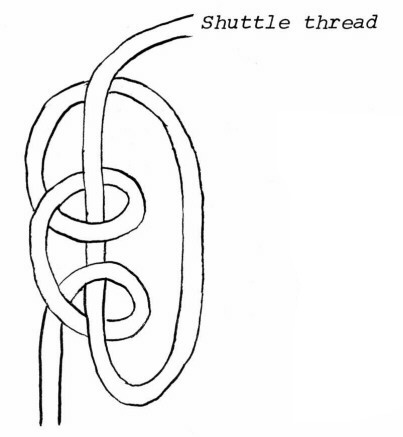
Ill. 9--Relax the fingers of the left hand and pull the shuttle thread taut. This should put it on the shuttle thread.

Ill. 10--Pull the two single hitches together, completing the double stitch.
7.Raise the middle finger, sliding the loop into position against the first half stitch. This completes
the second half of the double stitch.
Note: To test to see if you have made the stitch correctly, see if it will slip on the shuttle thread. If
it doesn't you will have to pick out the knot, or cut it off, and begin again.
8.Since the stitches are put on the shuttle thread and therefore slip on that thread, to make the circle larger as work progresses, unwind it from the shuttle and pull the thread through.
PICOTS AND RING
All tatted designs contain various rings and picots. The rings are the basis of the design and the picots are used for joinings and also give tatting its dainty, delicate effect. The instructions given here are for the basic ring with four picots. There are many variations in designs using more picots to give a lacier effect.
1.To begin the first ring make four double stitches.
2.Next, make the first half of a double stitch, but as you slide it into position, stop about 1/4 inch from the preceding double stitch. The spacings of these picots is your preference. The important thing is that all are spaced the same for a uniform design. You may need to put your thumb and index finger on this stitch to keep it in place.
3.Complete the double stitch. (Ill. 11)
Ill. 11--Make the first half of a double stitch 1/4 inch away from the last double stitch. Complete the stitch.
4.Slide the entire stitch against the first four double stitches. The small loop formed by the thread
left between the last two double stitches is a picot. (Ill. 12 & 13) 
Ill. 12 & 13--Slide the entire stitch down close to the last set of stitches. This will form a small loop called a 'picot'
[48]
5.Make three more double stitches and another picot.
6.Continue until you have completed 3 picots, ending with 3 double stitches.
7.Holding the stitches securely between the thumb and the index finger of the left hand, drop the circle thread from the left hand and draw the shuttle thread tight so that the first and last stitches meet, forming a ring. (Ill. 14)

Ill. 14--Drop the circle thread and slide all three picots and all double stitches down to form a 'ring'.
JOININGS
1.To form the second ring and joinings, wind the thread around the left hand in position for another ring. You will notice that the just completed ring is now hanging down with the end thread.
2.Make four double stitches 1/4 inch away from the ring just made.
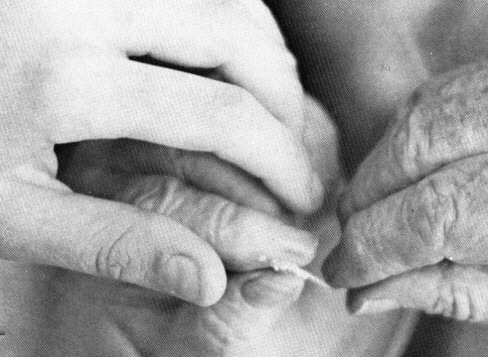
3.Insert the point of the shuttle through the last picot, of the previous ring and catch the circle
thread by pulling the point of the shuttle under the circle thread, as you would in a crochet stitch.
(Ill. 15)

Ill. 15--Insert the point of the shuttle through the last picot of previous ring. Pull the shuttle through the loop formed, as you would in a crochet stitch.
4.With circle thread still wound around your hand, pull the thread through the picot until the new loop formed is large enough for the entire shuttle to be inserted through it.5.Draw the shuttle through the loop and pull the shuttle thread taut.
[49]
6.Raise the middle finger of the left hand to draw up the circle thread. This joins the first part of the second ring to the first one and makes the first half of the new double stitch.
7.Complete the double stitch.
8.Finish the new ring by making 3 double stitches, a picot, 3 double stitches, a picot and ending with 4 double stitches as before.
9.Repeat in this manner for each succeeding ring. This procedure shows how to make a series of rings usually used on handkerchiefs, pillowcases, etc. for trimming.
BALL AND SHUTTLE THREADS
After learning to make rings, you may wish to make a more complicated pattern of rings and chains. The rings, made by connecting the picots as described above, are made with one shuttle thread wound in a complete circle around the left hand. chains are the scallop loops below the rings and are made with thread wound halfway around the hand.
When rings and chains appear in the same design it is necessary to use two working threads--a shuttle thread and a thread on a ball. With two threads it is also possible to have two colors.
1.To begin tie the end of the ball thread to the end of the shuttlethread, making one continuous thread. Hold knot between the index finger and thumb of left hand. Make the first ring on the shuttle thread. Put the first stitch as close to the knot as possible.
2.When the ring is completed, you are ready to make the chain. Turn the ring over so that the base of the ring (where it is joined) is at the top. Hold it between the thumb and index finger. This is called reverse work.
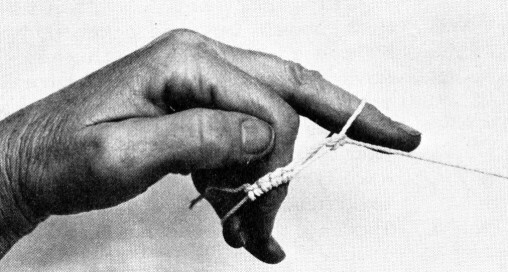
3.Stretch the ball thread over the back of the fingers of the left hand in the same way as is done with the circle thread, but instead of making a complete circle, wind it around the little finger to hold it and to control the tension (Ill. 16)

Ill. 16--Wind the ball thread around the ring and little fingers of the left hand to control the tension.
4.With shuttle and shuttle thread make stitches on the circle thread (which now is the ball thread). Position the first stitch as close as possible to ring just made. Make a series of stitches to form a chain. (Ill. 17) There are several variations of this. A simple pattern is 4 stitches, 1 picot and 4 stitches to complete one chain.
Ill. 17--Make a series of double stitches. Make one picot. Place the same amount of double stitches as before.
5.When you have completed the section of chain, pull the stitches close together and put down the ball thread.6.Reverse the work (turn the work over so that the shuttle thread comes from the top).
[50]

Tiny tatted stitches make lovely items.
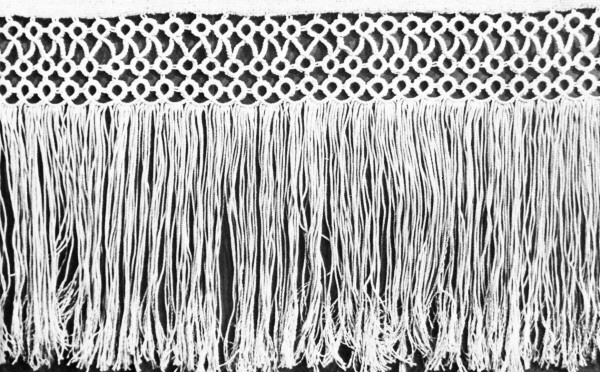
The fringe on this scarf was made by making extra long picots and then cutting them.

Tatted purse by Dorothy Deeds.

The different sizes of thread make varying sized stitches.

Tatted lace is more often used on handkerchiefs.
[51]
7.Working with shuttle thread as the circle thread make another ring. Join the rings as before.
8.Continue reversing the work and alternating between shuttle and ball threads to make the rings and chains desired. (Ill. 18)

Reverse the work to make a new ring.
SPLICING AND ENDS
When you need to add more thread, tie a hard, flat knot as close as possible after completing a ring or chain, but do not cut off ends too close to prevent stitches from pulling out. Since the stitches won't slide over a knot, all splices must be tied at this point.
To give a neater finished effect and to keep tatting from unraveling, whip stitch all loose ends to the wrong side of the work with matching color sewing thread and a needle., (Ill. 19)

Whip stitch the ends to give a finished look.
If you follow all these steps, then you should be able to do the basic tatting design. After mastering the rings, picots and chains, you may want to go on to many variations and designs tatting provides. Remember though, that it takes time and practice to become proficient. Then you, too, can agree with my great-grandmother, "It's easy once you get it mastered."
[52]
Copyright © 1981 BITTERSWEET, INC.
Next Article | Table of Contents | Other Issues
