 |
Volume X, No. 1, Fall 1982 |
TOYS
HOMEMADE BY R.L. ELGIN
by Kirsten Ksara and Vickie Hooper
Photography by James Heck
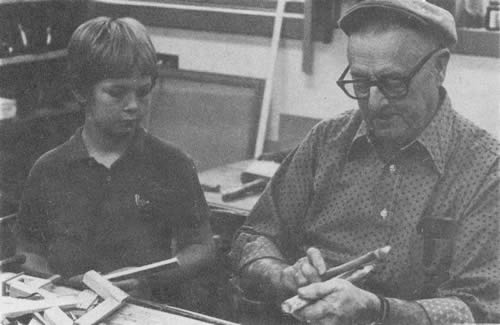
"Growing up on a farm you had to make your own toys and make your own fun." said Robert Elgin. Mr. Elgin is grown up now and lives in town, but he still likes to make toys as a hobby. His ideas come from toys he played with as a child and those he has seen in shops. His hobby takes him to many craft shows where he displays his toys and exchanges ideas with other craftsmen. However, the people who seem to enjoy his toys the most are his grandchildren, Amanda and Bird, who are shown demonstrating some of his toys in this story.
Children love to shoot anything from rocks to weeds to rubber bands. The first group of toys deals with toys that shoot.

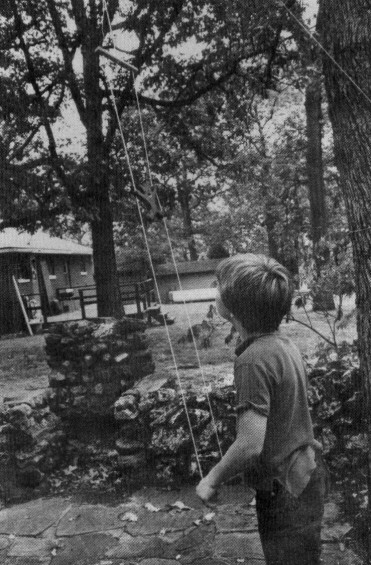
R. L. Elgin's grandson, Lee (Bird) Grimp, walking on homemade can stilts.
[55]
During childhood, children play games that use a lot of imagination such as cowoys and Indians, but what is an Indian going to do without a bow and arrow?
All you need to make a bow and arrow are two sticks and a piece of string.
Make the bow out of a green branch which will bend without breaking. It can be any length desired. Shape the stick by tapering it at each end. Cut grooves or notches near each end to hold the string and tie the string permanently on one end of the stick. Make a loop on the other end of the string to string the bow when ready to use. Bend the stick slightly to slip the loop on the other end of the bow. The string should be shorter than the bow.
The arrow can be any stick pointed on one end and notched on the other to fit in the string. Mr. Elgin even used thin slices of cedar shingles for his. Though not necessary, feathers make arrows fly straighter.
To shoot the arrow, put the notched end on the string, pull back on the string of the bow and release.
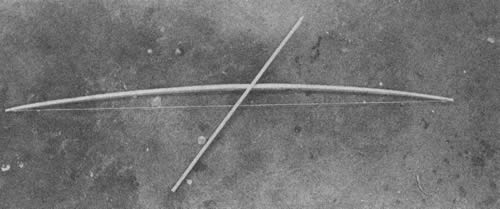
One of the most common homemade toys is the bow and arrow.
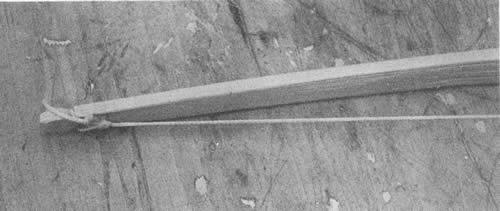
Detail showing how the string is attached to the bow.
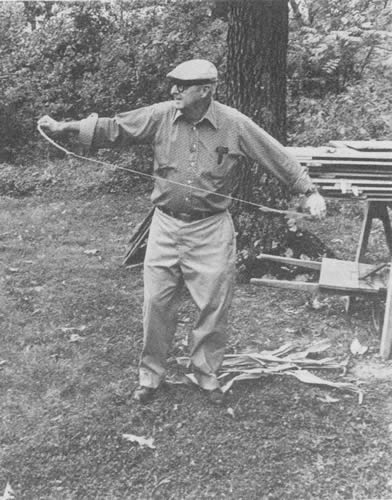
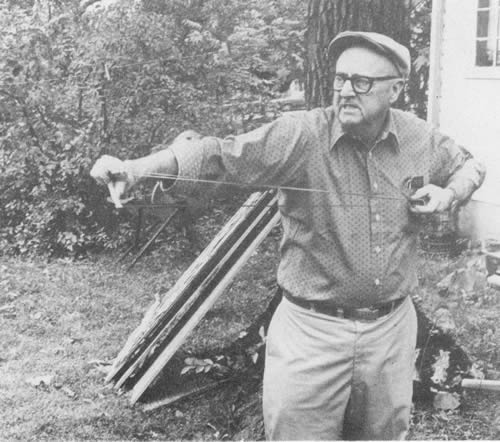
R. L. Elgin shows the proper way to shoot the whip bow.
A whip bow is a variation on the conventional bow and arrow. Both bows shoot the same type of arrows. Though the whip bow is less accurate, it is easier to make.
The whip bow needs a light sapling, such as hickory or elm, about 3 feet long and 1/2 inch in diameter, and 3 to 4 feet of good heavy string or cord.
Tie one end of the string to the thin end of the stick. You may need to cut a groove in the stick to hold the string. Make a fairly large knot in the other end of the string.
The arrows can be made out of virtually anything and can be round or flat and any shape desired. Their only requirement is that they have a notch about one forth of the way down from the pointed end. Children would usually just use sticks or sometimes large weed stalks such as horseweeds. An arrow will take a straighter course if it has some fletch-ing such as feathers on the back end. Cedar shingles make good arrows.
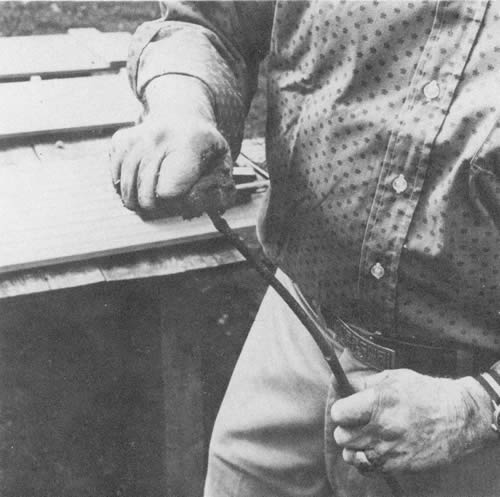
To use a whip bow, put the knotted end of the string through the notch in the arrow. Hold the end of the arrow in one hand and the end of the stick in the other. Whip the stick forward, releasing the arrow simultaneously. As the arrow flies forward, the knot slips out of the notch, sending the arrow forward with great speed. The whip bow has all the force of a bow and a sling combined.
[56]
Rubber guns were a different kind of shooting toy. They were made to shoot rubber bands, pieces of inner tube or anything that stretches and forms a circle. The guns are made of two pieces of wood, some screws and a spring clothespin.
The piece of wood that forms the handle of the gun should be about 1 by 4 inches. Chisel or trim both of the ends of the handle at a slant but parallel to each other to form a more realistic gun handle. Next, cut out the barrel of the gun. It should be about 1/2 inch thick, one inch wide and about twice as long as the rubber band being used. Then chisel out a notch through the top of the handle as wide and as thick as the barrel. Fit the end of the barrel in this notch in the handle and insert screws to hold it in place.
Last, attach the clothespin to the handle of the gun. Position the clothespin so that one flat side is against the handle and the clasp is level with the top of the gun barrel. Put brads or screws through the end of the clothespin to hold it to the handle.
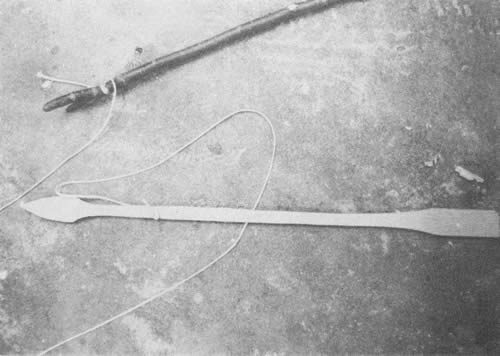
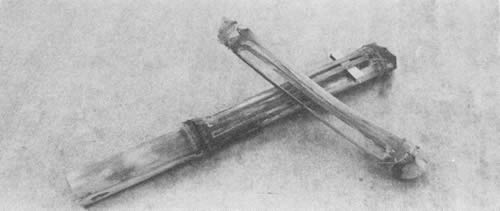
Details of the whip bow, showing how the string is attached in the notch of the arrow. Note this arrow has no feathers or other fledging.
To shoot the rubber band, snap one end of it in the clasp of the clothespin and the other end over the end of the barrel. Aim the gun, and press the trigger by opening the clothespin to release the rubber band. A big rubber band will shoot harder and farther.
You can make the gun double barrelled by using two bands. Mr. Elgin said, "To make it a double barrel, if you are real careful, you can mount two rubber bands. With very careful finger work, you can release one before the other, but it's kind of hard to do. Those are a lot of fun."
Still other toys shoot pellets or rocks such as the peashooter, slingshot and mousetrap cannon.
Both of these pictures show the rubber gun all cocked and ready to shoot. Opening the clothespin with the thumb will shoot the rubber band.
[57]
"We used to make peashooters all the time when I was a kid going to school," said Mr. Elgin.
To make his special kind of peashooter you need one wooden spool, a forked stick, a rubber band and ammuniion Mr. Elgin made a spool on his lathe as thread does not come on wooden spools anymore.
Carve one end of the spool rim with two ears protruding.
Whittle down the diameter of the forked stick so the single prong will slide easily through the hole in the spool.
Stretch the rubber band from around the ears on the spool down the length of the spool to between the forked prongs of the stick so that the end of the stick is stuck at an angle in the hole of the spool as if you would cock it.
For ammunition use anything which is smaller than the hole, such as peas or wooden pellets which you stick into the hole of the spool on the end with the ears.
Hole the spool in one hand and with the other hand straighten the stick from the cocking position in the hole by pressing down on one of the prongs of the fork. This action will trigger the gun, making the long end of the stick jump through the hole in the spool, shooting out the ammunition with much speed.

Materials for the peashooter.
The peashooter cocked.
Although the mousetrap cannon was not one of the simpler toys to make, it was very effective and could be dangerous if not shot with care.
The five parts of the mousetrap cannon are the base, barrel support, barrel, mousetrap and the ammunition.
For the base, cut a one inch board about 3 by 7 inches. In the center of one end about an inch from one edge, cut an inch square hole.
To make the barrel support, cut a one inch square piece of wood, about 4 inches long. Trim the hole cut in the base so that when the holder is inserted it will lean slightly back. Cut a curved groove in the top of the holder in such an angle that the barrel will be pointed slightly upwards when placed in it.
 |
 |
The mousetrap cannon being shot.
[58]
Make the barrel by drilling a hole through a one inch dowel pin that is approximately 5 inches long. Glue the barrel on to the stem about three quarters of the way down the barrel.
Position the mousetrap on the base so that When the trap is sprung, the wire will hit the center of the hole in the barrel. Nail the mousetrap to the base. Next, where the wire of the trap hits the barrel, make small grooves for the wire to fit into.
The ammunition can be any small objects such as rocks, peas or wooden pellets. Anything will work as long as it is smaller than the hole of the barrel.
To shoot the cannon, set the mousetrap and place the ammunition so that it is slightly sticking out of the end of the barrel near the mousetrap. Spring the mousetrap. The wire will hit the ammunition and send it through the barrel with great force.
Slingshots are some of the oldest toys known to mankind. Besides using them to hunt birds, rabbits and squirrels, a different version of slingshots were used to fight as far back as David and Goliath, and more recently in Mr. Elgin's childhood. "I remember one time a whole bunch of us kids got together and got in a fight on a big, old bridge," he said. Some of us were on it and some were under it. A kid shot through a hole in it and hit me in the head with a rock. It knocked me clear to my knees. Those things will hurt."

Most boys at one time or another have built and shot slingshots like the ones illustrated here.
The materials needed to make a slinghot are a forked stick, a pocket of some kind of material to hold the ammunition and two rubber strips cut from inner tubes. Heavy rubber bands will work.
The stick can be a number of sizes, but an average slingshot will be about 9 inches tall with the forking place about in the center. Any wood is okay, but Mr. Elgin's favorite is dogwood because it is tougher than most wood.
Make notches about one inch down from the top on both forked ends and tie rubber bands to the fork in these notches.
For a good pocket, cut a small rectangle, about one by 3 inches Out of a piece of soft leather. Mr. Elgin remembered using old shoe tongues. Cut holes in each end for inserting rubber strips.
Thread a good, wide, heavy duty rubber strip through each hole in the pocket and wrap it securely with strong cord to the fork at the notch.
Practically anything can be used as ammunition. Mr. Elgin used rocks, scrap iron, acorns, or anything he picked up. "The best things to shoot were ball bearings. They're round and heavy. Those dudes would really go. Years ago we always used old rubber from inner tubes for the band. That was real good rubber. You could make a slingshot that could shoot like a twenty-two. You could kill birds, rats, everything."
[59]
The last toy that shoots is the whip stick, a toy that illustrated how a little ingenuity could make up for a lack of resources. A whip stick was nothing but a thin, green tree branch about 3 feet long whittled to a point at the thin end. It was used as a sort of an extension of the arm to hurl mud, corncobs or any other object a long distance.
To use this toy, place whatever you want to throw on the pointed end of the stick. Hold the other end in one hand with the loaded end of the stick hanging down behind you. Swing the stick upward and forward, and flip it at the highest point of the swing to release the projectile from the end of the stick.
Mr. Elgin said, "We used to take a good long stick and have corncob fights down at the farm. It was especially good if we had a corncob from down at the hog lot where the hogs had stepped all over it and it got real muddy and about half wet. We could raise a blister on a kid with one of those things. We would do the same things with mud balls. We would make mud balls and throw them, but corncobs are really best. Just cut sections out of corncobs."
Putting ammunition on a whip stick.
Not only do children like to shoot things, they like to make noise. The following two toys are noisemakers that Mr. Elgin makes.
"Cornstalk fiddles have been known for years and years. Their music is as old as the hills," said Mr. Elgin.
Cornstalk fiddles require two dry pieces of cornstalks--a one section piece and one piece a section and a half. If the stalks are not dry, heat the green pieces in the oven for awhile.
Make the main part of the fiddle out of the section and a half. Hollow out the whole section of the stalk, leaving the half section of the cornstalk solid for the handle. When hollowing out, leave two strips of the skin of the cornstalk attached for the strings. Place a small stick under the strings for tension to get higher sounds.
To make the bow, use just one section of the cornstalk. Hollow it out leaving only one string attached.
To make music, rub the bow over the strings just like a real fiddle. Rub rosin on the strings for more music.
Mr. Elgin plays the cornstalk
[60]
Everyone has held a piece of grass between his thumbs and blown on it to make a noise. These squeakers work on much the same principle.
This toy requires a piece of thin paper, two blocks of wood and 2 to 4 small nails or tacks. The wood should be light and about two inches long, one inch wide and 3/8th of an inch thick. To give the paper room to vibrate, hollow out the wood so it is thinner in the middle. Lay the paper between the pieces of wood and put in tacks or nails at either end to hold it together. Take care not to pull the paper too tight or to make it too loose. The pieces of wood act as your thumbs would while holding the grass and the strip of paper acts as the grass. The toy looks like a sandwich with wood on the bottom and top and a strip of paper in the middle. Put the toy to your mouth and blow through the center.
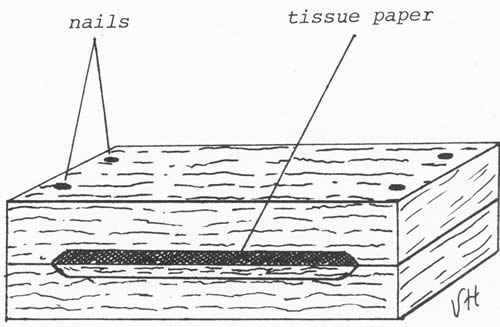
A diagram of the squeaker. Finished, it is two inches long.
Children like to be outside and be active. The next group of toys allow for active play which develops coordination of both small and large muscles.
Stilts were popular toys that were easy to make, lasted a long time and offered lots of entertainment. Children or their fathers made stilts of many different sizes and styles. Some even used sticks.
Mr. Elgin made his stilts of two one by two's 6 feet long. Screw a block of wood onto each stick about One foot from one end. Drill several holes in the long pieces of wood so you can move the blocks higher or lower depending on the child's skill and ability.
Moving the blocks up makes it harder to walk, but also more exciting. To walk on these stilts, stand on the blocks. Hold on to the stilts with the long ends behind your shoulders. A bit of practice will enable you to balance easily.

Bird balances easily on these wooden stilts his grandfather made. Stilts are quite easy to make.
[61]
If children want something other than the regular, wooden stilts, there were always can stilts to walk high with.
The materials needed are two cans of the same size and shape and two pieces of rope.
Any cans will work. Mr. Elgin likes juice and coffee cans best because they are taller. Cut two holes on opposite sides of the unopened ends of the cans near the edges.
Next thread a heavy cord, a clothesline rope or a sash cord, through the holes in each can and tie the ends together so that when the child stands on the can, each cord is the correct length to hold.
Step up on the cans and grasping the cords, walk normally, but as you lift your foot off the ground, pull the can up so that your foot does not leave the can. These are also sometimes called Chinese stilts.
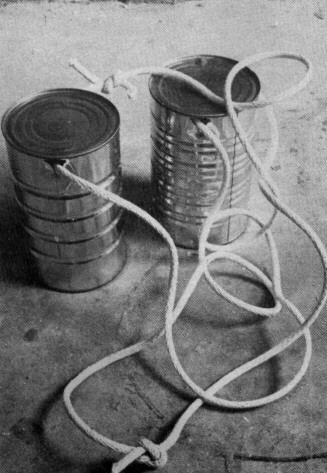
A close up of stilts
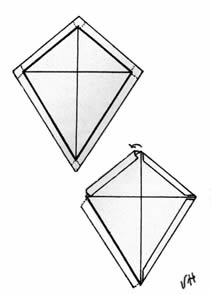
Although children did not use kites to make electricity such as Benjamin Franklin did or make them large enough to carry men as Alexander Graham Bell did, or use them to shoot at as imaginary airplanes as in World War II, they enjoyed making and flying kites.

Showing details of the back of the kite.
Triangular Kite
A triangular kite, the most popular of all kites, is the main type of kite flown every spring. To make it, get two sticks, string, paper and cloth for a tail.
Make the frame with two bow sticks tied in a cross-like fashion. Make a small slit on both ends of each stick. After tying the intersection of the bow sticks, run a string around the frame in the slits and tie it tightly. This procedure, which forms the shape of a diamond, makes the frame sturdy and gives a frame for the paper covering.
Cover the frame with paper. Wrapping paper is good, but tissue paper, although much weaker, will also make a good kite. To cover it cut out a big piece of paper about one inch larger all around than the frame. Lay the frame on the cut paper. Cut away notches in the paper at the ends of the sticks. Fold the edges of the paper over the string and glue in place. Tie the flying string to the intersection of the cross sticks.
For weight, tie a tail to the bottom A popular one is a long strip of cloth with little strips tied all down it.
Illustrates putting paper on the kite frame.
[62]
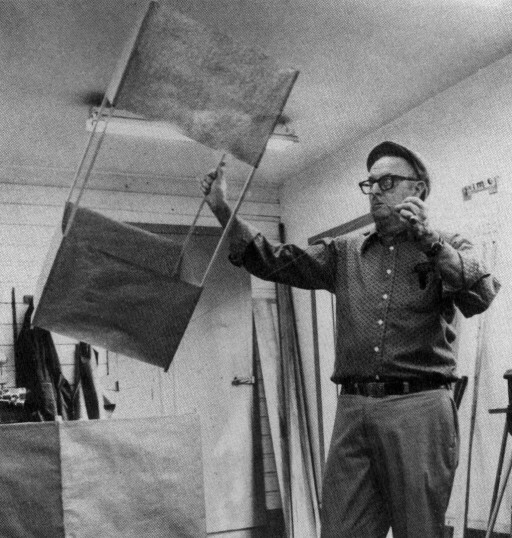
Box kites are more complicated to make. Needed are paper, string and eight bow sticks of equal width for the frame. Four of them should be about 18 inches long. The other four, should be about twice as long as the shorter sticks.
To begin the frame cross two of the shorter sticks in the exact middle and tie them. Repeat with the other two shorter sticks. On each end of the stick crosses, notch a small V.
Now glue each of the four ends of one cross about 6 inches from the ends of the four remaining longer sticks and tie with light string. The sticks should fit into the V's. Glue the other cross on the opposite ends of the longer sticks.
Next cut two 12 inch wide pieces of heavy paper, such as wrapping paper, approximately 74 inches long or long enough to wrap around the frame. Wrap one piece of paper around one end of the frame so that 1/2 inch of the stick is left protruding. Glue or tape the paper to the frame. This paper produces the first box. The paper edges can be folded over string placed around the frame for stability, if desired. Repeat on the other end of the kite with the other paper. When both papers are on, there will be about a 12 inch space between the two paper boxes which give the kite body.
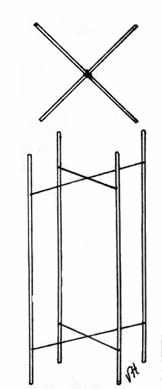
The frame of a box kite.

This is a helpful holder to wind the string on when flying a kite. It is simple to make, requiring only four pieces of wood and some nails.
This process completes the kite.
Now you need the flying string. Tie a string about 6 inches from each end of one of the longer stick frames. Tie these strings together so that one is a little longer than the other. These strings form the bridle. Now tie a long kite string to the center of the bridle to fly it.
"They're pretty darn good kites," Elgin said.
 |
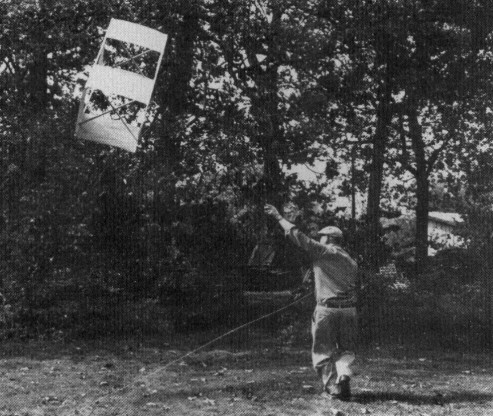 |
Though the box kite is harder to make than the conventional kite, it is fun to fly.
[63]
Boats were fun to make and fun to sail, whether in a creek, pond or in a horse trough. Paddle boats and sailboats were both popular during Mr. Elgin's childhood. One of his favorite pastimes was to play with boats on his pond.Paddle Boat
Paddle boats have four basic parts, the body, the cabin and smoke stack, the rudder and a rubber band.
Make the body of the boat by cutting a rectanglar shape out of a piece of wood or a wooden shingle about 5 by 10 by 3/4 inches. Point it at one end. On the opposite end cut out a 2 inch piece to allow room for the rudder. This will form a U shape. Taper the ends of the U and cut notches to hold the rubber bands.
Make the cabin and smoke stack in any shape and size desired, and nail it to the body of the boat. This piece not only makes the toy look more like a boat, but gives weight to the front for balance and stability.
Make the rudder by cutting a thin piece of wood about 4 by 1 1/2 inches. The rudder is the most important part of the boat because it produces the movement when the rubber band is wound up and released.
Put the rubber band around the notches in the U, and twist it around the rudder. Wind up the rudder clockwise so when it is let loose in water and unwinds, it will propel the boat forward just like a Mississippi steamboat.
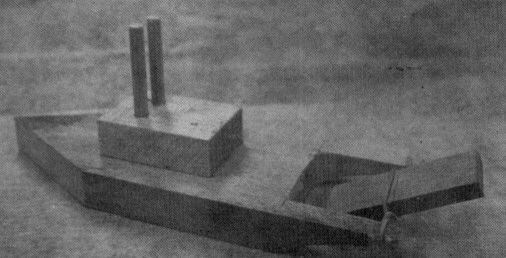
paddle boat.
Sail Boats
Though a paddle boat is simple to make, a sailboat is even simpler.
The two main parts of the sailboat are the body and the sail. A rudder is sometimes used but not necessary.
To make the body, cut a point on a thin board about 7 by 3 inches, or any size desired.
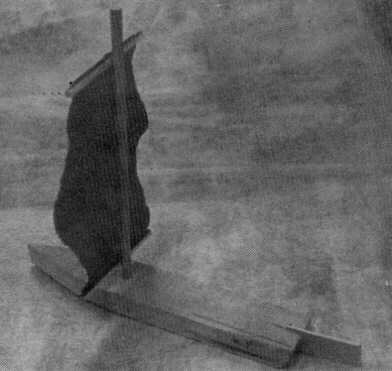
a simple sailboat.
The materials needed for the rest of the boat are one dowel pin or a thin round stick about 6 inches long for the mast, two smaller sticks about 2 1/2 to 3 inches long to fasten the sail onto and a piece of light cloth or paper to fit in the frame for the sail.
Make the mast by drilling a hole in the body near the pointed end and Sticking the dowel pin in it. Next, make the sail by tacking the top and bottom of the sail cloth to the small sticks. Then tack the sail on the mast. This kind of sail is not altogether necessary though. Mr. Elgin used to stick a large feather into the wood. Anything will do that will catch the breeze.
If the weight of the wood is not balanced so that the boat does not float properly on the water, add screws and bolts where needed to add weight.
Though the rudder is not necessary, it adds stability. Saw a one inch slit in the middle of the stern. Slip into this a thin piece of wood about 1/2 by 3 inches.
Once Mr. Elgin made a sailboat out of a sharp, wooden fence picket. It was so big that he added six sails to it and let the wind push it on his pond.
[64]
Tops, a "boughten" toy that used to be very popular, help the child develop small muscle coordination. They could be bought decorated or plain so a child could decorate them himself. The tops were relatively cheap and came in all shapes and sizes. Since tops are hard to find in stores now, Mr. Elgin makes his own on a lathe. He makes the tops perfectly symmetrical so they won't wobble as they spin. They are about two inches wide at the top, tapering to a rounded point at the bottom. To make a place for the string he cuts out a little ledge about 1/2 inch up from the point. He then drills a hole up through the point and drives into the hole a six penny nail with the top ground off. This makes a point for the top to spin on.
To spin a top, wrap a string around the top starting from the bottom ledge and working your way up. Keep the string flat against the top and do not overlap the string. The surface of the top should be roughened or grooved to hold the string. Hold the top in one hand with the point toward the floor. With a sidearm motion, throw the top forward and jerk back on the string. The top will be spinning as it hits the ground.

Homemade tops
Mr. Elgin said, "We used to have a lot of tops. We used to fight with tops. We would throw a top down and then the other guy would throw a top and try to knock it out of the way. If he succeded, he got the top."
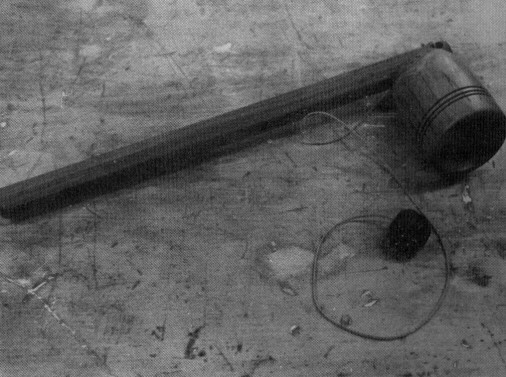
Another toy for active outdoor play was the hoop. Pushing a hoop around was a common pastime for both boys and girls. Though it took skill to push a hoop with two boards nailed together like a T, some children could do it for hours and even had races and contests to see who could keep the hoop rolling the longest.
The materials needed are a metal hoop and two thin, narrow boards about 1/2 inch thick which make the handle and the guider. The handle can be about 1 or 2 inches wide and about 3 feet long, depending on the height of the child. The guider is about 2 by 6 inches. Most any size would do.
Nail one end of the handle to the middle of the guider.
The hoop can be from any wheel, piece of farm machinery, a barrel or nail keg. Most farms used to have discarded metal hoops around. The size doesn't matter.
To begin the hoop rolling, hold the wooden stick in front of you with the top of the T on the ground. Roll the hoop down the handle. Push it to keep it rolling and guide it with the stick. To stop the hoop, just pick it up with one end of the guider.
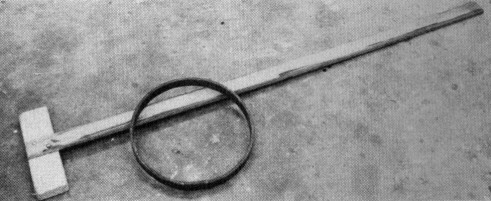
Hoop and guider.
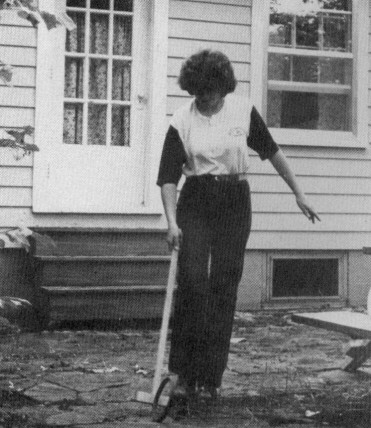
Deidra Morgan with hoop.
[65]
Children also liked to play with quiet toys they could use inside when the weather was bad. This last group deals with toys of this type which took a different kind of skill to operate.
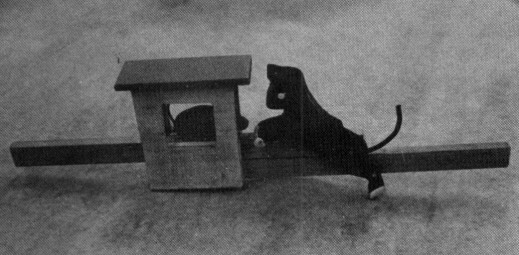
The purpose of the cat and mouse toy is to try to get the cat to "catch" the mouse.
"As the stick moves back and forth, the mouse runs out of the house and jumps back in when the cat tries to catch it," said Mr. Elgin.
Needed for this toy are two pieces 2 by 3 by 1/8 inch thick for the sides of the house; one piece for the roof, about 1 1/2 by 3 by 1/8 inch two 1/4 by 1/2 inch pieces about 8 inches long--one the stationary board or the bottom and the other the sliding board the mouse is on; two filler pieces 2 by 1 by 1/8 to go between the inside of the house and strips the cat and mouse are mounted on; and a model of a cat and mouse.
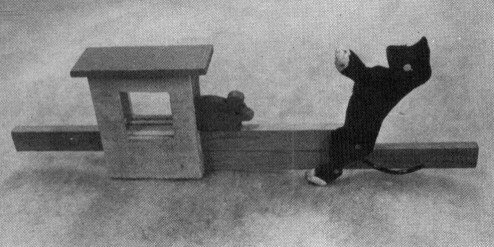
The cat and mouse toy. In the top photo mouse ventures out of the house. Pull back the board he is on, he gets in the house (below).
On each of the house sides cut a window. Nail the bottom of both house sides to the end of the stationary board. Next nail the roof onto the sides of the house.
Nail the leg of the cat about half way on the stationary board.
Attach the mouse on the top of the other board in the center. Place the mouse board on top of the stationary one through the house so that the end hits the cat in the hip. Nail that board to the cat.
Next put a nail through the house just above the mouse's board to keep it in position yet allow it to slide.
[66]
To operate the toy, slide the mouse board back and forth. If the toy is constructed correctly, when the mouse board is pushed out with the mouse out of the house, the cat leans back ready to pounce on the mouse. When the mouse is safe in his house, the cat should almost touch him.
Whenever there were a few buttons left over from old clothes, children liked to make a simple toy called sawmills to play with.
To make a sawmill get a large button with two holes and a piece of string about 3 feet in length.
Thread the string through one hole and back through the opposite one. Tie the ends. Scoot the button to the center so that an equal amount of string is on each side. Place thumbs in the loops in the string.
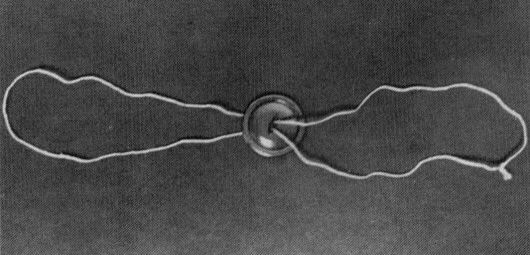
The simple sawmill is easy to make out of string and a button. Spinning it is not so simple, for there is a skill in doing it. Photos by Vickie Hooper.
To start the sawmill going, swing your wrist in a circular motion so that the button winds up the string. Then gently pull your thumbs apart, and when the string unwinds, let your thumbs come back together. This motion makes the string wind the other way. Continue movng your thumbs together and apart. If you listen closely, you can hear a buzzing sound which gives the toy the sawmilling effect.

A more complicated sawmill Mr. Elgin made with his tools.
Boys sometimes found ways to annoy girls with this toy. Mr. Elgin said, "While the button was spinning, boys would try to stick them in girls' hair. The girls would yell and scream and their mothers would do worse."
The ball and cup toy is still popular today because it combines just the right amount of skill and luck to make it fun. The object of the toy is to maneuver a wooden ball attached to a stick by a string into a cup on that stick.
This toy requires the following items: a small, wooden ball no more than one inch in diameter, about 18 inches of string, one or two small screws, a small cup of some sort and a stick about 8 inches long and 1 1/2 inches wide with a small hole through one end.
To assemble this toy, attach the cup facing upward on one end of the stick. Tie one end of the string through the hole of the stick and attach the other end of the string to the ball. To fasten the string to the ball drill a hole through the ball and tie the string' through it, glue or tack the ball to the string.
To make the ball land in the cup, grasp the stick in one hand with the cup facing up and away from your body. The ball will hang down. Flick the stick so the ball swings up and, hopefully, into the cup. "Kind of give it a swing and catch it," was Mr. Elgin's advice.
It takes good coordination to make the ball land in the cup.
[67]
Whammy doodles are toys that take a little extra Coordination to master.
There is also a secret to work them. Even though they are rather tricky to work with if you haven't practiced, they are not hard to make.
This toy requires two sticks and a propeller.
The main part of the whammy doodle requires nothing more than a 9 inch stick and a knife. The stick may be whittled down to four sides but it isn't necessary.
Make notches in a line along one side of the stick. These will help produce the vibrations that cause the propeller to turn.
The propeller is a very thin piece of light wood about 4 by 1/8 by 18 inches. You could use metal which is more sensitive. Nail the propeller into the end of the stick with a small nail so that it spins freely.
The object of this toy is to make the propeller spin, first one way and then the other. To do this, rub a small stick or pencil along the notches. The trick is how you press your index finger on the sides. "Just shift the pressure from one side to the other to change directions," said Mr. Elgin. "You can even use your fingernail for pressure."
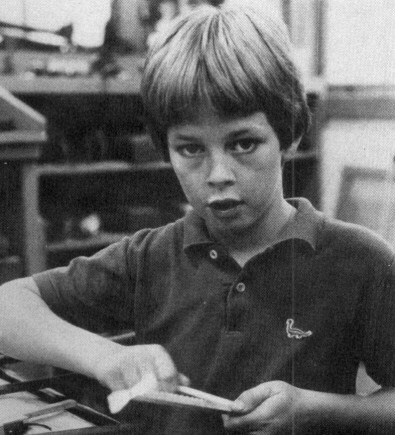
It is difficult to make the whammy doodle spin as Bird does.
This toy is also called a voodoo stick since not everyone can make it work.
I The climbing bear was an entertaining toy for younger children. It could be attached to a door frame or perhaps a tree branch so that a child could play quietly under a mother's watchful eye while she worked. The object of this toy was to make the bear "climb" up the string.
To make this toy you will need several yards of cord or rope and some one inch thick wood scraps. Cut an 8 to 10 inch bear out of light wood with a jig saw, paint it and decorate it so it has a nose, eyes and mouth. Drill two holes through the front paws of the bear to thread the cord through. Drill these holes at about ninety degrees to the bear's arm. The holes should be bigger than the cord and must be slanted toward the bear's head so the bear won't slide back down the strings so easily.

Next make a crossbar of a 1 by 4 about 12 inches long. Drill a hole about 2 inches from either end for the rope the bear climbs on, and also drill one through the middle for another cord to pass through to tie the toy to some stationary place such as a tree.
Bird is making the bear climb the rope.
[68]
Last, cut the cord into two pieces about 6 feet long and one piece 2 feet long, depending on need. Pass each of the long pieces of cord through one of the bear's paws and through the hole in one side of the cross bar. Tie a knot to hold each cord on the crossbar. Also tie a knot in the bottom end of each cord so the bear will not slide off. Now thread the short piece of cord through the middle hole in the cross bar and knot it at either end. The purpose of this card is to be able to tie the toy to something tall so the long cords hang down with the bear between them.

Bird has the bear almost to the top.
To make the bear climb, grasp the long cords and pull alternately on them. This movement will make the bear climb. This toy works best if the cord used is rough and the insides of the holes in the bear's paws are rough. This is so because to climb, the bear has to have a grip on the string. When the bear climbs to the top, just let go of the cords to allow the bear to slide back down.
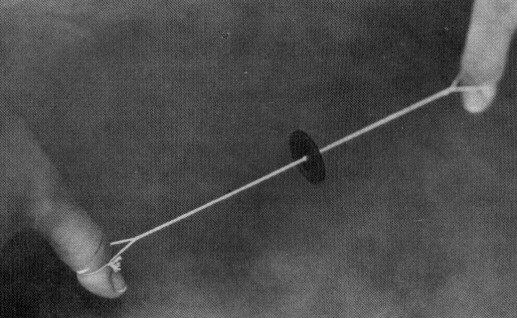
A pump mill is actually an ancient form of a drill. It is hand powered, so it could be, and in some places still is, used where no other power source is available.

A pump mill wound up ready to spin.
This toy requires a stick about the size of a pencil, about 18 inches of string, a circular piece of heavy wood about one inch thick for the flywheel and a piece of wood 1/2 inch square and 4 inches long for the crossbar. The flywheel gives the drill stability and momentum. It could be made of metal for greater momentum.
To make the drill, file the stick to a point on one end to form the drill bit.
Cut a notch in the other end of the stick. Next, cut a slit through each end of the crossbar to insert the string and drill a hole in it through the center that is larger around than the stick. Drill a hole through the middle of the flywheel that is exactly the diameter of the stick. The flywheel must be perfectly symmetrical so that it won't cause the drill to be unbalanced and wobble as it turns.
To assemble the pump mill, slide the stick through the middle hole of the crossbar. Put the string through the notch in the end of the stick, and thread each end of the string through the slits in the ends of the crossbar. Tie the ends of the string so that the stick and the crossbar are attached, yet the stick has freedom to spin. Last, wedge the flywheel onto the stick just above the drill point on the end of the stick. When the crossbar is hanging down on its strings, it should be about one inch above the flywheel.
[69]
To use the drill, hold the drill upright with the bit or pointed end of the stick against whatever you want to drill a hole. Spin the crossbar so that the strings wrap around the stick. Then push the crossbar down so that the strings unwrap, causing the stick to spin. The spinning motion of the stick will cause the strings to wrap back around the stick. Continue pushing the crossbar down and then letting it go back up to allow the string to wrap back around the stick. This action will keep the stick spinning.
The hobby horse is a special toy which allows children to use their imaginations to escape into a world of dreams.
Most hobby horses are purchased today, but Mr. Elgin still makes them. He made one for his eldest son when he was a child, but now it has been taken over by his grandchildren.
He also has a unique one called a shoofly--an old-fashioned one with a wicker seat and a tray for toys which he got as a gift from his grandparents when he was four years old. He called it Jack and Jill.
Play has been characterized as the work of children. Using that analogy, toys then are the tools that children use n their work. Besides encouraging and expanding their imaginations, toys prepare children for the adult world of live horses, real guns and boats that really run. In their play of imitating adults, they develop the skills they will need as they mature.
Years ago on Ozark farms, lack of money to buy toys did not prevent children from gaining all the benefits toys give. Using their imagination and ingenuity, they and their parents fashioned toys from anything at hand. By making them and playing with them, children learned twice.

Mandy Elgin is enjoying the ride and the thoughts she gets while playing with this hobby horse her grandfather had as a boy, just as she does from the many other toys she plays with from her grandfather's collection of antique and homemade toys.
[70]
Copyright © 1981 BITTERSWEET, INC.
Next Article | Table of Contents | Other Issues
