 |
Volume VII, No. 2, Winter 1979 |
Carving with Wax and Wood
LEE MCDANIELS SHARES HIS TECHNIQUE
by Patsy Watts, Photos by Mary Schmalstig
"There are two things that I like to do best--teach carving and teach the Bible. I'd work all day just for a chance to preach that night," Lee McDaniels began. "I don't preach for money, I preach the gospel for free, and anything that's used in the evangelistic way I'll make it free of charge."
Lee began carving in 1971. Asking the Lord to show him how, he worked first with wood and later wax, carving Biblical figures and visiting church camps. His ministry is his work--teaching carving to children to better acquaint them with God.
Having created many facial patterns to date, it's hard to believe that Lee could have gotten such a late start carving. His first attempt at doing a head was done in concrete. "We were building a church at Fair Grove. They threw some cement away and I went back over and picked up two nails, and in fifty minutes I had a head of Christ. I made a mistake and didn't use something to hold the head up to reinforce it. The face part fell off, and they kidded me about John the Baptist. I had to put it back on.
"Once Aunt Emma on 'Aunt Emma's Storytime' [Channel 27, Springfield, Missouri] had a church camp. She said, 'I like your work. I'd like for you to do a church camp.' I love kids so much I said sure. When I had church camps after that, it got so the parents would come around my chapel and watch us.
"I've actually carved hundreds of carvings, and I've given away hundreds. Everybody likes the carvings and everybody likes for me to have something for them. You know, it doesn't have to be much--just the idea of being wanted. It's important you show people personal contact instead of impersonal. I'd rather teach sculpture and wax carving to children or teenagers than carve myself."
These words were all the encouragement we needed. By using his patterns and instructions and working with him, we learned Lee's technique of carving heads from both wax and wood. We were even able to create one of each on our own, discovering first hand some of the difficulties Lee warned us of.

[57]
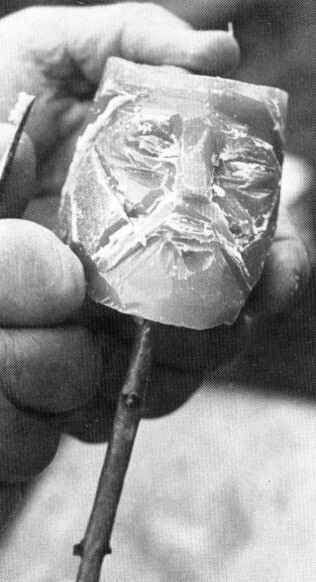
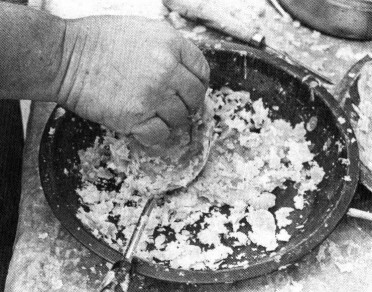
After letting the wax harden in a paper cup, peel the cup away (above) and carve out the basic facial features. Making V-shaped cuts in the bell-shape serves as a hairline guide around the face and adds interesting details (below).
Wax Carving
Though wax is a very flexible medium, it also demands constant attention and very quick hands. Lee does many different things with wax, including carving hand puppets which he teaches most often to children at church camps.
You will need the following materials to carve a puppet from wax:
wax
paper cup
stick (approximately 6" long and pencil width)
3 pound coffee can (or similar container)
2 medium sized pans
pocket knife or carving knife
large spoon
lid or flat skillet
Just about any kind of wax will work. Usually Lee uses petroleum wax. Paraffin dries quicker than most waxes because it has a lower melting point, but if you constantly work with it, it turns out just as well. The amount of wax will vary depending on the size of the head that you make. It might be safe to start with at least two pounds, just in case you make errors or have problems in forming the head.
Find an area in which to work that has plenty of room. As carving with wax is very messy, you may want to spread newspapers around your work area to catch some of the falling wax particles. Place all tools within reach, so that the wax won't harden during an occasional dash across the room to grab a forgotten item.
When you're ready to begin, put the wax into the coffee can and put it on the stove to melt. If wax is colored, and you want it to stay that way, you might find it necessary to add more color. The reason for this is that there occurs what is called "boil out," where all the color fades away. This can be rectified by adding crayolas or more colored wax in with the melting wax. If your wax is colorless you could also color it at this stage.
As the wax melts, be very careful. Aside from the boil out, Lee warned, "There's another thing called flair up. You don't never want that deliberately. If you leave it on after 235° and you hear it go 'fhoonk,' you know it happened. It will catch on fire. And if it does, don't get excited. Don't touch it. Don't put water on it. Take a frying pan or something flat and put it on top. Turn the fire off and don't take that lid off at least for ten minutes, because it'll catch on fire again the minute the air gets to it. Leave the lid on there. I'm not going to demonstrate, though."
[58]
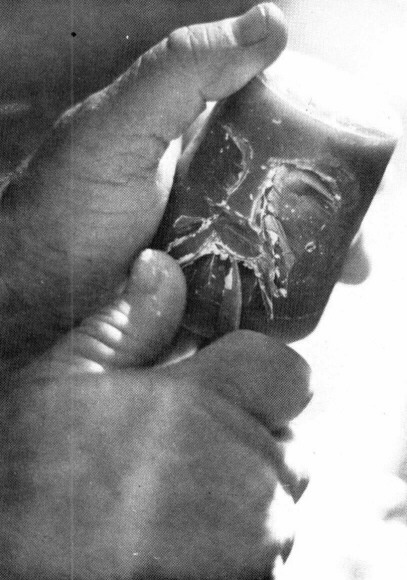
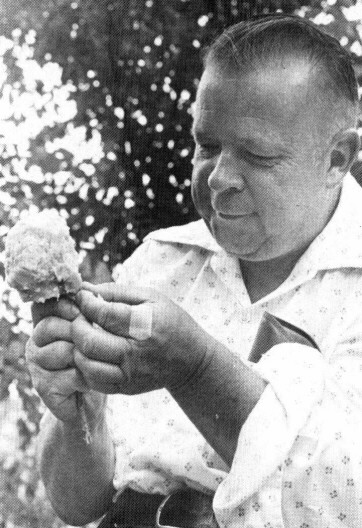
Build up the head with pinches of warm shapeable wax, beginning face first. Above--Trim off any excess wax that gets in the way. Upon finishing the face, build up the hair and the remainder of the head. Use a knife to sharpen the facial features.
And obviously, do not touch the wax at any time that it is heating. Hot wax can cause severe burns, especially at any stage after the boil out (235o). When the wax is melted turn off the flames and allow it to cool just a little because straight from the fire, it will be too hot to handle.
Pour wax into an upright paper cup and poke the stick in the center. As the wax hardens, it will do so holding the stick firmly intact to use later as a handle. When the wax has hardened, peel the paper cup away. By turning the figure upside down, wide end at the bottom, you have a bell-shaped core. If you happen to get the stick in crooked, use the side with the upward tilt as the chin.
Press into the wax with your thumbs to make the eye sockets. Use the knife to roughly scratch out the facial features, beginning with the eyes. Make slits for the eyes and then work on carving out eye sockets and creasing the brow. Carve the nose out and make hash marks (not too deeply) on the cheeks, so the wax will stick easier when you do the build-up. Carve out the mouth and remember that the lower lip should be smaller than the top lip. Next make a V-shaped cut on each cheek which becomes the jaw and the neckline. Carve out the chin line and make a narrow trench in the wax around the entire facial area to set off the hairline above the eyebrows.
By the time you have done all of this, the wax in the can should be cool enough to pour, or dip with the spoon, into one of the smaller pans. Fill the pan about a third of the way full, and let the wax cool until it is about 100° to 120°. Do not stir or it will cool too fast and won't be pliable enough to work with. When the wax is close to the right temperature, a film will develop over the top which you will need to skim off with a spoon. Scoop up a spoonful of liquid wax and lay the spoon into the other pan. You will be taking dabs of wax from the spoon to build onto the core, so if at any time the wax becomes too dry to work with, scrape off the dry wax and redip the spoon into the liquid pan.
[59]
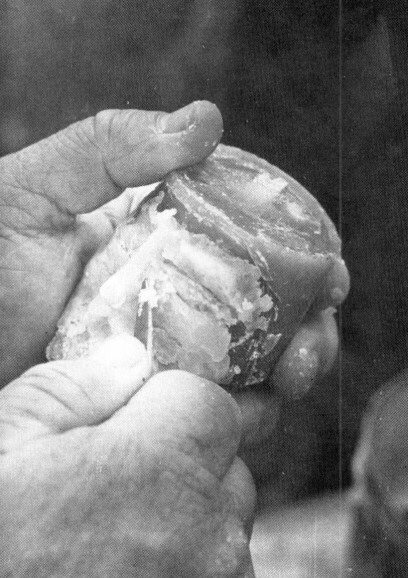
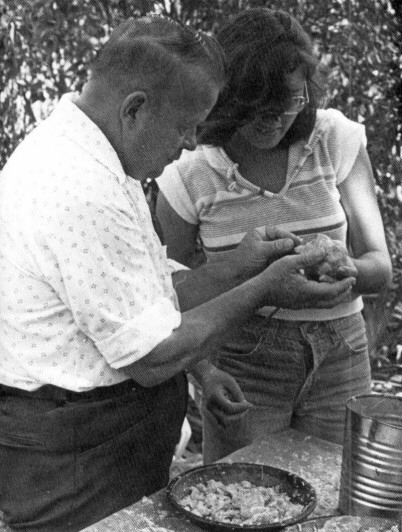
Using a large spoon to dip wax from the coffee can, put liquid wax into one of the pans. Allow this to cool until it forms a gel and then use fingertips to add pinches of wax to the puppet head. (by Tracy Waterman)
Pinch some soft wax off of the spoon with your finger tips. Be careful as you do this because the wax is still very warm. Glob the wax around the stick at the bottom of the core to build up the neck and reinforce the stick. When you've done this, allow the wax to cool and harden. In the meantime, return to the face and begin building the facial features. Lee said, "In forming faces, I'm trying to get away from the usual Michelangelo noses. My carving style includes fairly high cheeks, prominent noses and proud expressions."
Begin with the nose. Add enough wax so that you can build the nose out and make it protrude above the place where the mouth will be. Form the upper lip by squeezing off part of the excess wax. This action also helps in chiseling the nose. Lee readily admitted, "I've had little girls that have such small hands they can make Moses with a fine chiseled nose far better than I could."
Build up the cheeks using the same process, smoothing the wax in with the upper lip and sides of the nose. If your hands are small, you may not want to add as much wax as someone with larger hands. Be very careful, concentrate and keep your hands moving, or you could easily come up with a big blob instead of the figure you set out to make. Also, watch the temperature of the wax. If it is too hot, the features will run together, whereas if you allow it to get too cool, it won't adhere to the core.
Form a piece of soft wax into a canoe shape, and then place this into the eye socket. This will be the eye. Build a little more wax up above the eye and then form the eyebrows.
The eyebrows may be difficult to build on. If they fall off, take some wax and build a forehead onto the core, and then try the eyebrows again. Build each feature of the face in correspondence with the rough outline you scratched into the core. Use the hairline as a guide to know when to stop building the forehead.
Make a very small lower lip that doesn't protrude and then build up the chin. Leave a divide, or cleft, between the lip and the chin. If you are planning on building a beard, Lee advised, "Don't make the beard too flat. Make it like the wind would, not flat and stiff like a picture."
[60]
Tracy Waterman is eager to try her hand at building up the puppet head. Lee instructed, "Never add more wax to the head than you can work with easily."
After you have built on the chin or beard, look closely at the face. If it's not exactly right, keep building on to fix it, and if you make a mistake, build over it. The wax will take about ten minutes to completely harden, so when you are satisfied, lay it aside to cool.
After the face has hardened, sharpen the facial features with a knife. Trim away any unsightly excess that mars the face and scrape all of the trimmings back into one of the pans. By this time if the wax you poured into the first pan has cooled and is no longer workable, scrape all of the wax from both pans back into the can to be remelted.
Begin building up the hairline and the back of the head. Add the wax freely, but don't get more than you can handle. Shape the wax, and as it hardens, use the knife or a fork to make waves or curls in the hair and to emphasize details on the entire head.
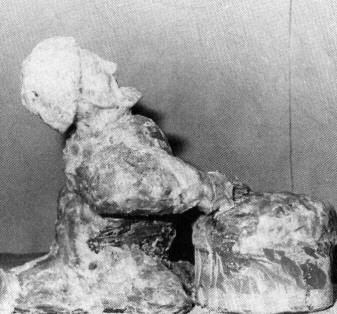
Don't be discouraged if your first attempt doesn't turn out as well as you planned. With practice you will learn what to expect from the wax. After you have worked with wax and are confident enough on the head, you may want to experiment with other types of figures. An example of the different type of figures Lee carves is illustrated (far right) by the wax figure bowing in prayer. Experience is a good teacher, as the saying goes, so with practice you can create your own wax carvings.
Wood Carving
Although he finds it a much harder medium to work with than wax because of the lack of freedom, Lee also does carvings in wood.
"Most carvers say the best wood is bass wood," he said. "Ash and red elm is good. White cedar doesn't work as well. Sassafras has a nice scent but tends to crack whether green or dry, and with walnut sometimes I'll get a figure almost all the way done, and it'll crack. Sometimes I depend on wood cutters to bring my wood and sometimes I trade my carvings for it."
The carvings Lee does range from bodies to hand puppets. He carves busts, heads of Indians, puppets of Biblical characters and cane heads, and once he carved a whole man. The way he carves puppets and cane heads is very much the same with only slight variations. He teaches his method to teenagers because it is easier to do. As Lee put it, "Some teenagers want to do instant carving. Interested but impatient."
[61]
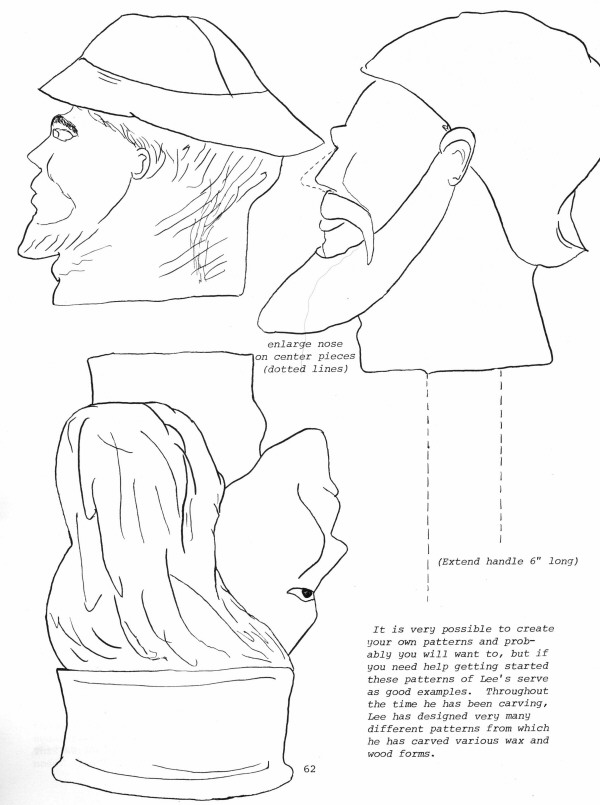
It is very possible to create your own patterns and probably you will want to, but if you need help getting started these patterns of Lee's serve as good examples. Throughout the time he has been carving, Lee has designed very many different patterns from which he has carved various wax and wood forms.
[62]
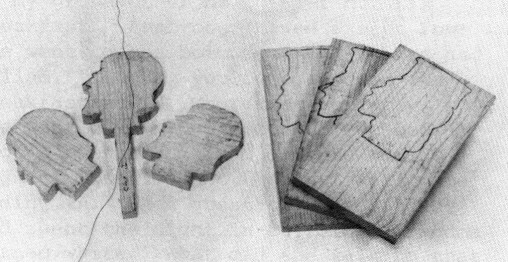
The first step to carving is to decide on a pattern and to trace it onto the three boards to be cut out.

Next glue the pieces together and clamp overnight.
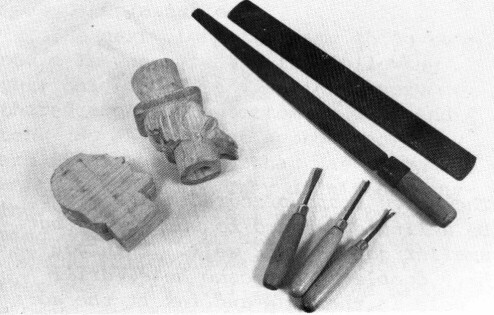
The tools and equipment you will need in order to make a puppet head or cane head of wood are
the following:
3 small wooden boards (1" thickness)
band saw
glue
c-clamps
rasp
sand paper
V-knife
files
dowel pole for cane (1" in diameter and cut to height of user)
pocket knife
u-gouge
flat gouge
To begin, choose a pattern (or create your own) that appeals to you. For the first time, a bearded figure is much easier to make than any other. Trace this pattern onto each of the three boards. Enlarge the nose on the center board and eliminate it on the two side boards. We forgot to do this on our first solo attempt at carving and had quite a time carving the facial area. If you are making a puppet, draw a handle on the center pattern, about one inch wide and six inches long.
Cut out each of these patterns using a band saw and then glue them together. The easiest way to do this is to put glue on each side of the center piece. Apply enough glue so the boards will stick together, but not so much that they slide around and won't stay in place when clamped together. Put the noseless pieces on the outside of the center piece, lining up the facial features as best you can. Clamp these three together tightly, but be careful not to press into the wood because the clamps will leave indentations.
Let the boards set in the clamps at least for five or six hours, or preferably overnight. Remove the clamps, and you have a very rough head shape which now needs to be smoothed, rasped, and sanded down to your satisfaction.
Experiment with the carving tools to see which you can work with the best. Lee does most of his carving with a pocket knife, but lacking the talent and experience that he has, we found that the gouges offered more control. Stylizing your carving will be by no means an easy task. It takes time, patience and plenty of blisters on the hands to get the head exactly how you want it, especially if you use white pine. Use your own judgment as to what needs to be whittled away.
[63]
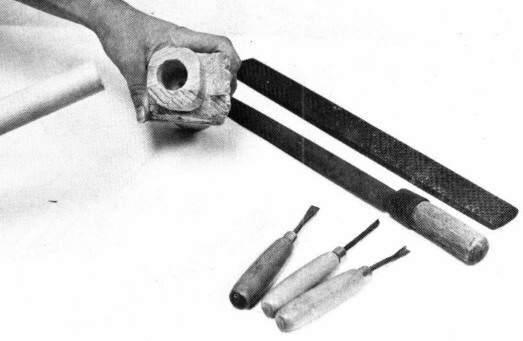
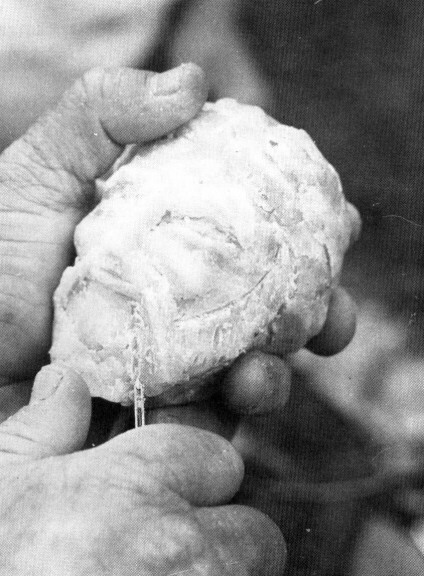
The heavy rasps pictured above might be a little awkward to work with, but smaller gouges work well. When you have completed the cane head, drill a hole in the base and insert the dowel pole.

This is the cane we carved and a hand puppet of Lee's.
Make waves in the beard and hairline. Be especially careful around the facial area as a slip of the hand could leave your figure noseless. And above all, try not to cut toward your body or hands. Although they may not seem to be a threat, carving tools can be very dangerous--especially when you do not take proper precautions.
When you have finished carving, use a light weight sandpaper to smooth the handle of your puppet and rough areas on the head.
If you are making a cane, drill a hole in the neck of the figure one inch in diameter and two inches deep. This is where the dowel pole will be inserted.
You may want to make the cane more ornate by stylizing the dowel pole with a V-knife.
Whittle the end of the pole so that it fits snugly into the hole you drilled in the cane head. Apply glue to the newly trimmed edge and also in the hole. Insert the pole and wipe off any excess glue. Allow this to dry and you have successfully completed a custom-made cane.
Clothing for both the wood and wax puppets can be made easily. Drawstrings, collars with snaps, or even small buttons that tighten the dresses snugly around the neck work well.
Whatever Lee creates, whether carving a puppet or cane, he gets a joy out of his work. "I can't be happy carving for money. I'd rather teach boys and girls for nothing and get the chance to lead them to a saving knowledge of Jesus Christ. They like to have the puppets and older people like the canes. I give them to them because they are human and I love them."
[64]
Copyright © 1981 BITTERSWEET, INC.
Next Article | Table of Contents | Other Issues
